Table of Contents
- Modifications
- Mandatory Modifications
- Recovery Modifications
- Security Modifications
- Electrical Modifications
- Additional Batteries
- Primary start battery (24v)
- Second battery (24v) installation
- Primary battery jump starter
- 24vdc to 24v dc isolation
- 12v battery installation / charger
- Switches – Primary battery switches
- General Switch gear
- 24 Volt switching
- Cables
- Fuses
- Dash-cam
- Generator / Alternator
- Radios and Antenna
- Inverter
- Battery Monitor(s)
- Cabin Modifications
- Wheels (Rims and Tyres)
- Painting and rust control
- Lights
- Overdrive
- Turbo and Exhaust
- Towing Modifications
- Service Kit
- Fuel Water Separator
- Tyre Inflation & Deflation
- Donaldson Top Hat
- Tarp / Cover / Canvas
1 Introduction
1.1 About U1700L Unimogs "Mogs"
The Australian Department of Defence (not Defense) (DoD) has been slowly replacing its support vehicles as they have exceeded their 30 year planned economic life. This means 1000+ Mercedes 4x4 Unimog trucks are becoming available. From the army (mostly) these are noisy, uncomfortable, and slow vehicles. However, with hundreds of hours of work, and between $20-60,000 of extras, these can be made into noisy, uncomfortable, and slow vehicles. Yes, I know, that is not a change. You can’t change the basic DNA of these trucks, but those that like them don’t want to. They are incredibly capable vehicles that can be easily modified. They can carry more than 5 tons on their back, while towing 12 tons, and they go more places than most cars. Apart from being able to tow / carry lots, the Unimogs are famous for their portal axles which give more than 40cm clearance underneath, and for having an articulating chassis, so that the front may be at a different angle to the rear. Both of these features are very rare, and make the vehicle very capable in off-road / difficult terrain situations. In two of Australia's toughest 4x4 areas - the Simpson Desert and Alpine Region - these are the vehicles of choice for recovery / tow trucks.
The ex-Military Unimogs come in a variety of flavours. The standard Army U1700L Cargo truck, then Cargo with Crane, with or without winches, (tray) twist locks, tippers, etc. There is also the Air Force U1750 truck - which is very similar to the Army truck, but of course needed air conditioning etc. before the RAAF would consider it suitable. (yeah, I am ex-military, and not RAAF). The U1750L also has the newer OM366A engine, and - I believe - higher speed final gearing. There is then the bigger U2450L 6x6 Wrecker. It definitely has all the mod cons. It also costs at least $50K more at auction, but it would cost more than this to upgrade a U1700L to its specs. The Australian Defence Force (ADF, i.e. uniform DoD people) also brought several, but not many 'DOKA' vehicles. In Mog terms a DOKA is a dual cabin variant that can seat up to seven people. I know a number of people have modified their normal single cabin Mog into a dual DOKA cabin Mog, but true DOKA's are pretty rare, and pretty desirable.
1.2 About this web page
This web page was started as my own notes and plans on what I was going to do on my own Unimog. It has grown to be a resource that others might find useful. However, you do so at your own risk. I have tried to include links to my sources. I do not claim to know the answers to the questions here, or how to correctly do any of the upgrades, but I do claim to be interested in finding the right answers, and this is my research. If it helps others - great - but please augment my research with your own, and - like the rest of the internet - do not take my thoughts to be 100% accurate for you. Oh, and comments / corrections / updates are welcome.
1.3 Useful Links
- Mog Central Website
- Mog Central, located in Queanbeyan (i.e. Canberra surrounds), and run by Ben Nash, are the most well known supplier of parts and advice for the Unimog. Ben is active on the Facebook "OzMog" group, and very helpful. The team at Mog Central undertake a lot of install, upgrade, fabrication and servicing of Mogs. If you look through this website, you will see that Mog Central is my 'go to' store for Unimog parts.
- Unidan Website
- Unidan are located in Queensland, and are well known for producing fully upgraded and refurbished trucks. They also supply a range of upgrades. Founded by Daniel Mavin in 2011 and is based on the Gold Coast in Queensland. After years being part of the off-road, 4×4 and Unimog world, Dan now lives his passion by repairing, customising and building some of the world’s most impressive and remarkable machines. (extracted text from "https://www.unidan.com.au/about-us/" 2024-03-11)
- Ultimate Mogs Website
- Ultimate Mogs is also located in Queensland, and they have a range of parts that is similar to Mog Central. Ultimate Mogs is Australia’s largest independent Unimog and MB-Trac parts stockist. With over 1300 items available to order online and the ability to support a vast array of unique Mercedes-Benz© models. (extracted text from "https://www.ultimatemogs.com.au/about-us/" 2024-03-11)
- Brown Bear Components Website
- Brown Bear Components was established in 2023 by two mates from different backgrounds but a shared passion for Unimogs.
Both Stuart and Justin have Ex-ADF U1700's and like to play with these trucks as much as they like modifying them.
Justin has been a mechanic for more than 18 years, working on everything from motorcycles, muscle cars, heavy trucks and some non-motor sport areas as well.
Stuart has a vast amount of experience from over the years as a boilermaker and building designer.
Together they have put their skills to work, developing some of the most outstanding products on the market. (extracted text from "https://www.brownbearcomponents.com.au/about-us" 2024-03-11 - Dare to Dream website
- While the above websites are also shops, this website follows the list of modifications to a U1700L purchased in 2017. The range of modifications is extensive, the work professional, and text readable and honest. There are also plenty of pictures of the work and end result.
- Australian Frontline Machinery
- AFM publish a lot of internal DoD documents related to vehicles that the DoD are selling off. Their Unimog Documentation is must have for any Unimog owner. Just select your variant. Note that they also have various repair instructions available for download.
- The Outfit YouTube Videos
- The Outfit "DIY Unimog Expedition Vehicle Build Series" is a YouTube playlist of some 46 videos, where Chris and Ange find an ex-Army Unimog, and slowly turn it into an expedition vehicle. This playlist is followed up by some additional 49 videos of their travels around Australia in their modified vehicle.
- Pat and Jele YouTube Videos
- Like Chris and Ange, Pat and Jele have created a range of videos as they find, modify and travel in their Unimog In this case there are some 102 videos (and still counting) that are a mix of the modifications and travels.
- OZMOG facebook group
- The Ozmog facebook group is probably the most active group (9.9K members) and it is certainly a very helpful group. I would recommend it for anyone that owns a Unimog, or is thinking of buying one. "This group has been created for people primarily in Australia to discuss anything to do with Mercedes Benz Unimog off road vehicles. Please feel free to post questions, photos of your own project and discuss anything to do with Unimog vehicles." (extracted text from facebook page 2024-04-09)
PLEASE use the search function on the group for any questions. Ben Nash of Mog Central is one of the admins. - Unimog Owner's Group Aus.
- With 11.1K members, this group is even larger than Ozmog. "This page is designed as a community for like-minded people to discuss anything and everything Unimog related. Share stories, experiences, advice and ask questions. We are Australian based & Openly Welcome all overseas enthusiasts, Owners etc." (extracted text from facebook page 2024-04-09)
- State based Unimog groups
- There are several state based Unimog facebook groups also. These are smaller, but they can provide local help. For example, the Victorian group had some 1.3K members last I looked.
- Johan Bester
- Johan is a Unimog owner that produces modifications for the Unimog. I purchased his Stairs. My video on installing it is below. They work a treat, and were not hard to install.
- Martin Godden
- Martin is another Unimog owner that produces modifications for the Unimog. I purchased his Roof Console, and it is great piece of kit. I will also be copying his headlight installation.
- Sam Keck
- I am deeply jealous of Sam, as he clearly has a great workshop and can modify his Unimog as he sees fit. If you are interested in Mogs, whether modifying them or driving them (or breaking them), check out his facebook page and his Chasing the Dog YouTube videos. I am keen to install his Rapid Tyre inflation and deflate.
- Williamstown Metal Merchants
- While not Unimog specific, this is our Melbourne store for metal products. If you are going to modify an ex-Army Mog, then you need a supply of metal components and a good welder.
- Lasercorp
- While not Unimog specific, this is an online store that will laser cut and supply via post anything that you can send them a CAD drawing (.dxf file) of. In case you are worried about the cost of CAD software, Fusion 360 is free for hobbyists. They do stainless, aluminium and mild steel. Turnaround time is a few days.
1.4 Unimog Licence requirements
In Australia, a vehicle over 4495kg GVM is classed as a truck, and cannot be driven on a standard (car) drivers licence. (Note: this is irrespective of the registration (Heavy Vehicle or Historic)). For Victoria the Heavy Vehicle Licence Page contains the details, but in essence there are 5 different categories of truck licence: Light Rigid (4.5-8T), Medium Rigid (8T+, 2 axles), Heavy Rigid (8T+, more than 2 axles), Heavy Combination (8T+, with trailer of more than 9T GVM), and Multi Combination (other, including B-double). The Medium Rigid licence is enough to drive a Unimog, but almost all accreditation firms will only offer Heavy Rigid training & testing. The Heavy Rigid lets you tow a trailer up to 8T - which is the maximum for the Unimog. For my wife and myself, we did this via Barkly with a cost of some $1350. The course and testing took a morning. You must have had a car licence for at least 24 months.
2 Operating the Mog
This section is based on Chapter 4 Operating Instructions, of the UHB-Unimog-Cargo.pdf Technical Manual User Handbook published online by AFM Safety (UHB-Unimog-Cargo.pdf).
If you are new to Mogs, then I suggest you download the User Handbook to suit your model, and the various Servicing Instructions etc. that are supplied by AFM. The AFM web page also contains a range of support material. There is a formal U1700L Workshop Manual available, but I think it costs about $600. Mog Central Service Manual
2.1 Check engine oil
The Unimogs are famous for using oil, and for blowing smoke when they first start. You really need to check the engine oil every time you go out - and after a reasonably long period of driving (4+ hours). The oil is the classic heavy diesel 15W-40 oil.
2.2 Start procedure
Start the engine as follows :
- Select neutral on the main transmission.
- Select two-wheel drive on the drive selector switch.
- Ensure the parking brake is applied.
- Position the hand throttle in the engine idle detent.
Do not operate the starter motor for more than 15 seconds. If the engine does not start in this time, allow 30 seconds for the starter motor to cool and the battery to recover. If the engine fails to start at the third attempt, abandon the start procedure and report the fault. - Turn the key to the on position.
- Ensure the alarm sounds and the low oil, low coolant and high temperature lights illuminate.
- Turn the key to the start position.
NOTE Release the key as soon as the engine starts. - Ensure the alarm mutes and the low oil, low coolant and high temperature lights extinguish.
- When the engine is running, allow the air pressure to build up to a minimum of 12 bar (7 bar in an emergency).
- Check that only the parking brake, differential pressure and the brake pad wear warning lights are illuminated.
Note: the Unimog cant be moved until the two air pressure gauges have reached 8 bar. In mine, this takes about 20 seconds if the Unimog has not been running recently. Once the pressure has reached 8 bar, it continues to climb to 12 bar, where it releases pressure. The 'woosh' sound it makes when releasing pressure will make a first time driver think that they have broken something. No, it is normal.
2.3 Stopping the Engine
Stop the engine as follows :
Do not stop the engine when the coolant temperature is higher than 90oC. Keep the engine running at 1200 – 1500 rpm for approximately two minutes to allow the coolant temperature to drop below 90oC.
- Move the hand throttle to the engine shut down position.
- Turn the ignition key to the off position. Do not leave the truck in gear.
- Select neutral on the main transmission.
- Ensure the parking brake is applied.
Note: the Unimogs are classic diesel motors. They do not need ignition / electricity to run. If you switch the ignition key 'off' when the Unimog is running, nothing will happen to the engine. It will keep running. You need to remove the fuel to stop it.
2.4 Fording (river crossing)
Prior to fording, select four-wheel drive. This will ensure the truck transmission and axles are pressurised to prevent the ingress of water. Note, the Unimog is labeled as being limited to 1.2m depth. However, I am not clear on why this limit is imposed, or how easily it can be increased (safely). I have seen YouTube videos of Unimogs going deeper than 1.2m, but of course it is unclear if they were scrapped or repaired after, or prepared before. There are breathers between the cabin and the tray. I have not measured their height. They look higher than 1.2m. The snorkel, like most snorkels, is more meant to limit dust ingress than to breathe in deep water.
3 Maintenance Procedures
3.1 Daily (before driving)
- Engine. Check the engine oil level and top up as necessary.
- Radiator. Check the coolant level and top up as necessary.
- Windscreen Washer. Check the water level and top up as necessary.
- Fuel. Check the fuel level and refuel if necessary.
- Security. Check that the spare wheel is securely mounted and that external lockers are locked. Check that all stores and loads are securely fastened to the truck.
- Truck Serviceability. Inspect the truck for any damage, and loose or missing parts.
- Tyres. Check the tyre pressures and inspect the treads and side walls for signs of damage. Refer to EMEI Vehicle A 291-5 for the correct tyre pressures.
- Leakage. Check under the truck for any signs of coolant, oil or fuel leaks.
- Air-pressure Check. Start the engine. Check that the air pressure warning lamp extinguishes and the warning alarm mutes.
- Accessories. Check the following accessories for the correct operation:
- headlights,
- horn,
- indicator lights,
- hazard warning lights,
- (if fitted) crane spotlight, and
- windscreen washers.
- Brakes. Allow the truck to move forwards slowly and check that the foot brake works. Stop the truck and check that the parking brake operates correctly.
- Steering. Whilst moving slowly, check that the steering is free and responsive without any undue slackness or sponginess.
- General. Check all lashings, tie downs and canopy security. Report all defects or damage.
3.2 After 4 hours of Operation
- Engine. Check the engine oil level and top up as necessary. Do not remove the coolant expansion tank filler cap while the engine is hot.
- Radiator. Check the coolant level and top up as necessary.
- Fuel. Check the fuel level and refuel if necessary.
- Tyres. Check the tyre pressures and inspect the treads and sidewalls for signs of damage.
3.3 At End of Trip
- Fuel. Fill the fuel tank.
- Engine. Check the oil level and top up as necessary.
- Radiator. Check the coolant level and top up as necessary. Do not remove the coolant expansion tank filler cap while the engine is hot.
- Parking. Ensure the truck is correctly parked with the parking brake engaged, the transmission in neutral and the Fwd/Rev selector in the Fwd position.
- Crane. Ensure the crane controls are at neutral and that the crane and stabilisers are correctly stowed.
- General. Ensure the truck is left in a clean condition. Report any service due. Report any malfunctions or damage. Ensure the truck is locked.
3.4 Regular Servicing
I have moved this information to a separate servicing page as it became too large for here.
3.4.1 Check Engine Oil
Provided that you are at least 6 foot six, then this is an easy job :-). All jokes aside, it is an easy job, but it is also high up. I use a stool. Others climb up the front step and stand on the front bar work. The dipstick is at the front central part of the engine bay, covered in a red rubber cap. The dipstick shows full through to 1 litre down. As the Army Mogs were intended to use oil, the oil is likely to need topping up every few hundred k's.
3.4.2 Greasing
The Unimog is an old school vehicle, and it requires greasing of many points - something that most modern vehicle owners probably don't do. A few users on Facebook report that greasing the Mog is not as simple as it sounds. One user reported that they purchased a Makita grease gun kit, only to find that "it does not clip onto the nipple properly and none of the grease actually got into where it needs to go." Several users indicated the need for high pressure quick release coupler and flexible high pressure whip hose. The amount of grease points / volume of grease makes little 'hand grease pumps' fairly hard work. Most owners appear to have gone for a battery powered grease gun with or without a quick release coupler.
3.4.3 Change Engine Oil
A quick look at the Regular Servicing details shows that checking and changing the engine oil are two of the most common tasks.
3.4.4 Check / Change Portal Oil
3.4.5 Check / Change Transmission Oil
3.4.6 Replace Oil Filter
3.4.7 Replace Fuel Filter
3.4.8 Replace Air Filer
4 Facts
| Manufacturer | Daimler-Benz Germany, but modified to suit the Australian DoD requirements within Australia. |
| Technical Designation | The Army used Unimog 435.113 vehicles, typically with the OM352 engine. Later models (e.g. Airforce) used the OM353 engine. |
| Gross Vehicle Mass (GVM) | The total (gross) legal weight of the Unimog and its cargo: 12 Ton. |
| Tare or Weight empty | (The weight of the Unimog without cargo or fuel etc.). This varies on model etc., but about 5.2 Ton. |
| Kerb Mass or Weight with fuel etc. but no 'payload' (cargo) | This varies on model etc., but about 5.5 Ton. |
| Payload | Depends on empty weight, but about 6.5 Ton. |
| Gross Combination Mass (GCM) | 24 Ton, meaning it can tow 12 Ton. i.e. Gross Trailer Mass is 12 Ton + 12 ton Gross Vehicle Mass. |
| ADF Published Mass table | |
a. Unladen |
|
(1) Without Winch: |
|
(a) Front Axle | 3,810 kg |
(b) Rear Axle | 2,790 kg |
| (c) Total | 6,600 kg |
(2) With Winch: |
|
(a) Front Axle | 4,060 kg |
(b) Rear Axle | 2,740 kg |
(c) Total | 6,800 kg |
b. Maximum Loading: |
|
(1) Front Axle | 5,300 kg |
(2) Rear Axle | 7,000 kg |
(3) Total | 12,000 kg |
| Ground Clearance | 440mm (17 3/8 inch) |
| Fording Depth | 1.2 M, but see additional information on this later in this page. |
| Fuel, fuel capacity and fuel usage | Diesel 130L tank. (Unidan sell a 260L tank) The Unimogs typically use about 20-23 l/100K for the truck on the open road, and more like 25-27 l/100k with a full expedition box fit out on the back. This means that their range is about 560-650 kms for the base truck, and around 480-520 kms for the expedition vehicles on the open road. Note that it is easy to change / add fuel tanks though, so for example two Unidan 260L fuel tanks could be used to give a range of ~2200 kms. Unimogadventures posted details of their 64,423km fuel usage. It was 13,549L for Average 21.03l/100Km in an 'expedition' type vehicle. My truck gets about 22-23l/100 cruising at 100km/hr. |
| Voltage | 24 Volt, supplied by 2X 12V 'car batteries'. These are typically Delkor 100D-730 730CCA 100AH batteries, but in a pinch, several lower cost car batteries will fit. |
| Turning circle | 14.1m. i.e. poor for car, but very good for a truck. |
| Height | The Unimog height (including canopy) is 3.01M (laden) - 3.03m (unladen). Without canopy & frame i.e cab height 2.58m (laden) and 2.615m (unladen) The tray is about 1450mm off the ground. |
| Length & Width | Width - 2.49m (tray), Length 6.940m (with PTO winch) and 6.545m without PTO winch. |
| Pintle Hook Height, Receiver height | 3.85m Pintle Hook Height (laden) 705mm. Mog Central Hitch Receiver height 665mm (with 395/85R20 tyres). My caravan hitch height 375mm. Implies 290mm (11.42 inch) drop |
| Wheelbase | Track Width (standard Army tyres) 1840mm. Track width for 395/85R20 tyres ~2300mm. |
| Tray Internal Dimensions | Length 4.05m, Width 2.375m, Height 500m (tray sides) |
4.1 Vin number
The Unimogs were manufactured prior to the VIN number being universally adopted. However, Mercedes was already using a chassis number, which was the basis for the Vin number. The VIN number of Daimler Benz trucks is WDB + the chassis number. WDB indicates it is a Mercedes (Daimler Benz) truck. Mine is WDB 435 113 60 XXX XXX
4.2 Bulbs
Side direction P21W, (BA15s) Side Light R5W, Rear direction indicator P21W, Tail light R10W, Stop lamp P21W, Backup lamp P21W, Licence plate (?) R10W , Low beam H4, High beam H4, parking lights T4W, Fog Lamps H3.
4.3 Tyre Pressures
Source: (AFM Safety Unimog Cargo) Section 1, Chapter 2 page 3
Tyre Pressures: (Note this is for Army tyres on Army rims)
(1) Highway:
(a) Front ................................................................. 550 kPa 80PSI
(b) Rear .................................................................. 825 kPa 120PSI
(2) Cross-country:
(a) Front ................................................................. 550 kPa 80PSI
(b) Rear .................................................................. 700 kPa 100PSI
(3) Sand:
(a) Front ................................................................. 400 kPa 60PSI
(b) Rear .................................................................. 400 kPa 60PSI
For those of us that are not running the Army 12.0 tyres, but have changed to 395/85R20 - the recommended tyre pressures seem to be: 60psi for highway, 50-55 psi for gravel, 40-50psi for rocky roads, 20-25 psi for sand or mud, and down to 10 for emergencies (the tyres are normally on beadlockers).
4.4 Fuel, Lubricants, Filters
One of the first things to say is that people are always asking "what (oil/grease/etc.) does the Unimog need?". Castrol have devoted a whole page on what are the best / better oils for the Mog.
Thabo does a YouTube video on changing the oils.
The Oil data below is combined from AFM, Castrol and from various Facebook chats.
See Thabo’s YouTube video on changing oils for what type of oils to buy: Minute 0:56
| Fuel | Diesel 160L capacity (for standard DoD trucks) |
| Coolant | Cummins PGXL 20L capacity This is available from Penrite or Cummins. Penrite have 20 litre drums. (PGXLPMX020) About $200-250 per drum, available special order. |
| Engine Oil | DoD standard OMD-115 aka Castrol RX Super 15W-40 CJ-4/E9 Lots of discussion online about what OMD-115 is, or what should be used. SAE40 appears to be answer. Castrol RX Super 15W-40 CJ-4/E9 or Castrol Vectron 15W40 (1) Capacity (Maximum) 15 L (2) Capacity (Minimum) 12 L |
| Transmission | (1) The DoD manuals say: Type OMD-115 Again, debate and ill-informed comments online. Castrol says : CASTROL SYNTRANS 75W-85 or even better CASTROL TRANSMAX MANUAL LONG LIFE 75W-85. Neither of these align with the DoD instruction which simply says use engine oil (OMD-115). This is probably for ILS* reasons though, and not the best solution for the transmission. I think Castrol’s answer would be better by far. (2) Capacity 10.5 L Thabo changing it Minute 7:29 Thabo changing it Minute 8:01 * ILS = Integrated Logistic Support. i.e. they don't want to ship and store two different oils. They would prefer the troops to simply use engine oil in the field, the result being 'good enough'. |
| Front and rear differentials | CASTROL AXLE AP 85W-140 Gear oil SAE 90 2.5 liters each |
| Front and rear hub drives | CASTROL AXLE AP 85W-140 Gear oil SAE 90 0.25, 0.6 liters |
| Hydraulic brakes and clutch | All-seam brake fluid CASTROL AGRI TRANS PLUS 80W |
| Power steering system | CASTROL AGRI TRANS PLUS 80W Automatic transmission fluid Type TF |
| All grease points | All-season multi- purpose grease |
| Battery terminals | Petrolatum technical Vaseline |
| Front Axle: | (1) DoD manuals specify Type OEP-220. "OEP" stands for 'Oil, Extreme Pressure'. The civilian equivalent would appear to be a 75W85 or 80w90 type oil. Castrol recommend Castrol Syntrax universal plus 75W90 (2) Capacity 2.5 L |
| Front Wheel Hub Drives: | (1) (1) DoD manuals specify Type OEP-220. "OEP" stands for 'Oil, Extreme Pressure'. The civilian equivalent would appear to be a 75W85 or 80w90 type oil. (2) Capacity 0.6 L each (Thabo changing it Minute 2:56) |
| Rear Axle: | (1) (1) DoD manuals specify Type OEP-220. "OEP" stands for 'Oil, Extreme Pressure'. The civilian equivalent would appear to be a 75W85 or 80w90 type oil. (2) Capacity 2.5 L (Thabo changing it Minute 5:26) |
| Rear Axle Hub Drives: | (1) Type OEP 220 (2) Capacity 0.6 L each |
| Steering System: | (1) Type OX-47 (grade 10) Castrol agri trans plus 80W (2) Capacity 2.25 L Move the steering wheel full right to get the steering wheel out of the road of the oil change. |
| Steering wheel oil filter | Take the plug out of the centre of the filter. Lift the front of the truck to let the fluid get in properly after filling. The reservoir has a mini-dip stick in the top of it. You also fill from the top. |
| Brake System: | (1) Type OX(AUST)-8 (2) Capacity 1.0 L |
| Clutch System | (1) Type OX(AUST)-8 (2) Capacity 0.2 L |
| Grease Nipples: | (1) DoD says:Type XG-274. Silmid does not list this as a standard Joint Service Designator grease. Shell however list it as "(obsolete) - General purpose mineral Microgel airframe grease for use in bearings and gearboxes". Again, I believe the reason that the DoD use this grease has more to do with ILS than anything else. It is a high pressure lithium grease. (2) In the servicing instructions they indicate "XG-291" - again, this is not a standard commercially available product, but does come back to "A multi-purpose grease designed for use in the aviation and shipping industries. It's a lithium complex soap thickened lubricant with a semi synthetic base fluid. It's designed to provide long-term lubrication in harsh operating environments." 3) MogCentral list Castrol Spheerol LMM Grease. Castrol describe this as 'Heavy Duty Extreme Pressure'. Castrol's Product Data Sheet indicates: "Castrol SpheerolTM LMM is a multi-purpose lithium grease containing molybdenum disulphide solid lubricant to enhance its load carrying properties under conditions of high or shock loading or to prevent scuffing or fretting. It contains oxidation and corrosion inhibitors, anti-wear additives, has good mechanical stability and can be used in the presence of moisture." Quantity as required. |
4.5 Oil filters
The U1700L's appear to have come with two different configurations of oil filters: a model with one oil filter, and another with two filters. My Unimog is the twin oil filter type. These are available from Mog Central. (Mog Central Twin oil-filters )
4.6 Electrical Cable sizing
Electrical cables are not all equal. Basically the type and thickness of the insulation will determine the voltage the cable can carry, and its wear characteristics over its lifetime. The size of the internal wire will determine what current it can carry, and what the voltage drop will be across the wire when carrying that current. Two things on current:
1) every electrical connection has a fuse. This may be one you install, or it may be the wire itself. i.e. no fuse, means you have just made the wire itself a fuse.
2) Low voltage supply is the death of things like air compressors, and winches. When they say that they are "12v", they generally mean that they need 12.5-14v under load. Similarly "24v" generally means 25-28v under load. The wiring for a Runva EWB25000 rear winch (for example) will draw up to 280A on a 24V system. (see Runva's table below)
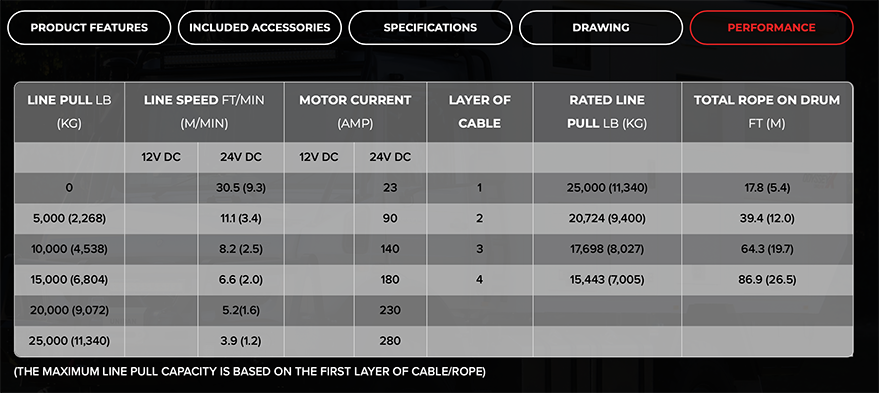
This means that the cable that supplies the rear winch needs to supply that 280A from the battery while providing ~24V+ to the winch. A voltage drop of only about 3%. Depending on the cable run, that distance is about 5 metres or 15 feet.
The table below uses "Famps" which is 'foot-amps'. 280A current times 15ft length equals 4,200 foot amps. Looking down the 24v, 3% drop column until we reach a number bigger than 4,200, we see an AWG wire size of AWG 2 is the minimum wire size that can achieve this performance.
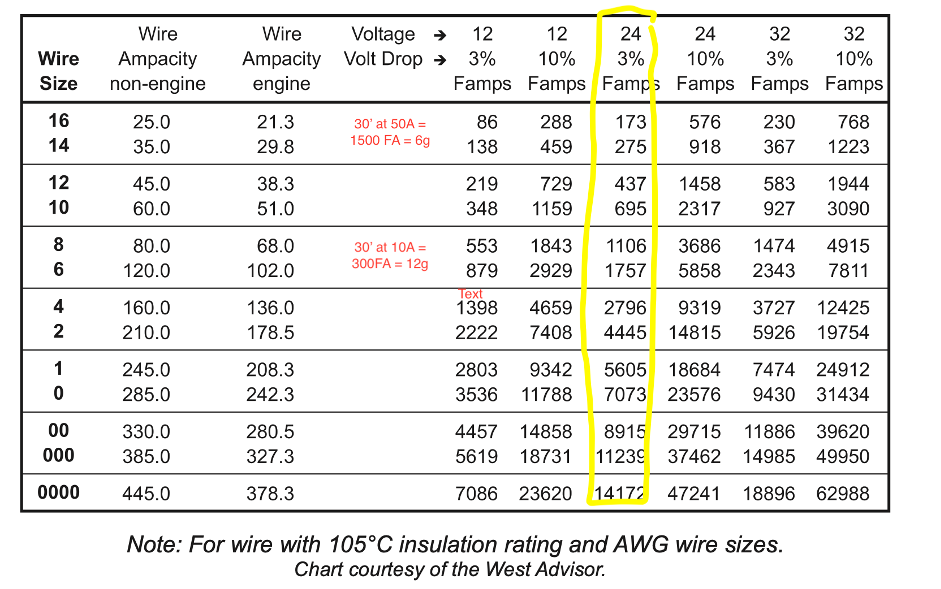
Blue Sea Systems also has a nice wire sizing chart that also has metric distances and wire sizes. They also have a foolproof Circuit Wizard that lets you set many options and tells you what wire size you need.
4.7 Roadworthy
In Victoria, before you can register a truck, a heavy vehicle road-worthiness tester must check the vehicle. (i.e. NOT your local mechanic) There is a site (www.vicroads.vic.gov.au) that has a list of Registered Heavy Vehicle Testers. For other states: the same basic process applies, and no doubt, like Victoria, it is hard to find details on the web from the State Government.
I tried booking in to some 6 heavy vehicle testers in Melbourne. IF they were willing to do it, then they had a 6 month backlog of trucks trying to get registered.
Northern Fleet Care said to come in next day, and then when I arrived, they denied any knowledge of the booking. The boss pointed out that he was not in the office so a booking could not have been made by his firm – despite me showing when I called and that the phone was answered by someone in his office. Seems his employees do not count as real people.
Big Wheels truck alignment Morwell – spoke to a lady there on Friday and booked it in for the following Monday. They opened at 8, I was there about 9, they expected to be able to give me a call in a few hours. These people were great to deal with, and they knew Unimogs. For me, the roadworthy process was a two step affair:
Step 1) This took about 3 hours. They lent me a car, and I went to sit in McDonalds about 2 km away and did office work remotely. They found some basic issues: a) I had two cracks in the cabin, b) I had a hole where either the crawler gear stick goes or the PTO(?); and c) they wanted reflectors on the tray front, sides and back.
[they also said I needed a ‘new’ accelerator cover – but when I tried to buy one from Ben at Mog Central, he said that there is no such thing and that they are not needed. I told Big Wheels about this and they removed the requirement.]
The cracks I welded (really really badly), the hole I filled with kneadable plastic, and the reflectors I got from ebay and just stuck on.
Step 2) I returned, and they checked the above, and then they did the brake and road test. I went to Maccas again, and they took about 2 hours. Each visit cost me some $360, for a total just over $700.
I must say here that this was easy compared to some horror stories on Facebook. This may have been due to the fact that these were nice guys, but I am more inclined to think it was due to this being their fourth Unimog. Going to someone that knows these vehicles is important. Driving a couple of hours to see them is not. (IMHO)
4.8 Driving the Unimog before it is registered.
Driving the Unimog before it is registered. Vicroads has a site where you can buy a permit to drive an unregistered vehicle. Unregistered vehicle permits. I am sure that the other states have a similar scheme. What I am not sure about is crossing borders - e.g. Vic->NSW. I had to buy 3 short term (2 or 3 day) permits to pick it up and get all the pre-work done on my Mog. It only takes about 10 mins on the computer to find the site and fill out the details. You can then print the resultant permission (I did) or keep it on your phone in case you are pulled up. My drives were long (4 x 2 hours) and I was never questioned.
4.9 Registration
Some owners get their Unimogs registered as Historic / Club vehicles, and this not only reduces the registration costs, but seems to affect the insurance. While I did not do this, and are therefore far from being an expert, my understanding is that to do this:
- you need to be a member of a car club (any);
- the roadworthy is carried out by the car club, and one would assume, is easier and cheaper than a Heavy Vehicle roadworthy;
- you need to have a log book in the car / Mog;
- (and this was the killer for me) you are limited to 60 days per year private use (this is in Victoria, other states limit it even more);
- you can attend club events, or trips to the mechanics, in addition to that 60 days (yes, officer, the nearest mechanic I trust is in Broome -- honest);
- it is only $50-$100 or so per year and cheaper insurance.
Note: there is some discussion that NOTHING is allowed to be done to the Mog in terms of alterations / modifications / enhancements under Historic registration. How true this is I don't know. My suggestion, if you are thinking of Historic registration, is to join Facebook / Ozmog group or the group in your state, and search the comments on there. I am sure you will find several people that have been down this path.
While much easier and cheaper than the full Heavy Vehicle option, I did not like the limited ability to use the vehicle imposed by Club registration, so I opted for 'normal' heavy vehicle registration, which now comes under a national code.
I have been to RTA offices in the western suburbs of Melbourne. I am not saying that they are rude or officious or anything – but they are SO busy. You can see queues running for 20 m outside of their offices. I was really not looking forward to doing something very new for me, and which facebook users tended to say was full of holes / mis-information etc. Given my experience with Morwell being quicker than Melbourne, I ended up going to Leongatha RTA. This involved:
- Waiting for 10 mins to book in to get it done. The booking was for some 12 days later.
- Getting the Unimog weighed on a public weigh bridge the morning of the booking. (This is in the rules, but I don't know if the VicRoads person looked at it)
- Going to the RTA, and parking some distance away, as I could not park nearby.
- The nice lady took some basic details and then asked me to bring the truck over.
- She then measured it (length, width, height), checked its manufacturing info (part information is on each door), photographed the Chassis number (on chassis, above the drivers side tyre – it is hard to see), and engine number (on top of the engine, in about the middle of the engine).
- I already had my ego plates, so she took down their number, and charged me some $2000 (I forget the details). That was it. This was very painless and even pleasant. It took 10-15 mins. NO issues about Elephant Ears or anything.
Overall, this was one of the easier things to do on the Unimog. No quibble about anything. I still have elephant ears on the Mog, etc. The only change to the Unimog was that it now has some reflectors on the side and front of the cargo tray.
While my experience was in Victoria, Jason Firmstone's experience was in NSW. Read his experience here. In summary, he tried to register as a Historic Vehicle, but his rego was rejected as he had modified his Unimog. It is my view that most ex-Army Mogs have been modified, and therefore would also be ineligible. He also discusses Motorhome registration, which is another option. If you are new to Mogs, or looking at getting one, I suggest you read his page.
4.10 Log books and driving the Mog post registration
Once registered, the Mog is a Medium Heavy Rigid Vehicle with a 12T GVM. It's actual weight is really irrelevant from a legal point of view, provided it is below 12T. To drive it you have to have a Medium Rigid (or Heavy Rigid, or Combination, etc.) license. BUT do you need to have use a log book?? The NHVR process applies for all states except WA & NT. They require a log book when you are driving a Fatigue Related Vehicle more than 100km from your 'home base' (which is not your home). Clear as mud.
A Fatigure Related Vehicle is something that exceeds 12T. The bottom line is that the Mog (when not towing) does not EXCEED 12T, and therefore it is not classed as a Fatigue Related Vehicle. As soon as you tow something though, you EXCEED 12T, and it does apply. In this case:
1) you are ok provided you are within 100km of your 'home base'.
2) You need a logbook if traveling outside of that 100km. The 'home base' is where the truck would normally start from, e.g. your work location, truck storage location, or home.
The log book process limits the amount of driving you can do with breaks. As with anything legal though - check online yourself. https://www.nhvr.gov.au/law-policies/heavy-vehicle-national-law-and-regulations Patricularly the Fatigue related stuff. It is not easy to understand.
I got my my logbook in Mar 2025. I got it from Vicroads, but NHVR rules apply here. The Mog itself, does not exceed 12T, so rules on logbooks do not apply. However, tow anything and your GCM is now 12T+ and rules apply. WHY you are driving is irrelevant (recreation vs work). IF more than 100km from ‘home’ base, you need to have a logbook. To get mine, I simply went to Vicroads, waited 20 mins, told them that I was driving a 16.5T GCM rig (only ~9-9.5T actual weight), and paid the $30. You must have your license with you, and you must have your last logbook (if you have one). They write in all the details on the front page, and everyone signs. You then get 93 days of travel in that book before you move to the next. You can’t have two active at once (or in your possession) - so a few days before the 93rd day, you go in and do it again. You cancel the remaining days in the old log, and they check and sign the new log. Oh, and I tried electronic logs - there are a half dozen, but all paid for trucking company apps. Not really what you want.
Weigh Stations. As a truck, you are required to drive into all open weigh stations. That does not mean that you will be weighed. Most of the time they simply wave you on. However, several Mog owners have been fined for not driving in. Remember, regardless of your actual weight, you are a 12T (GVM) Truck.
Traffic Lights. Most traffic lights (and many fixed speed cameras) are triggered by two inductive 'coils' in the ground. You can see these as two square cuts in the asphalt just prior to the lights. Wires are laid in these, with a signal going around one square, and being sensed in the second square. Cars provide a conductive link between the two squares, so the sense signal increases and the traffic light knows that someone is there. The trouble with Mogs is that they can be too high to create this conductive link. Hence the lights don't know the Mog is there. Some owners drive up the side of the square to help trigger the lights. No idea if this works.
4.11 Insurance
The Unimog is not easy to insure.
Shannon’s (who I have other insurance through) would insure it, but only provided it was garaged inside a structure that was attached to an occupied building. E.g. a garage beside a home, or a car port. Given the size of the Unimog, this was impossible for me. I also tried RACV, but they said no.
Unidan have arranged something with Club 4X4 for insurance. I settled on them for insurance.
When I first talked to them, they wanted photos of the front, outside, underneath, speedo etc. but when supplied, they did not answer.
I rang them during working hours, and the contact found out where my emails / photos had gone. He raised these as priority. A couple of days later a very nice gent rang, and we sorted it all on the phone. He had many options, and would insure modifications etc. He also offered remote travel insurance (as an extra option), and said that if it did intend to travel remotely, I could simply up the insurance for a short time and drop it back later on. Only my wife and myself are insured to drive it, but that works for us.
In the end, my insurance was $2454 per annum, for an agreed sum (about $35K if I recall correctly) - BUT only the two named drivers.
4.12 Electrical
The Unimog uses a simple 24v truck electrical system, based on 2 X 12v lead acid starter batteries. In the case of the ex-Army U1700L's it also includes a generator instead of an alternator. This is to reduce the electro-magnetic interference that comes with an alternator.
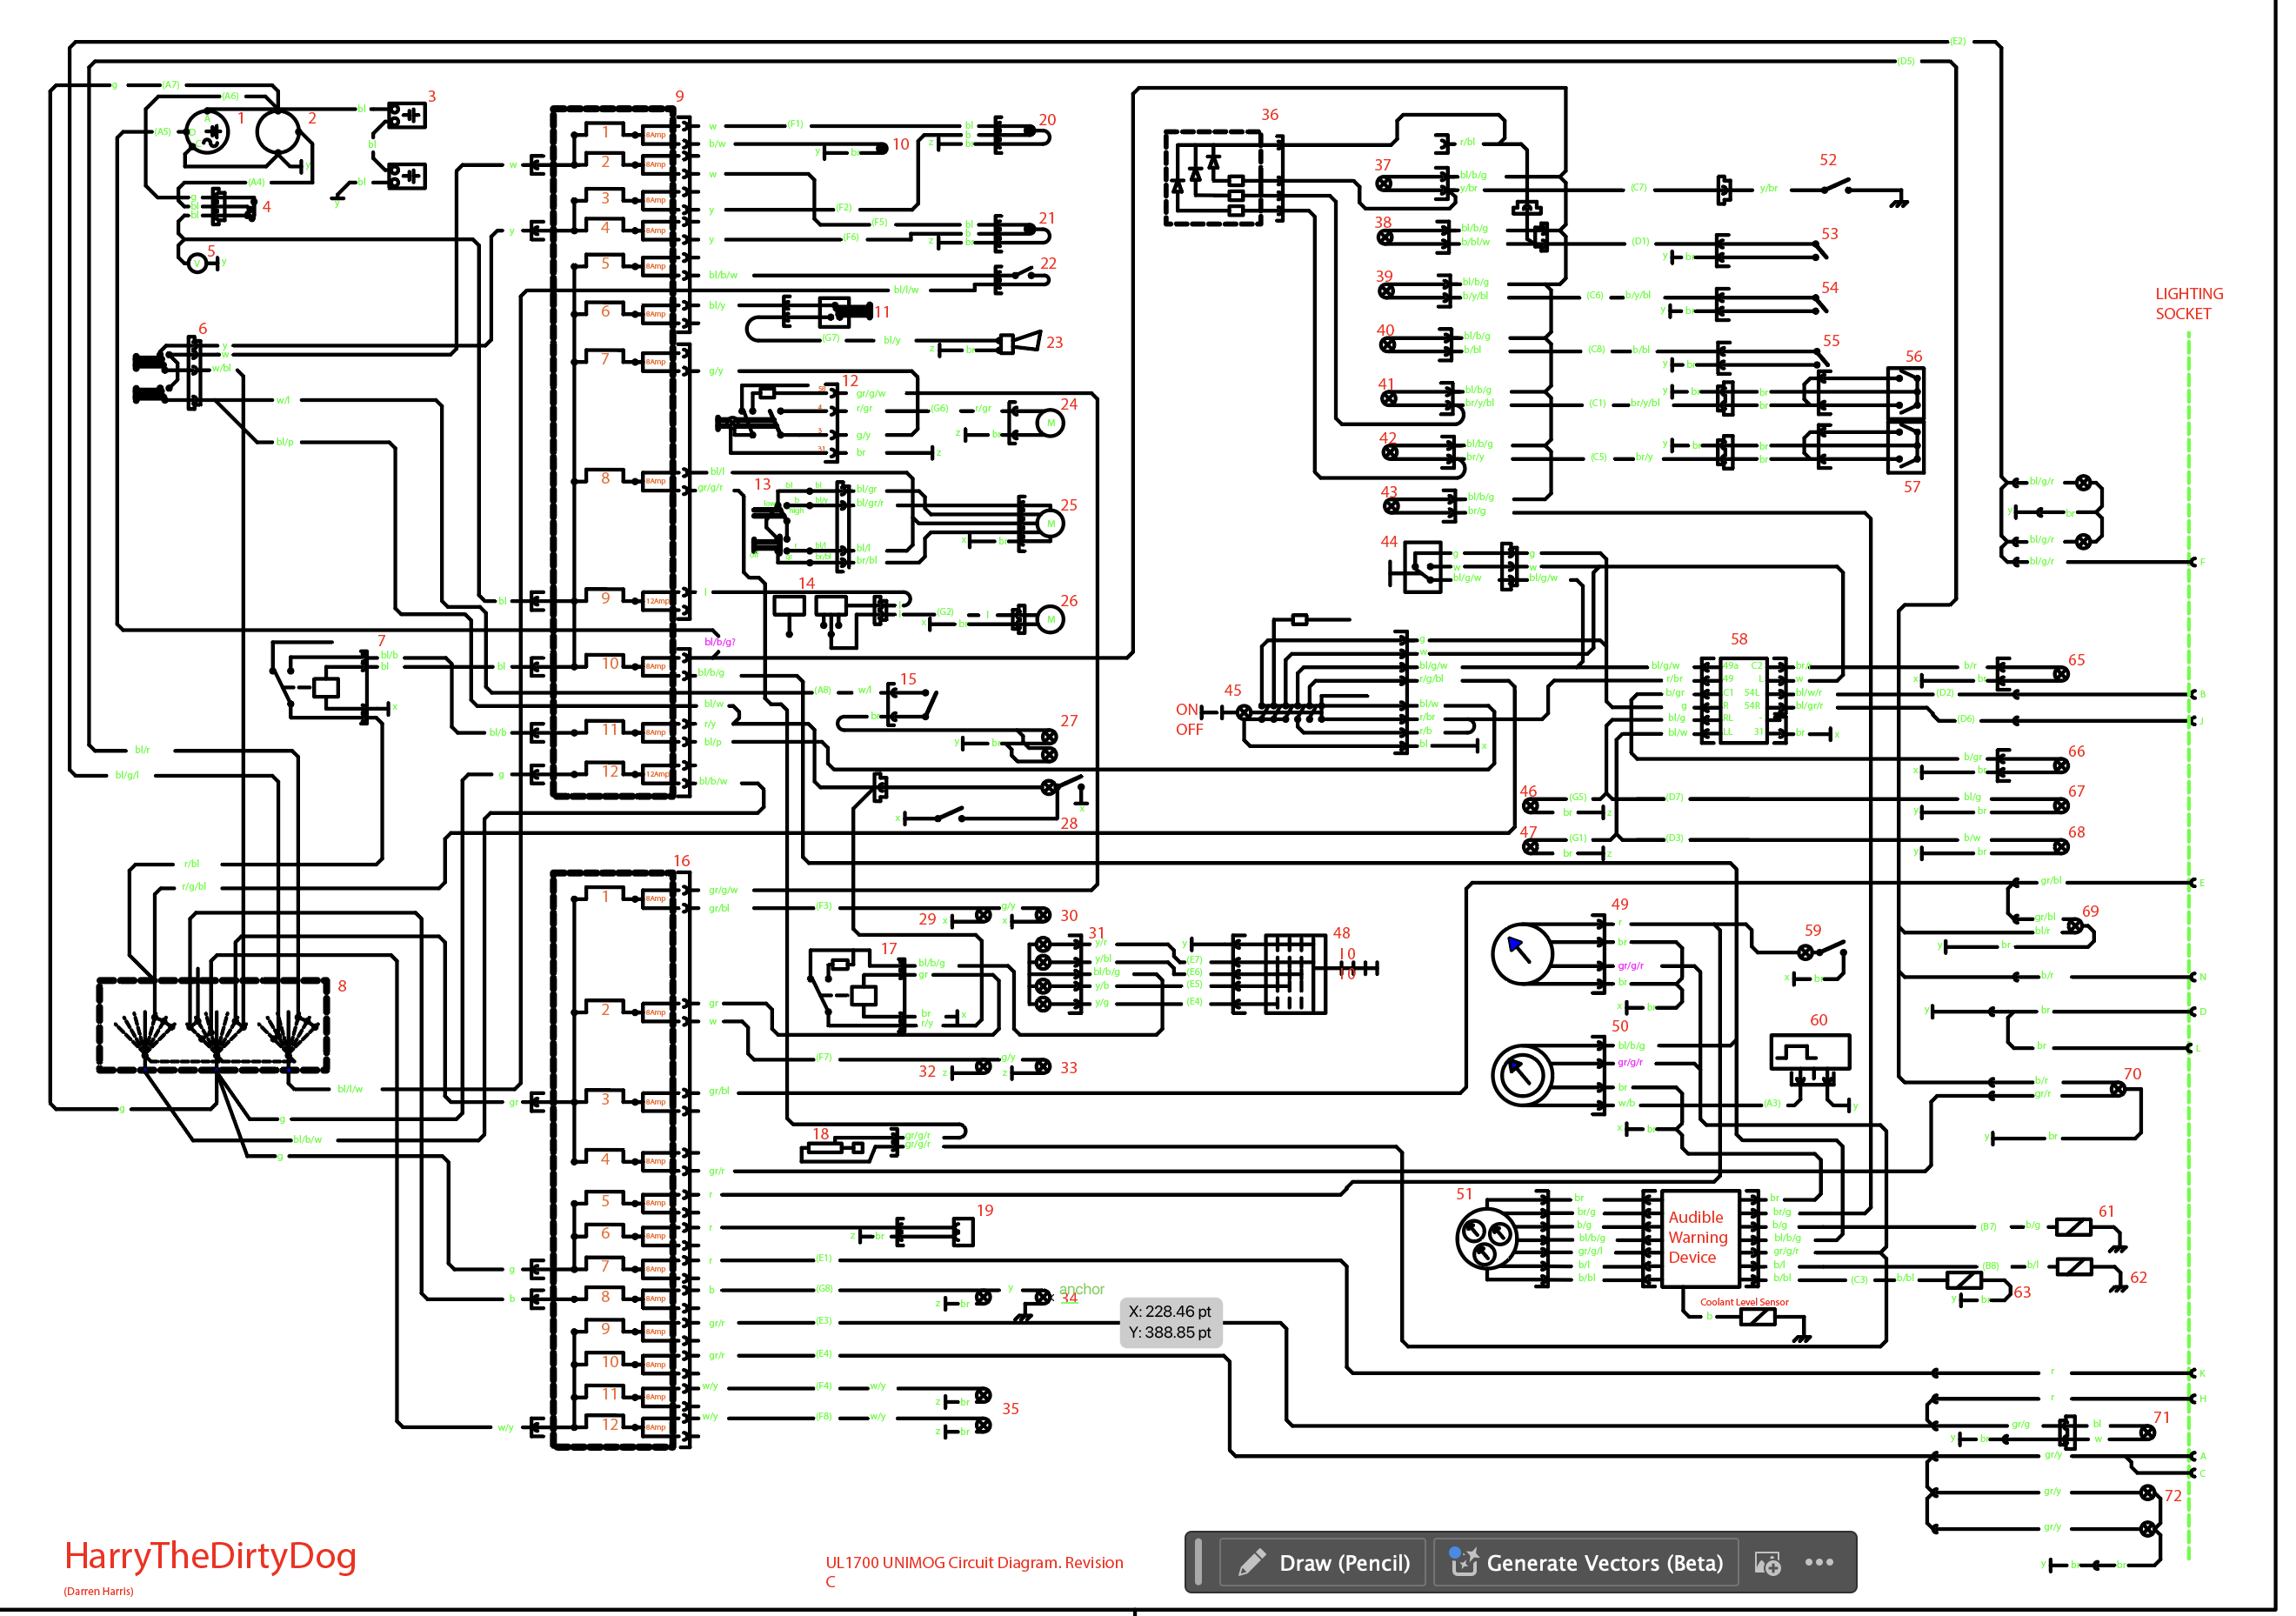
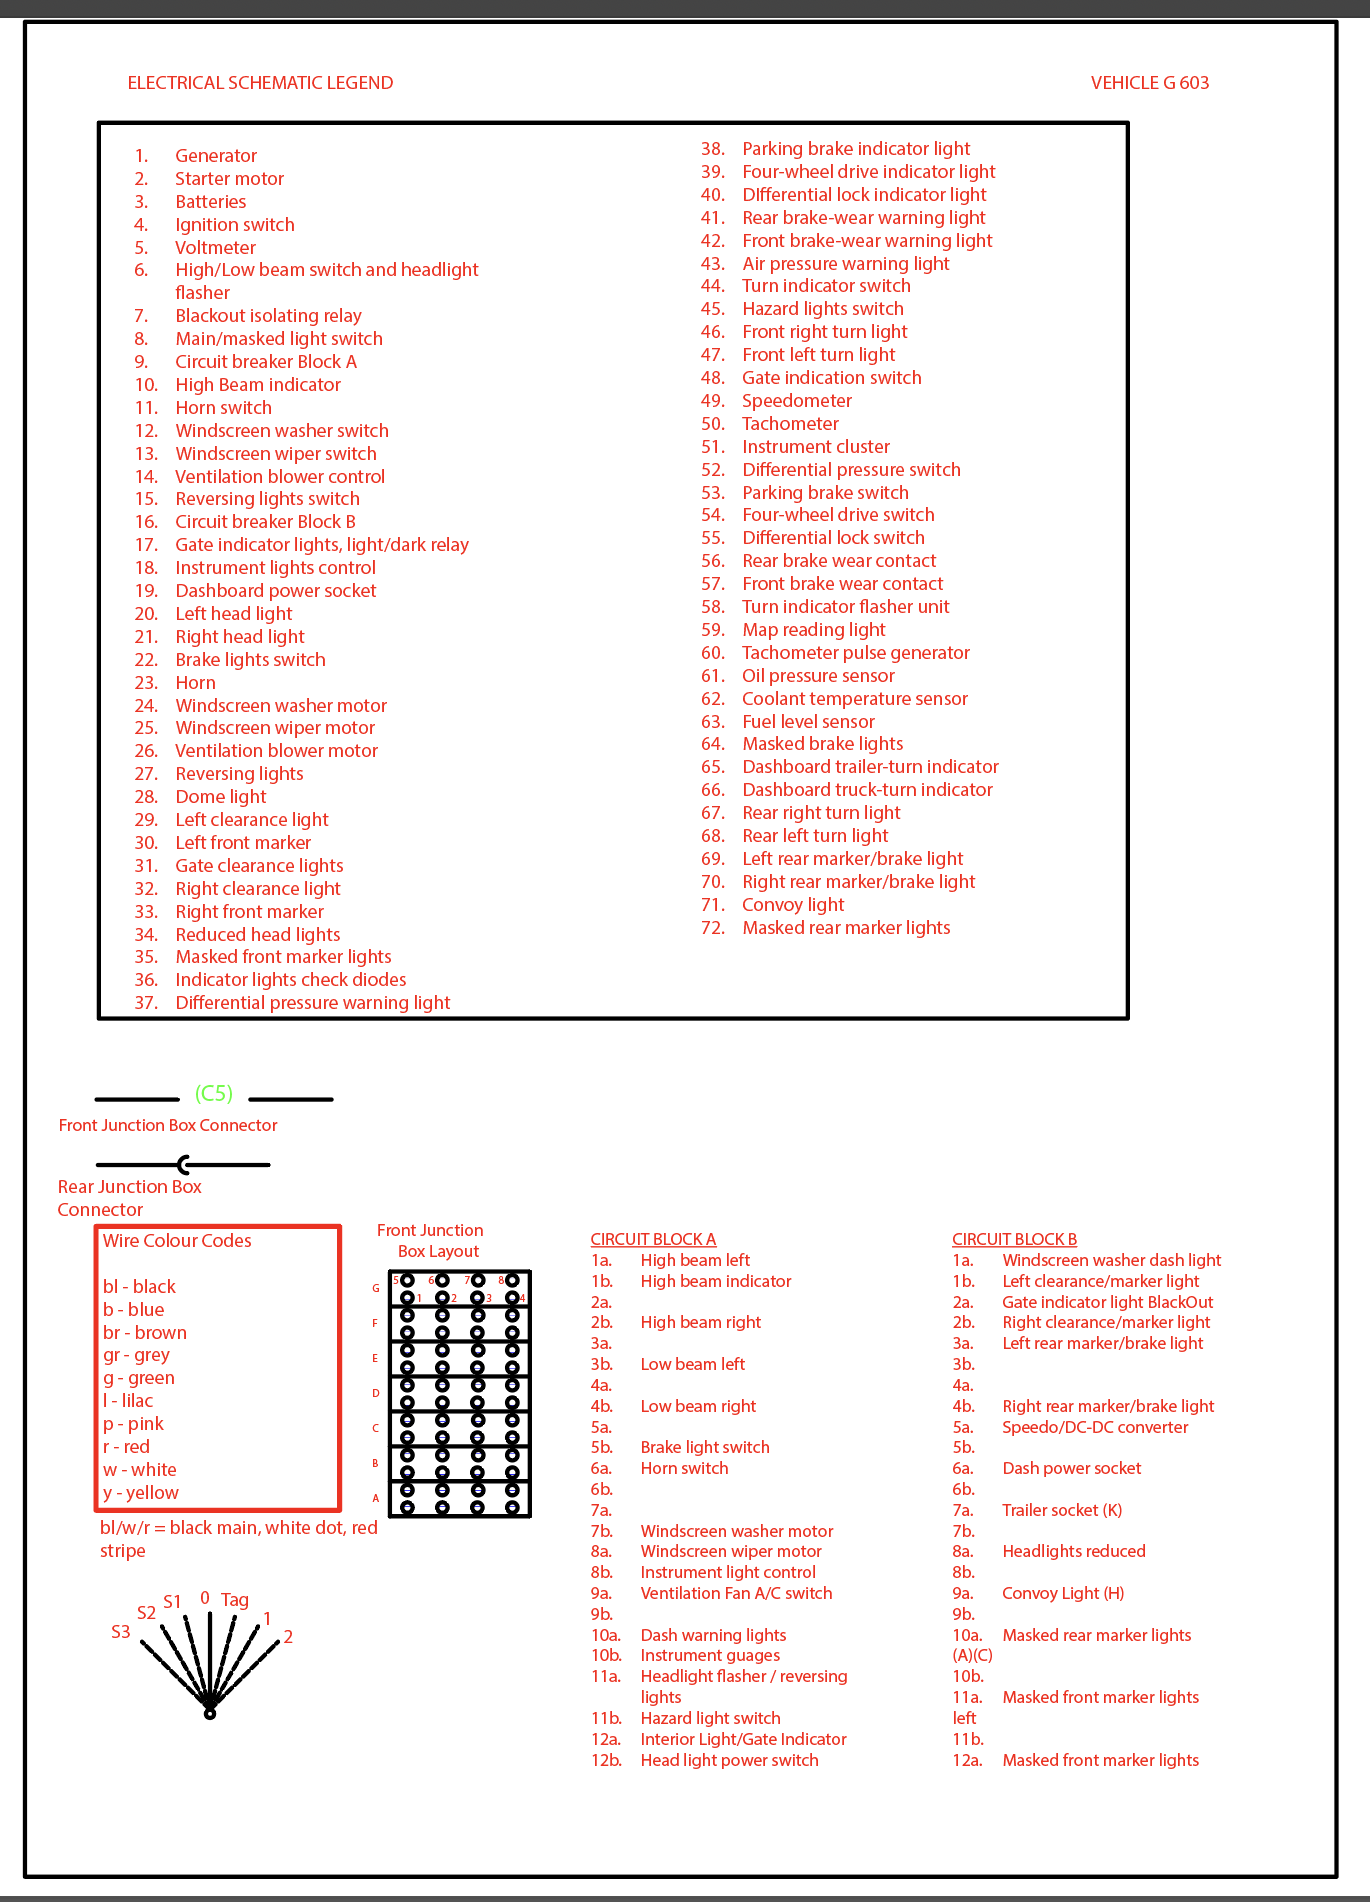
The various online manuals do contain an electrical schematic, but Facebook OZMOG user Darren Harris (HarryTheDirtyDog) has made some improvements in its readability. His PDF version is available here. Many thanks to Darren. The legend to suit is shown below.
The modifications I did (am still doing) to the Mog are extensive, and detailed in Section 5.4 Electrical Modifications.
4.13 ADF Modifications
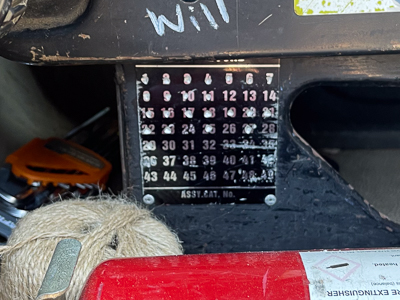
The ADF specified and purchased these vehicles during the late 1970's and took delivery of them during the 1980's. They are only now disposing of them, some 40+ years later. During their lifetime, the ADF decided to undertake a number of modifications to the U1700L Unimog. The modifications to a particular vehicle are recorded on the 'mod plate', which is on the drivers side seat base and visible from outside the vehicle with the drivers side door open.
| Mod number |
Mod reference (EMEI Number) |
Details | Comments |
| 1 | G607-1 | Brush guard Modification | Cargo variant. Provides open area for access to engine bonnet spring catch. |
| 2 | G617-1 | Emergency Stop | All types. No details found. Included in G604 Medium Repair Manual. |
| 3 | G607-3 | Hydraylic Jack Stowage Bracket Modification | Cargo variant |
| 4 | G617-3 | Clearance Light Wiring Modification | All types |
| 5 | G617-2 | Coolant Heater Tanks Modification | All types |
| 6 | G617-4 | Accelerator Pedal Stop Bolt | All types |
| 7 | G607-4 | Tray Seating Grab Handle Modification | |
| 8 | G617-12 | Water Pump Jockey Pulley Bracket | All types |
| 9 | G617-6 | Brake Caliper Protection Shrouds | All types |
| 10 | G607-2 | Horn Relocation | Cargo variant |
| 11 | G617-7 | Change of Engine Shutdown Method | All types |
| 12 | (blank) | ||
| 13 | G617-9 | Fuel Tank Drain Plug | All types |
| 14 | G607-6 | Centre Seating | |
| 15 | G617-10 | Accelerator Pedal Cross Shaft | All types |
| 16 | G607-7 | Tail Light Strengthening Brackets | |
| 17 | G617-11 | Lifting and Tie down point modification | All types |
| 18 | G617-15 | Clutch Output Shaft Bearing Modification | All types |
| 19 | G617-13 | Tray Seat Legs Modifications | All types |
| 20 | G617-14 | Brake line Chafing Modification | All types |
| 21 | G617-18 | Tray Floor Headboard Assembly Modification | All types |
| 22 | G617-16 | Clutch Master Cylinder Removal Modification | All types |
| 23 | G617-20 | Engine Warning Device Modification | All types |
| 24 | (blank) | Possibly a DOKA specific mod. | |
| 25 | G617-21 | Modification Recording Plate Modification | All types |
| 26 | G627-2 | Hydraulic Control Valves Crane Modification | Crane Variant |
| 27 | G617-23 | Fitting Additional Blackout Driving Light Modification | All types |
| 28 | (blank) | ||
| 29 | G617-25 | Fitting of Austeyer Weapon Brackets Modification | All types |
| 30 | (blank) | ||
| 31 | G637-1 | Dump Truck Variant | |
| 32 | G627-3 | Inner Boom Rust Crane Modification | Crane Variant |
| 33 | (blank) | ||
| 34 | G617-27 | Trailer Safety Chain Anchor Brackets | All types (I believe removed / superseded by Mod 42) |
| 35 | (blank) | ||
| 36 | G617-29 | Transmission Shift Mechanism Modification | All types. Note, also a duplicate 36 is Air System Filter - but this does not appear to have been implemented in many vehicles. |
| 37-41 | |||
| 42 | G617-36 | Fitting of 12.5 Ton TRL Safety Chain Mounts Modification | All types |
| M (gearbox) | G617-24 | Transmission Oil Distribution Pipe Modification | All types |
| (blank) | G617-26 | Handbrake Lever Modification | All types |
| Mod-1 | G627-4 | Crane Pressure Gauge and Lockout Circuit Modification | All types |
5 Modifications
I am not saying that the straight-from-the-army Unimog is useless or anything - these are very capable vehicles, and well maintained - BUT, I doubt many people are going to buy such a vehicle and leave it how it is. Some people do very little with them, and use them on farms etc, and others make them into full blown expedition vehicles with ensuites, beds, and kitchens. My current intention is to keep the Unimog as the ex-army vehicle that it is. It will be a 'tow-tug' and camper. I will make it more comfortable and capable etc., but I will not fit it out with a 'camper-box' on the back. I will tow my existing caravan many places, but leave the van, and travel up the various tracks in the Unimog without the van. This includes camping out of the van for up to a week or so at a time using tents and fire pits.
The ability to tow a caravan (3.7t), the ability to self-recover when traveling solo, the ability to 'go anywhere' (rocks, rivers, beach sand, sand dunes, mud), and finally the ability to carry a collection of camping gear such as tents, cookers, fridges, etc. comfortably are going to be my foci.
I have no intention of wasting my time making the Unimog 'pretty'. It is not intended as a show vehicle, but rather a work horse. If it has, or gets a scratch - so what - that is what it was brought for.
5.1 Mandatory Modifications
These modifications are things that need to happen to allow the Unimog to be registered, or roadworthied, or insured . . .
5.1.1 Door and Ignition Locks
The Army had the ignition keys pinned into the ignition barrel so that the key could not be removed. They also left the doors unlocked (as the key could not be removed, I doubt that they could have locked them if they wanted too). This was not a lack of physical security awareness on their behalf, but rather a recognition that 200 trucks would pose an issue with key handling, and to be able to perform their job quickly was more important than the minor risk that someone would steal a slow and difficult to drive truck in the midst of a thousand fully armed soldiers in a guarded compound.
So while ideal for the Army, this is illegal for a heavy vehicle. Prior to roadworthy, the ignition key needs to be changed, and this means changing the ignition barrel, key and 2 X door locks. Kits are available to do this though. Door Handle Set, Plus Ignition Barrel with Keys. The process is not difficult. Unimog Locking Door Handles is an example video.
Note, in my case, the door locks had not been used for 41 years. They needed some WD40 applied liberally, and then a good amount of coaxing / moving to properly free up. I then had to slam the door a few times to get the locks moving, and I also locked / unlocked the door while open to free up the mechanisms.
5.1.2 Speedo
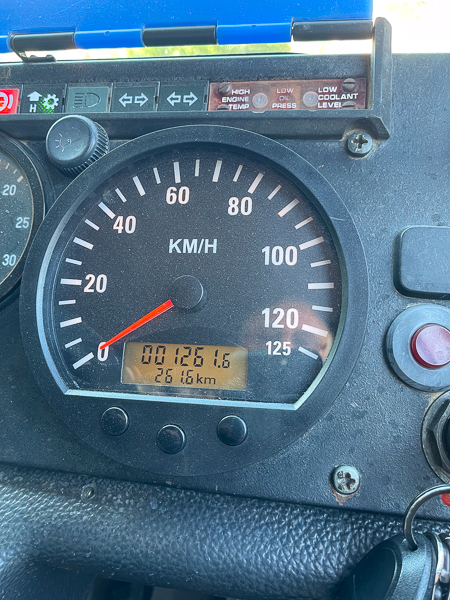
This item belongs in both the upgrade and repairs sections. The Unimogs are well known for having speedo's that show X distance, while their log books show much greater than X distance driven. This is not the Army falsifying its speedo's, but rather the Army needing to replace their speedos. In my case I was driving along and noticed that my speed (as per the speedo) was slowly increasing, while my engine revs remained the same. This is basically impossible, so it had me intrigued. My speed went from ~80 kph to mid 90's and then suddenly the needle hit its maximum, and started bouncing all over the place. I am not clear if this was a cable or speedo issue, as I didn't attempt to repair it, but I simply replaced it with a planned upgrade. The Mog Central Hall Effect Speedo Kit replaces the cable from the gear box to the speedo, and the speedo itself. It took me about 2 hours to install (you really need to remove the spare tyre to access the gearbox, and this takes half the time). The hall effect basically gives pulses as the gearbox turns, and the speedo counts these pulses to determine the speed. The big advantage in this is that: 1) it is purely electrical and therefore very reliable, and 2) you tell it what number of pulses to use, so the speedo can be re-calibrated for different tyre sizes etc. at any time. (I believe I used 7400 for the Omnitracs. I know others have used 6973 for the 395/85R20's.). Retro Gear's "1984 Unimog U1700L Speedo Change" provides a video of the basic process.
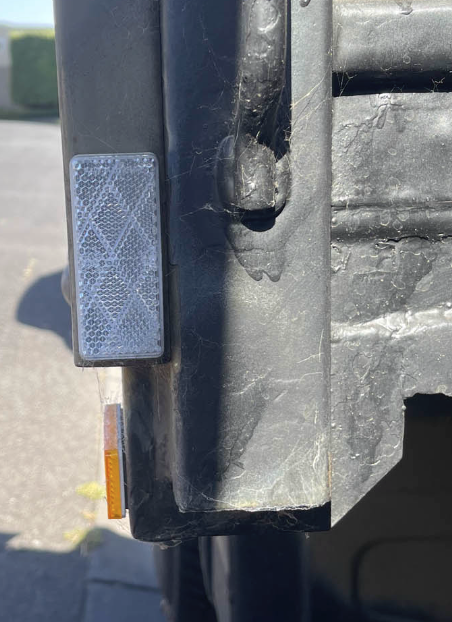
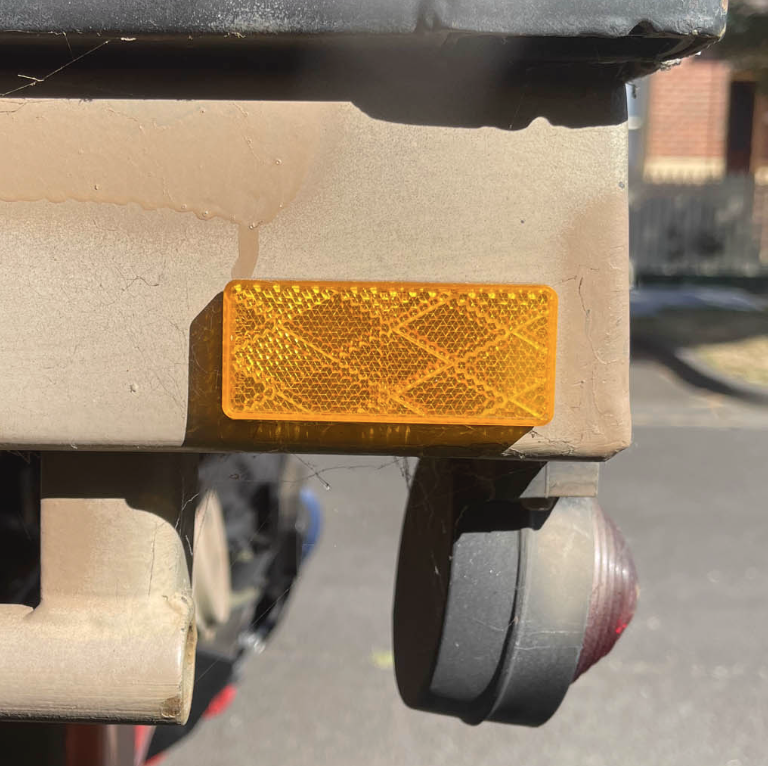
5.1.3 Reflectors
One of the reasons that I could not get the Unimog registered initially was that it did not have the required reflectors on it. The cargo tray protrudes outside the side of the cabin (when viewed from the front), so it needs to have white reflectors on the tray on either side, facing forward. On the rear of the Mog, the Army has installed rear facing red reflectors, so that is ok. On the sides though, when viewed from the side, there were no reflectors. Yellow reflectors are required here, and I put three on each side, one towards the front, one towards the back, and one in the middle. I brought my reflectors from ebay, but i see that Bunnings Trailer Reflectors are available for around $5-6 each. These simply attach with double sided tape. I also think it is best if they are removed for painting, so either the whole reflector could be replaced or new double sided tape used. I carry a couple of spares, but I have not had one fall off, or be knocked off by trees.
5.1.4 Elephant Ears
I thought I would add this section for clarity. The 'elephant ears' are the big frontal protrusions with eyelets in the top of them, and in the bottom (seen just above, and at the top of this page). They are used in the military as lift points for helicopter transport (something that not many 4x4 enthusiasts do). They poke forward from the bumper bar or bull bar area, and this is the problem. There are lots of people being told to remove the elephant ears in order to get a roadworthy. The legislative requirement for this is far from clear. At the time of their original import, the vehicles were approved to have these. While they might not be allowed to be imported like that, or approved for that NOW, new importation rules are irrelevant to old vehicles.
I am certainly not clear on whether they are, or are not, 'legal'. Despite strong comments from both the for and against parties on the web, no one has actually quoted a source better than 'my mate', or 'my mechanic'.
The Dare to Dream website contains some good discussion on elephant ears : Frontal Protrusions. If you are concerned about the elephant ears, or someone rejects them, then I suggest you read this page.
My Unimog has been roadworthied and registered as a National Heavy Vehicle without removing these elephant ears. The National Heavy Vehicle requirements are the same across all Australian States. In Victoria at least, the Roadworthy has to be done by a Heavy Vehicle Assessor (not just any mechanic), and the Victorian Roads officer that did the actual registration walked all around my Unimog taking measurements and photographs. Neither party commented about the ears. I should say that in both cases, the people were well aware of Unimogs though.
At the moment, the Elephant Ears sit around my Runva winch, and they provide side protection for the winch, and easy hookup points for recovery gear. However, they were approved prior to the winch / winch plate installation though.
For those that consider elephant ears are not allowed: Christopher Gabirel in the Unimog Owners group Australia created a post (17Jul23) where he indicated $400 (plus $50 postage) for 'mini-ears'. These go up and down and not protrude forward, so they should not upset any roadworthy / inspector. There are also some 'blanking plates' available from the various Unimog fabricators, such as Unidan Lift Point Delete.
5.2 Recovery Mods
Like most people who buy one of these Unimogs, we wish to travel remotely. That means we need to have our own recovery gear. I have no intention of being a tow truck, but I would hope I could assist in the recovery of vehicles traveling with us. For that reason, I will carry both heavy (Unimog) and normal (4x4) recovery gear.
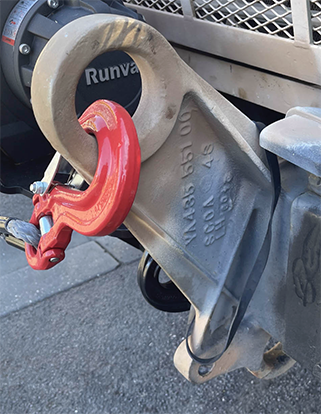
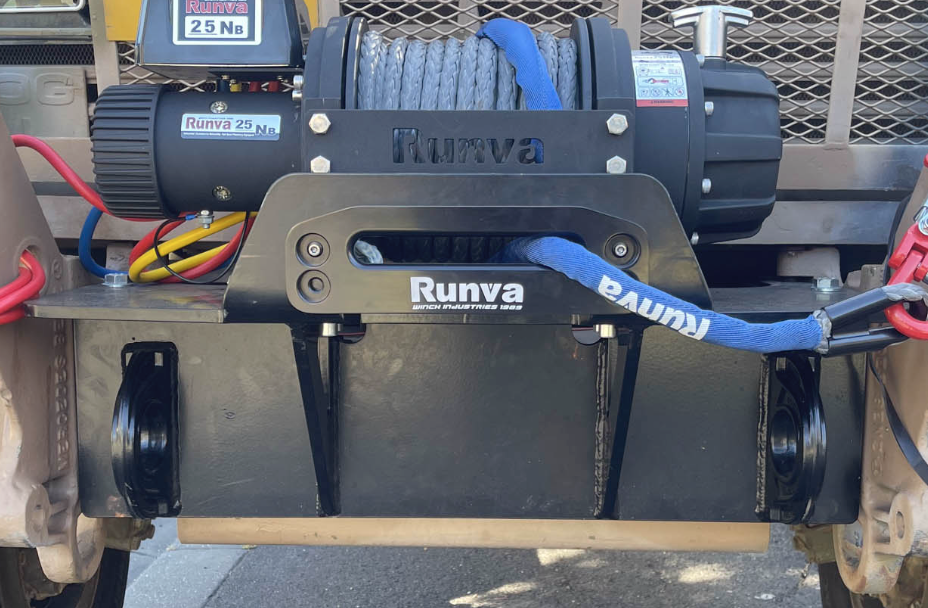
5.2.1 Runva 25K winches
SOME Ex-Army Unimog's came with a Werner 62kn front winch as standard. This is a PTO ((engine) Power Take Off) driven winch which means that the engine runs it. No issues with Electrical supply. It has a 30m X 14mm steel cable, and it is not suited to synthetic cable. I specifically selected a non-winch Cargo truck, as I did not want a PTO / Steel cable winch. I wanted synthetic cables, and at both front and back.
Putting add-on electric winch(es) on the Unimog was a high priority. Two questions: 1) what size? and 2) how many? On the first, the difference in cost between small and large winches is not that large when you take into account that they both need plates, wiring, etc.. So while I was not sure what the minimum sized winch I needed was, I just went big. The Runva EWB2500 24v has a 25,000 lb line pull, runs off 24v (which was key) and comes in synthetic as well as steel cable. I wanted synthetic for safety reasons.
An aside here if I may: I have seen on that fountain of mis-information (social media) some 'mathematics' for working out what size winch you need. In particular, I have seen three statements: 1) your winch must be the same size as your GVM; 2) your winch must be the same size as your GCM; and 3) if your winch is bigger than 150% of your GVM then 'its too powerful for your car'. Now frankly, there is no basis for these statements. Firstly, taking the Runva 25000 (pound) as an example: Figure 1 above shows that this is capable of 25000lb (11,340kg) line pull, but only when there is one layer of cable on the drum. Otherwise, it is between 7000kg and 9,400kg. Secondly though, if your car's GVM is 11,340kg (and you are not overloaded, and the cable strength exceeds 25,000lb, etc.), then this would be sufficient to pull your car up a cliff. Now we can talk of Working Load Limits and what Worksafe Australia would let you do, etc. but theoretically, that is what that number means. So what line pull do you need to pull a 11,340kg car on the flat? Anyone who has pushed a stalled car, or seen a 'strong-man' tow a 200 ton airliner with their teeth, can tell you -- not 11,000kg or even 1,000kg. (The YouTube video 800T shunted by Unimog shows a ~5T? Unimog moving 800T). So if you are bogged in sand - what do you need? Good question, and without knowing how deep, what the level of suction is, what striction, if any part of the car is caught on a rock, the carrying capacity of an African Swallow, etc. there is no way of knowing. The first two rules above are merely guesses. I don't have a better answer, but any other guess is equally as valid / invalid. On the 150% winch 'over-powering the 4x4' - I am not clear what is meant by over-powering, but if it is intended to say that it would it cause damage to the 4x4, then this would require knowledge of the structure of the car / truck (e.g. monocoque vs chassis construction) and the strength of the components. Again, some rule of thumb bull by the expert 'my mate'. I would need manufacturers data, a range of scenarios and a computer to calculate this, and even then it would be a 'most-likely' outcome.
In terms of how many winches, I know most people use a winch to pull them (forwards) through a difficult patch. I also know that it is possible to use a front facing winch to pull yourself out backwards. However, in terms of self recovery, if I got bogged in some outback long patch of sand or mud, I would be more inclined to back out and find another track than to try and skull drag the Unimog 100m through. Yes, I would pull myself forward through a puddle, but no to anything over 10m or so.
So I was thinking about a winch on the back. I also realised that, when towing the van, if I got into trouble, I could 'drop' the van, move the Unimog forward (for example up a dune), and then winch the van up to meet the Unimog. That clinched it. One on the back too.
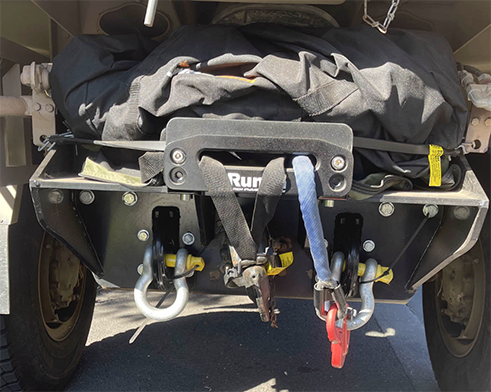
I purchased the Mog Central Runva EWB2500. Wiring is based on the tables in "Electrical Installation" above, coming from the second 'leisure' 24v battery, and thus sparing the 24v starter battery. This will go from 24v dual battery, via fuse then isolator, to the winch. Unbroken earth return cable to the battery. I also ran a cable from the starter battery to both winches. This gives the advantage that the Unimog's generator can add up to 100A to mix, and it also means that I have redundancy. Note the Runva kit includes the battery isolator, hook and a remote. Runva do a 24v winch solenoid at 600A for $99. As does carbon off road. The ‘winch solenoid’ is really the winch controller / solenoid and not a simple 600A solenoid though. It is not what I was looking for. I will need to go with manual switches.
5.2.2 Rear Winch Plate
I ordered and installed the Mog Central Rear Winch Plate. I have a Video on installing this. Not too hard, PROVIDED that you have some way of lifting it. It Weighs 60kg or so. Far too heavy to just hold. I used an engine lift and a few ratchet straps to move / hold / position. Then a fid (pointed metal spike) to align, followed by the bolts to finish. Given that the winch plate needs to lifted up under the rear tray, and then have the winch lifted on top of the plate (again, under the tray), I decided to mate the pair and to then lift them both into place together.
5.2.3 Front Winch Plate
I also purchased the Mog Central front winch plate, and got it delivered at the same time. Video on installing this. Not too hard, PROVIDED that you have some way of lifting it. Weighs 60kg or so. Far too heavy to just hold. I used an engine lift and a few ratchet straps to move / hold / position. Then a fid (pointed metal spike) to align, followed by the bolts to finish. Given that this winch plate was not under something, this was a much easier installation.
Mog Central have now changed their front winch plate - or perhaps added an additional style. This new style replaces the ADF front corners (that contain the head lights), and adds a bull bar style bar over the top of the winch. This bar contains driving light mounts for three 9 inch lights. The new corners also contain new headlights. A really nice piece of kit. YouTube have a 'Short' video of it Our BRAND NEW Full Winch Bar.
5.2.4 Soft shackles and loops
George4x4 have 26000kg soft shackles – more than twice what I need. Any soft shackle over 11,000 kg will work. Their kit Recovery Kit will work for both the Unimog and my Silverado.
5.2.5 Kinetic ropes & recovery
OK, I know I am out on my own here, but I don't like Kinetic recoveries. The idea of connecting a 5-8 ton truck to a massive spring, and attaching that to a movable object (car) and then driving off worries me. The various kits I have found are based around a big 'ol kinetic recovery rope, a few shackles, and a bag. I know that a kinetic recovery can be quicker and easier than a winch recovery, and that it works great for sand - but I would still tend to reach for a winch rope before a kinetic rope. I will augment the relatively short 25m winch rope of the Runva 25000 with another 20m of 25000 lb+ rope, and then perhaps another lighter rope of at least 20m.
A quick follow up. Sam Keck posted on Facebook Ozmog (20240818) that he did a kinetic recovery, using soft shackles. One of the 18T soft shackles broke, the rope (and broken shackle) recoiled and it took out his bonnet, blinker and headlamp cover. Thankfully everything was soft synthetic material and not steel, as it would have been deadly.
5.2.6 Recovery Tracks
Having gotten bogged in my 4x4's before in mud, I find recovery tracks my first choice, and they are usually effective (provided the tyre pressures are dropped). I already own a set of MaxTraxs, and a set of Treds. In use, both of these products have certainly done their job, and I haven't seen a significant difference. After a couple of recoveries (~4T car) though, both are missing their plastic lugs, but the MaxTrax have not been damaged as much. (Yes, I know that you are not supposed to spin your wheels on them.)
Basically, the plastic lugs take a real beating when doing a recovery - and that is with a comparatively light 4x4. The issue is not the weight of the car on the lug, but rather that the car is already spinning its wheels in the mud / sand - so when you do get moving onto the first few lugs, the tyres are invariably spinning over the lug and wearing them or breaking them. I worry about the weight of the Unimog (~6T) on them. I have seen steel versions of the same idea before, but I will probably go with the MaxTrax Pro. It appears stronger, and it has metal replaceable lugs. I very much doubt that the Mog will grind down the metal lugs like the car does with the plastic ones. It may however simply rip them out - in which case a few replacements will be needed, but these are not expensive.
Ronny Dahl does several YouTube videos on recovery boards. (Which is the best 4x4 recovery tracks) (MaxTrax, 10 easy to use MaxTrax 4x4 tips)
Note: if you have not used trax before, then take it from me, add some rope to the sides of them before you use them. Once used, these things shift in the sand / mud quite a long way and become VERY buried. They are not easy to find, remove or clean after you have done the recovery. Having a rope end on the surface (and away from the bog) means that you can follow the rope to the buried trax.
I also found an American comparing traction boards on YouTube This is quite a good review in my opinion. Maxtrax Vs Budget Traction Boards | Is it worth spending more on the real thing?
One more item in the Maxtrax's favour. Ignoring the Xtreme board with its metal teeth, I found that you can replace the teeth on the standard Maxtrax with metal teeth. For me, the teeth that take the battering are those right on the end, where the traction board is partially poked under the tyre. This is not a large number of teeth, but the tyre can't get to the rest of the board without going past these first. Outback Equipment Maxtrax Replacement Teeth Repair Kit [Qty: 12pk] is one of several options for replacing 'standard' Maxtrax teeth. I prefer this kit, as it would give 6 teeth for each of my two tracks - which are really the only ones taking a beating. You drill out the old teeth, and insert these.

5.2.7 Sand Anchor
I inherited a sand anchor some years ago. It is similar to Sherpa Sand Anchor. Basically, you connect a winch rope to it, take it a fair distance from the vehicle (to give a long & straight pull), then shove this into the sand / soil like a spade. As the winch pulls on it, the angle of the force should (in theory) bury the blade further into the soil and improve the level of anchoring. I have not used one of these in earnest though, and I doubt it would provide a great deal of towing capacity before it simply pulled out of the sand / soil. I did buy the Unimog with the intention of doing outback (sand) tracks though, so even a 100 kg of added traction would help. I will take this with us, but I wont be confident in its abilities.
5.2.8 Recovery Kit
Winches are not much good unless you have some gear to go with them. I am not a fan of dynamic / kinetic recoveries. I do want tree protectors, and cable extensions. Now the 25,000lb (11,339kg) Runvas can be used with smaller capacity kit to do smaller capacity pulls, but big kit is going to be needed to get full use of the Runva's capacity. I already have some recovery gear from George4X4, and they have a George4X4 Heavy Duty Kit that "Suits for Vehicle with GVM of 5.5ton to 8ton including but not limited to ISUZU NPS300 / UNIMOG / FUSO Canter / HINO 300 / IVECO daily, etc". This is $1099 (2024-03-21). This kit includes: "1pc*Kinetic Rope 23900kg*9m; 3pcs*Soft Shackles (Button Knot), Australian made 22000kg*60cm; 1pc*Bridle Rope (Pink), Australian made 14000kg*4m; 1pc*Tow Rope, Australian made 13200kg*20m; 1pc*Tree Equaliser 24000kg*3m; 2pcs*Aluminum Pulley Snatch Rings, Australian designed and NATA accredited lab tested 15000kg; 2pcs*4.7ton Rated Shackles; 1pc*Camouflage Recovery Bag; 1pc*Dampener"
I did find a cheap "Bogbuster" 10T 20m winch extension rope / tree protector on Ebay for $68.95. In most cases I can use this as a 20m extension. In some cases as a tree protector, and in others as a 10m odd 20T extension.

Mog Central have the Saber 22,000kg Ultimate Heavy Duty Recovery Kit. ($1,039 2024-03-21). This includes: "INCLUDES: 1 x 22,000KG Kinetic Recovery Rope, 2 x 24,000KG HDX SaberPro Bound Soft Shackles, 1 x 18,000KG SaberPro Soft Shackles w/ Sheath, 1 x 15,000kg SaberPro Utility Rope, 1 x Ezy-Glide Recovery Ring, 1 x Winch Damper, 1 x Recovery Gloves & 1 x Australian Made Rope Bag" (extracted 2024-03-21).
The kits seem very similar in both contents and capacity. The George4x4 one appears to have the Tree Protector, one snatch ring and 2 X 4.7 ton (hard) shackles extra, and the SaberPro appears to have gloves extra. As mentioned, I cant see myself using the kinetic recovery rope much, but I can certainly see myself using the tree protector.
5.3 Security
5.3.1 GPS locator
I originally went with a Mongoose VT904 GPS Locator. $289 to purchase, but requires a data sim as well. I have used these before and I like the outcomes. These devices report their GPS location without the need for telephones / wifi (they have their own 4g sim i.e. telephone card) and they have a good iphone app that lets you see where the item is now, where it has been, and create geo-fenced locations. Geo-fencing is great, as if the item moves from its (virtual) ‘compound’ – then an alert is sent to your phone and you can have a look at where it is, what is happening. The VT904 is DC 9-75V. It doesn’t have a battery itself. Its brother product LT604 does. However, mine will be feed by 24v continuously. It also has siren outputs, but I will probably not use these. (at the moment).
I ended up replacing the Mongoose with a Solid GPS though. ($157 - $247 depending on battery size) This was not because I had any problems with the Mongoose, or could see any difference in the overall functions - but because the price of data sims kept going up. The best prices I could find for data sims was about $25 per month, or $100 per annum. For various reasons, I was on monthly plans, so these were getting to some $300 per annum. The Solid GPS does not use an separate user-provided sim, but rather a plan from SolidGPS that is only $70 per annum. It was therefore $30 - $230 per year cheaper, and as it contains its own battery, it has more placement options. I went with the Large Tracker, which has a 6 Month battery life. I will power this through a 12V usb port. In terms of the functionality of their reports / website, the product does what I want. I can look up the website to see where my Mog is or has been, and I can set 'fences' or boundaries whereby I get notified if the vehicle moves from its home location. This geo-fencing functionality is brilliant - as you get notified by sms if the vehicle moves. Of course, you do get the occasional notification that YOU just moved it - but that just reminds you that the GPS is working.
5.3.2 Dash Cameras
I have several types of cameras fitted. Firstly there are those that help me see when driving - such as the reverse camera / mirror, but there are also dash cams for accidents and dash cams for pure security. The normal dash cams record what is happening both in front and behind the Unimog. I use the Blackvue DR970. This can be used to show who is at fault in an accident / incident, but they can also be used for YouTube type content, and - provided the vehicle is recovered - for who stole or damaged the Unimog. It is worth saying here that this is not the first dash cam I have used. I had one fitted to my wifes car, and we were subjected to a crazy road rager for several minutes with my wife driving. "No problems" I thought - it is all on dash cam. Well, you can see what happened, but the resolution was not good enough to make out a number plate - even though she (the other driver) brake checked us several times over several kilometres. The DR970 is 4K resolution (3840 x 2160). The old one was 1080 (1920 X 1080). If you are going to fit a dash cam, I would not bother with anything below 2K resolution (2560 x 1440) and this is still marginal in my opinion. If there is an incident / accident and the other person leaves the scene, you really need to be able to read their number plate.
Interior dash cam. While the above Blackvue dash cam records the external view of traffic (in front and behind), I also have dash cams installed purely for security though - they upload video direct to the cloud. These show the interior of the Mog. i.e. usually me. They are activated via my phone; record any incident where the 'scene' that they see changes (i.e. there is movement, such as someone getting in the Mog); and they send this direct to my phone. This means I see who gets into my Unimog, and I see it before they can see the cameras. I certainly get the occasional video of myself, but that is not an issue.
5.3.3 Alarm
Details to be added.
5.3.4 Engine Immoboliser
Many car alarms have an engine Immoboliser option built in. Basically, this just cuts the ignition supply to the engine, which stops the spark plugs firing, and stops the starter motor from being able to be used. The Unimog, as a traditional diesel, does not really use the ignition supply for anything except starting. After starting, the Ignition can be turned off, and the key removed. I dare say, you could even lock the Unimog and walk away. Cutting the ignition supply will not stop the engine or immobolise the Unimog. A different approach is needed. Thankfully, while not 100% secure, it is possible to immobolise the Unimog. I'm afraid you are going to have to figure this one out yourselves though. :-)
5.3.5 Apple AirTag
I am aware of one Unimog being stolen, and one 4x4. The 4x4 had an Apple AirTag installed, and it was recovered within 2 days. For those that don't know, an Apple AirTag costs about $50 and is the size of a large coin. While not waterproof, it is water resistant. The battery in the tag lasts about 1 year, but it costs about $2 to replace and takes about 10 seconds. The AirTag communicates with your Apple devices via Bluetooth, and your Apple device can see where it is (or was) when they last talked. If your device is stolen though, you can declare this on your Apple device and ANY Apple device that sees this will then report its position to you. Apple do not see the position, BUT, after a short time, any Apple device that is traveling with the (now stolen) AirTag, will be notified that they are being tracked. The person that is notified that they are being tracked can then find the AirTag by asking it to beep. They can then listen for the beep and close in on it.
This means that, for example, if the Unimog is stolen, then any time that an Apple device gets near it within the next year (including the thief if they have an iphone), you will be told of its position. However, assuming the thief is also using an Apple iphone, it will not be long before they will know that there is an AirTag in the vehicle. It then becomes a game of chicken - will the thief hang around looking for the AirTag when the police might be on their way or will they simply dump the vehicle?
This is a pretty cheap, and pretty long lasting 'gps locator'. The AirTag is small enough that it can be hidden just about anywhere, and the better it is hidden, the more likely it is for a thief to dump it, even if they do know it is there somewhere. As it is a radio transceiver though, I do not suggest putting it inside a steel box. (e.g. toolboxes). Behind the seat, in the engine bay, under the Unimog, .... Note that there a various holders available for them to be clipped to things, tied to things, and make them more water and dust proof. For $50, they are proven effective.
There are now several products that act like Apple AirTag, but do not include a speaker. The Apple AirTag's speaker can be used to help find it. You ask where it is, and it beeps back at you. Some people disable the speaker for security. These newer devices don't have it installed. They also imply / claim to not notify the thief that they are being tracked. I am not confident that this is correct though, as I thought it was part of Apple's software which would make it device independent. Still, without a speaker, these would be very hard to find. You know it is near you - but only close enough to know that it is on the truck (something you already knew).
NOTE: the 'Tile' is something different to AirTag. It is a similar, but older, technology. It works with Android and Apple phones. It only works with phones that are running their proprietary application though. It is NOT Apple AirTag compatible (as at 20241026). This means it can help find your keys, but if the item is stolen / more than 150m or so away, it will not work as it cannot use other peoples phones to find the device.
In terms of novel ways to hide the airtag, ElevationLab produce a range of products. They also produce a 10 Year AirTag holder that increases the battery life of the AirTag to 10 years by replacing the small button battery with two Lithium AA batteries (that have a shelf life of 25 years). They also produce holders that require special tools to enable access to the AirTag. Everything Mount. Not angle-grinder safe, but certainly much harder to see and open.
5.4 Electrical Modifications
In the end, I have done many many changes and upgrades to the electrical side of this vehicle. A new alternator. Dual Batteries in steps (one each side of the Mog). Dual 150AH Lithium 12v batteries. 24v->12v converter. 12v accessories. 12v fridge. 12v towing of caravan with all signals (left turn, right turn, lights / clearance, stop lamps). 12v trailer brakes linked to Mog braking. 12v Reverse camera. 12v dash cam. 12v security system. 12v CB Radio.
24V batteries
I spent some time looking at how I wanted the battery systems to work. I have experienced and seen flat starter batteries before, and I did not want this in the bush. I wanted a 'spare' starter battery that could start the Mog if the main start battery was flat, and I particularly wanted a 'house' or accessories battery that would provide camping needs without draining the main start battery. Lithiums are good for house batteries. Delkor / lead-acid provide the Cold Cranking Amps (CCA) for starting. In the end, my decision was driven by the fact that my wife was too short to get into the Mog. Extra step = battery box / steps, and this suited Delkor's. I went with one either side (for my wife), which gave me a redundant start battery. Both batteries have isolating switches, so I can use one, the other, or both; and similarly, charge one, the other or both. This solved the 24v problem, but left the house battery.
5.4.1 Additional Batteries
Part of outback travel is the need to self-recover. This includes not only self-recovery from being bogged in sand / mud, but also self recovery when failures occur. e.g. flat batteries, tyre punctures, etc. Most cars fitted out for this sort of remote travel have a 'second battery'. This is not to be confused with a 'leisure battery'. A second battery provides a back up in case the primary (starter) battery is flat. A leisure or house battery is used to supply the rear of the car - e.g. the fridge in back, the camp lights, the 12v air compressor power etc. Both secondary and leisure / house batteries support the starter battery, but in different ways. In some cases people have combined the two - but hopefully they recognise the inherent danger in this - in that while a flat leisure battery is no big deal, if it means that you have lost your secondary battery, then you have no backup to a flat starter battery.
In the case of the 24v Unimog, adding batteries turned out to be more complex than I imagined.
Many accessories, such as fridges, air compressors, etc. operate off 12v. Lithium batteries (LiPO4) offer many advantages over lead acid batteries, and most 4X4 enthusiasts are now installing them as the leisure battery.
In the case of the Unimog, the starter battery consists of two 60AH (i.e. small) 12v lead acid car batteries in series. The ideal situation would be where:
- There are two 60AH lead acid batteries used for the starter motor. (Lead acid batteries can provide the car starter 'Cold Cranking Amperage' (CCA) of 700+ amps.)
- There is a second 24v 'battery' that can provide redundancy in case of the starter motor battery being flat. Lithium 'battery cells' are able to provide high cranking current - however when the cells are assembled into 'battery packs', the manufacture adds a Battery Management System (BMS) that does several things, one of which protects the battery by limiting the maximum current. So production Lithium Batteries are rarely able to start a car let alone a 5.7L diesel. This means that the second battery really needs to be lead acid also.
- A 24v leisure battery that could power all the accessories that are likely to drain the battery, e.g. the winches, the driving lights, the camp lights, the fridge, the invertor, etc. Two 12v Lithium Batteries would be perfect for this. However, the winch is a fairly high current draw accessory, so the lithium battery would need to be suitable for this.
- Given that some accessories are only available in 12v - another 12v only leisure battery. This could be Lithium, as it would not have any cranking to do. Note: I do note that the 24v leisure battery would consist of 2 X 12V batteries in series, and that the lower of these two could provide +12v supply. However, doing this would imbalance the pair and end up with one fully charged 12v battery in series with one flat battery that is open circuit (protected by the BMS). So, no, it is not a good idea. The batteries need to be separate.
Four 'batteries', three of which would comprise two 12v batteries in series would mean a total of seven 12v batteries. Ridiculous. I tried to look at having the leisure battery charge a flat starter battery (via dc-dc). I tried to look at only using 12v accessories. While all theoretically possible, each option meant additional power supplies, electronics, cost, etc.. I could not find a reasonable answer. I finally settled on: 2 X 60AH Lead acid starter battery; a duplicate 2 X 60AH lead acid battery for both secondary & 24v leisure; and a 12V Lithium accessory battery. The duplicate 24v battery could - acknowledging the risk - be both secondary and leisure battery. IF the starter battery did not provide the bulk of the power for winches, driving lights, or accessories - then it is less likely to go flat - but there is still a risk. Adding some heavy duty switches, would allow me to: 1) start from starter motor battery, 2) use the front winch from the starter motor / generator pair, 3) start from second battery, 4) use the rear winch from the second battery, and 5) pair both starter and second battery for any of the above, including charging. I determined to use a 24v dc-dc converter to charge the second battery (even though I could simply pair them), and to have a 24v->12v dc-dc to charge the 12v lithium battery from the second battery, but only while it was being charged itself. This appeared to be the most practical approach, and it would give me the option to add 24v Lithium batteries in the future.
5.4.2 Primary start battery (24v)
The standard Unimog batteries are 2 X 12V 100D-730 Delkor batteries. These are 100 Amp Hour, 730A cranking current. Neither figure is particularly large. The construction of these batteries is physically pretty good though, and they are intended / rated for construction equipment / military installations. Everybattery charge about $550 for one, Mog Central a much more reasonable $377. Century have a heavy duty 740CCA, 120AH battery for $450. The key issue for me is that I would like to be able to fit any replacement battery (or aux battery) into the same space. The Delkor are reliable, suitable, and certainly fit / work well. The Hardcore MFN120A is also supposed to fit and be suitable for unimogs (and most Mercedes trucks) - a quick look at them says they wont fit the U1700L battery box though. This is a problem with websites saying 'fits Mercedes Unimog' - it may very well fit a U5023, or 404 or 406 or . . . . but does it fit a U1700L?? I cant find a price on these, but they are 1000CCA, which is nice. They are available in Truganina – which is not far from where I live. Having the secondary battery bigger than the primary battery in capacity, CCA and physical size would not be a huge problem if I used the switching system discussed above.
5.4.3 Second battery (24v) installation
The Runva 25000 require batteries that are nearby, and at least 750CCA. The Unimog batteries are not nearby and are only 730CCA. I need to ensure good current to the winches. I also need to ensure that the engine is running when winching. A feed from the generator (alternator) would be useful / necessary.
LifePo4oz have cells that are 304AH LifePO4 If I put 8 of these in series I will get 24v (a little over – 25.6). They then have an 8-22 cell 200A (350A peak) BMS with a 2A active balancer. This kit would give 24v @ 300Ah, 200A normal load and no problems going substantially higher for short periods. (350A for 2 mins) I believe that this would easily crank the Unimog and be suitable for the winches.
Itechworld make a lithium 12v battery that can be put in series to create 24v. It is only 60AH, but it has a 1420Amp high cranking current. Two of these can be used to start the Unimog These are $1200 each, so $2400 for a 24v system. It would need a dc-dc to charge off the generator. It would also need an A, B or Off selector to determine which battery to start from, and a Voltage Sensitive Relay (VSR) to stop it charging until the primary start battery is going well. Add a Victron 24-12 at 70A, and I would have 12v supply from the 24 without needing an additional battery. That 24-12 should be switched so that I may use it with the engine off, but it would not normally operate with ignition off. What about cameras & security? Maybe leave it on, or use a small 12v lead acid battery of only a couple of amp-hours. I think I could set the 70a Victron to 13 odd volts to charge a small battery.
Ok, 2X 12V car batteries mounted in the rear and connected in series. Charging from this Redarc SBI224 24v battery isolator. Using 100A fusing. ($228) This is a smart battery isolator (SBI). When the engine is not running, the batteries are disconnected, when the engine starts, and the generator raises the battery voltage to 26.4V (which is above fully charged, meaning it is in the state of bulk & absorption, or Float.) – then it switches in. It switches off at when the voltage drops below 25.4v – which is lower than any alternator / generator would be charging the battery, but still indicates near 100% full. It is rated for 200A (SBI224 vs SBI24), when the output of the generator is 100A max, and most of the alternators are also no more than 150A.
5.4.4 Primary battery jump starter
Yeah, belt and braces, I know. If the starter battery is flat, then the Unimog can be jump started from a specialised lithium jump starter. There are several options here, but the Jaycar 12/24v system is as good as the rest in terms of function & price. It is also able to handle both voltage systems, so could be used to jump other vehicles. It has a 22Ah battery installed, a usb port and a light. It can be charged from either 12v cigarette lighter or 240v via the supplied adapter. Jaycar 12-24vJump Starter $459 (22 Mar 24). Given the final battery design though, and the ability to charge the 24v batteries from the house battery, I did not purchase this.
12V Lithium 'house' batteries
To run camping gear and accessories, I had a choice of buying normal 12v car stuff, or specifically finding 24v alternatives (and mostly, there is). Given I already had a fair number of 12v items, I opted to go with a 12v installation for accessories. This made the choice of video cameras, reversing cameras, security systems, and radios much easier. I did not want to spend a lot of money on this though. I do not intend to park up and power a town for a week. One to max(?) three nights is about me - remember, we will have a caravan for 'holidays', and the Mog camping will just be when we leave the van alone for a few days and take a rough track. The Simpson Desert trip will be the longest I envisage being without the van - say 3 weeks - but I will be driving each day, and that will recharge the house batteries for that night. A 24V 100A alternator can charge a 12v battery system pretty quickly via the Victron 24/12 70A. In the Mog I don't have an air-conditioner to run overnight, or microwave, coffee machine, washing machine, etc. etc. So I intended to purchase a 100AH Lithium, but got a good deal from Jaycar on two 120AH lithium deep cycle batteries enclosed in two Battery Box. 240AH, recharged virtually each day, and with no substantial current draws sounds more than enough.

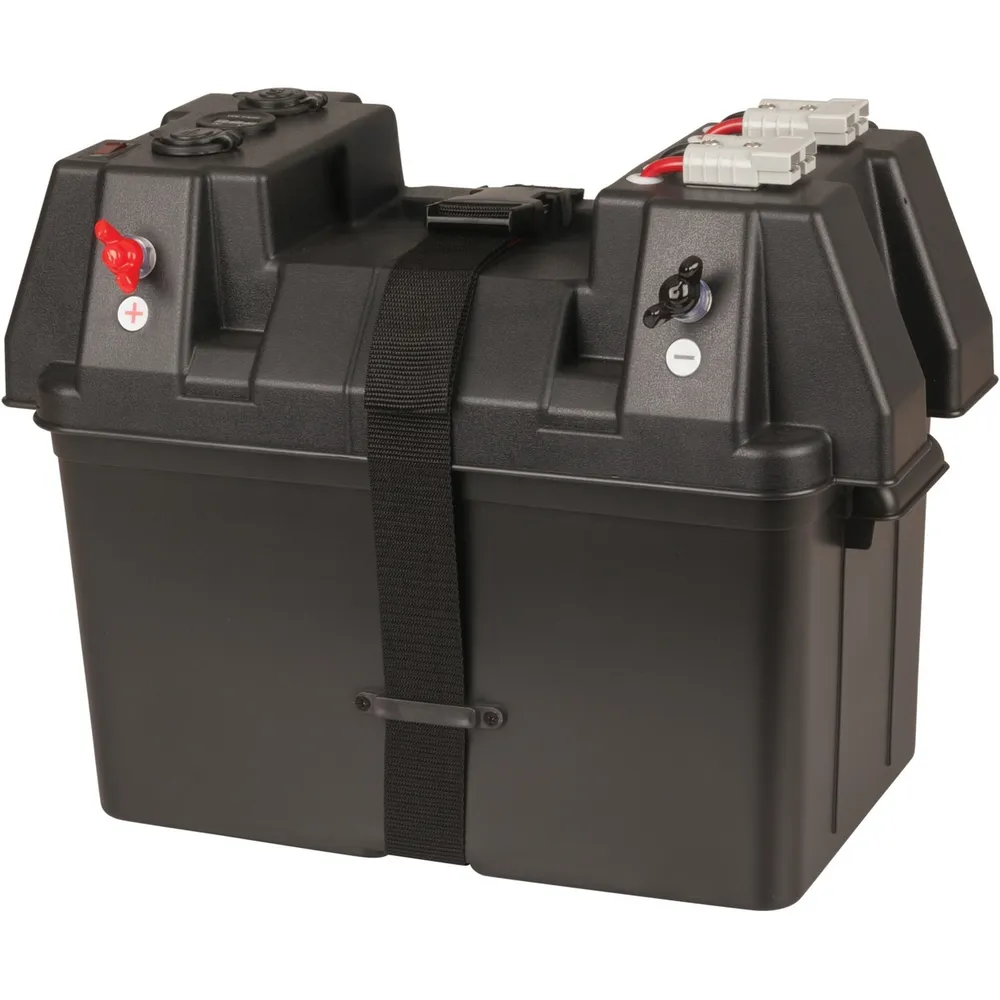
I just joined these boxes together via a M10 Power Distribution Posts, feed from the Victron 24v to 12v 70A dc to dc converter. 12V to the vehicle was via some heavy duty fuses: 100A Main, into 40A to fridge, 40A circuit breaker to Anderson, 30A to cabin permanent systems. I also used a 24v double pole, double throw relay switched by the Mog's 24v ignition to provide 24v 40A ignition and 12v 40A ignition circuits.
12V Bus Bar(s)
I quickly realised that running cables from the batteries to all the 12v accessories was going to be ridiculous. I needed a distribution point in the cabin, close to the accessories. I ended up buying a BlueSea fuse block that can handle 100A per block and 30A per circuit. This has blade fuses to each circuit, and M4 screws to connect wires into. I found that some of the devices I want on the whole time ('permanent') - such as the security systems, but other items - such as the rear view mirror - to only be on when the truck is on. i.e. feed from the ignition. I therefore installed a second fuse box, with this one being feed 12v via a relay that was switched by the 24v Mog ignition. This gave me a 12v 'ignition' source direct from the 12v batteries at 60A.
 24v DPDT Relay used to provide 24v and 12v ignition
5.4.5 24vdc to 24v dc isolation
I did start investigating 24v Voltage Sensitive Relays. These basically disconnect the leisure / second battery when the engine is not charging the primary battery, and then reconnect it when the engine has charged the primary battery to near full. The trouble comes in mixing battery types, VSRs effectively need all batteries to be of the same type. However, if I use the Enerdrive EN3DC30-24 – which is 24v-> 24v, lithium battery charging, also has an MPPT charger built in. It monitors the input voltage from the primary battery and only chargers the second battery when the primary battery voltage is above 26.4v (i.e. charging). (Enerdrive EN3DC30-24 Install guide $435 at redfleet. (what is the advantage of 30a charging vs cheaper Redarc 100A SBI?? I can use Lithium batteries if I want.
I got the enerdrive 24v dc to dc. The issues now are: 1) can I use this to charge from 12v battery to 24v? and if so, 2) can I select which 24v battery to charge? Note D on page 21 of user manual indicates battery input voltage is detected on first connection, and stored. “it will only be erased if the Input battery is disconnected or …”. So disconnect input from 24v prior to connect input to 12v should clear it. This means that I need a 100+ Amp switch from the 12v and the 24v for feed. I will also need some switch for the Voltage Sense Override. i.e. from ignition for 24v, and from battery for 12v. Need separate fuses for these, 2 X 1A, 1 X 40A and 1X70A. I also need something to change over the output from aux to prime.
Note, I looked at the Redarc 24v 200A starter battery isolator. It is nearly $500, and is effectively, just a relay. Their BCDC2420 is a dc to dc @ 24v. It is only 20A, but it also has an MPPT controller that can take a 12v solar blanket like I have and charge the 24v battery from it. It is about $800, and allows a mix of battery types – BUT does charge 24v lithium.
5.4.6 12v battery installation / network
A 12V car batteries can provide the 12v circuits. This Redarc Voltage Reducer provides 24v -> 12V at 30Amp. $600 though. Input fuse is 20A and that should be via a relay which I can switch from the cabin. Victron Orion Non-isolated 24/12-70 dc to dc is adjustable, and only $249. This could be used from the 24v battery directly to power any 12v devices. I brought this Victron 24->12v charger. It can charge the 12v circuit as well as charge the 12v battery. Its input range is 18-35 volts, and its output is adjustable between 10 and 15 volts. It has an output current of 70 amps, and it has remote on-off (which I am likely to connect to ignition).To be honest, 70 amps is a little too big for what I would I would like. The 40 amp would be more suitable to charging batteries, and outputting via a 50 Amp Anderson - but the 40 amp version is not adjustable. It just means that I am going to have to upgrade my Anderson connectors, wires etc.
12V car batteries can provide the 12v circuits. Victron Orion 24/12-70 DC-DC is an adjustable 70 amp 24v DC to 12v DC voltage reducer, and only $249. This could be used from the 24v battery directly to power any 12v devices. The input voltage is 18-35v (so it will work off Unimog generator, lead-acid starter batteries, or Lithium house batteries if I use them.) The output voltage is adjusted with a potentiometer in the range of 10-15v (pre-set to 13.2v). I brought this Victron 24v->12v charger. It can charge the 12v circuit as well as charge the 12v lithium battery (I will set it to 14.4V).
5.4.7 Switches – Primary battery switches
These need to be 500 or 600A switches. (The cranking current is neither high, nor long in duration. The runva winch maxes out at 280A, but this is pulling 11T. In most cases – 2-4T, it is below 150A.
Outback marine have 2 way selector switches – even better. 300A battery switch $71. This is only 300A continuous, 500A (5 Min), 900CCA, but the winches rarely get to 300A anyhow. It can handle higher loads, but not for long. It is doubtful that either the winches or batteries could handle higher loads for long either. There is a ‘big brother’ switch that handles 500A continuous, 1600CCA, and 700A for 5 mins. One for Unimog power, one for rear winch. Front winch?? Obviously from front of Unimog (generator area) to winch, but other?? For now, just use the switch that came with the Runva, from the generator (which is of course also connected to the primary battery).
5.4.8 General Switch gear
Where to put switches, relays, and harnesses is an issue. A remote switch solves some wiring problems. Teralume (Australian) and Auxbeam (US) have similar products. A ‘panel’ of 8 switches connects to box where the electronic switching occurs. (Note, they both now have 12 switch panels). As there is not a lot of logical positions for switches in the Mog, I have decided to use two of these panels: one for the 12v items, and one for the 24v items. I did also look at the ARB Lynx system, which has many advantages, but I decided against it. The advantages of the system mostly came with remaining within the ARB eco-system, and while their products are great, they mostly were not what I wanted on the Unimog. e.g. air lockers, compressor, air suspension, etc.
| 12v switching This will be for 12v items only. | ||
| 1 | Fridge (12V) – will always be on. It has a switch on the fridge. | Powered by the 12v battery installation / charger |
| 2. | CB Radio will always be on. (it can be switched off via the handset) | Powered by the 12v battery installation / charger |
| 3. | 2 X quadlock phone chargers will always be on. (12V source). | Powered by the 12v battery installation / charger |
| 4. | 3X 12V accessory sockets will always be on to charge devices. | Powered by the 12v battery installation / charger |
| 5. | ||
| 6. | ||
| 7. |
5.4.9 24 Volt switching
Auxbeam have an 8 way one that connects to the phone. AR820 RGB This has several advantages. This can be for the 24v items, and it would be mounted in the tray. The connections would be:
| Circuit | Amps | Usage | Comments |
| 1. | 30A | Not yet assigned. | |
| 2. | 20A | Reverse lights | (10A draw @24v, so direct, no relay needed) |
| 3. | 10A | Side light left | (2A draw @24v, so direct, no relay needed) |
| 4. | 5A | Front Stedi (driving) lights | This will just be power through a headlight engaged relay to power 2 power relays to turn on the 24v aux to the lights. The Stedi ST3303 Pro 39 inch comes with 2 fuses, dual relay, and H4 piggyback adapter. I am not sure that the H4 adapter will work on the Unimog, but in terms of power, I only need to switch the power to the relays (or through the relays?). This should be less than 1 amp. The draw on a aux battery is 36.7A at 13.6v, so I would assume ~20A at 26-27V for when the Unimog is running off the generator and the lights are powered by the leisure battery. 24v -> 12 V charger – nope run this off 24 aux battery and via ignition feed relay. Ignition on, relay allows 24v aux battery to charge 12v battery 12v battery installation / charger. |
| 5. | 30A | Not yet assigned. | |
| 6. | 20A | Not yet assigned. | |
| 7. | 10A | Side light right | (2A draw @24v, so direct, no relay needed) |
| 8. | 5A | Air horn relay. | (2A draw @24v, so direct, no relay needed) |
The Solenoid for the front winch needs a 600A relay. (Note, 600A relays are not that available, a 600A manual switch is probably a better idea.) Maxiparts have a range of Narva heavy duty battery isolators. These would be better for battery selection / isolation / winch power.
The Solenoid for the rear winch will also need a 600A relay.
5.4.10 Cables
Firstly, in the big sizes / big currents, these are worth a lot of money. You don’t simply go to Jaycar and buy 500m of 000 B&S cable to sit in the shed. BlueBar shows 000 B&S (335 amp) to be $537 for 12 metres. I need to measure the runs before I buy this. 6-8mm cable will do for most controls, and is fairly sturdy in the physical sense.
Fitting all of the batteries, invertors, dc-dc, videos, etc. etc. means a lot of cables to be sized, terminated and run. 70mm cable required for the inverter, 90mm cable preferred. ‘welding cable’ better for the winch. Need to know lengths as this stuff is expensive. I will also need a crimper that can handle these sized cables.
5.4.11 Fuses
I need some large capacity fuses (500A) for the winches, but mostly 10A – 100A fuses fed from the same bus bar. The Mega fuse block is surface mount, and able to handle 500A fuses. There is also an option for a bus bar to interconnect these – probably not worth the effort. Enerdrive seem to do some fuse box / distribution boxes. They have an ‘ANL fuse block’ that goes up to 750A and is surface mounted. https://enerdrive.com.au/product/anl-fuse-block-with-insulating-cover-35-to-750a/ I like this one. In terms of the other fuses - https://enerdrive.com.au/product/st-blade-split-bus-fuse-block/ offers either 2 X 6 fused outputs or 1 X 12. It has a maximum of 30A per circuit though. M4 screws. #8-32 screw terminal type. (i.e red ring terminal) The SafetHub https://enerdrive.com.au/product/safetyhub-150-fuse-block/ provides 4 X 200A and 6X30A fused outputs, plus negative bus bar connection.
5.4.12 Dash Cam
I think it is dangerous to drive the roads without a dash cam. Too many people are willing to lie to the police about accidents and incidents. I have seen 4 road traffic incidents where a driver lied to the police / insurance. One ticket or one insurance claim will more than cover the cost of a dash cam. I have chosen the Blackvue DR970X 2 channel. It will record out the front window, and from the rear (but not via the caravan). This records to an SD card and can download to the phone. I have two of these already, and I find them great. I do however hate their wifi connection, as the phone invariable decides to connect to them expecting to be able to reach the internet – and of course that does not happen – so it messes my phone connection. These have a great video out the front (and good out the back). In one incident, with another camera, where my wife was driving and being subject to road rage, we could record the whole incident – but not with enough detail to see the number plate details. I therefore want a system that provides good high resolution, although this means that the memory card gets full quicker, and therefore overridden quicker. The DR970X operates off 24v (or 12v), and shuts itself off (variable voltage cut off system) when the battery gets down to 22.8-24v (on 24v system), or 11.8 - 12.5 (on a 12v system). The cut off is adjustable.
The Nature's Generator website indicates that a 24v flooded lead acid battery is 25.29v @100%, 24.14v @50%, and 23.18v @0%. This implies that the Blackvue will run the battery down to zero before disconnecting. The ‘variable’ means that the battery voltage at which it cuts off is selectable in the options. This is NOT the case for my old DR900X camera, but it must be an option on the newer cameras. I will set this reasonably high, as I want my batteries to be mostly charged. I need to have the black to ground, yellow (Batt) to 24v constant, and Red (ACC) to switched 24v ignition.
5.4.13 Generator / Alternator
The Army chose a 24v 100Amp generator for the Unimog, instead of the more usual alternator. There are several reasons for this, but primarily a generator produces very little electro-magnetic noise compared to an alternator. i.e. it would improve radio communications and reduce the Unimog's noise signature for electronic surveillance measures. A lot of the Unimog community consider the generator prone to failure though, and they replace it with a alternator of similar size. Mog Central, Unidan and Ultimate Mogs all have alternator replacement kits. I had thought that this was a simply like-for-like replacement - take one out, put the other in. I found it is not that simple. Without knowing all kits, it can mean brackets, pulleys and cable changes. While we can of course fit some solar cells, when traveling remotely it is the generator or alternator that be the primary source of electrical power. If it fails, and users indicate the generator is prone to this - then you are not going to far. I decided to get my generator replaced while it was in the Mog Central workshop. It did not need to do it, but I could not afford for it to fail someplace remote. (See also Generator Repair)
5.4.14 Radios and antennae
Ok, so the first question is: what radios and how many? In almost all outback driving you want to monitor a UHF radio. For most roads, channel 40 is used by the oversized vehicles to let you know they are coming. In some logging areas or limited width roads, there will be a UHF channel where people tell you that they are coming down the road. This means that you can pull to the side and let them through where safe. So one UHF is pretty important. But two comes in handy as you can monitor two channels at once. (or talk on one and monitor another). A HF radio is also handy to have in the outback. UHF only has a range of about 2-5km. HF is 100’s if not 1000’s of kilometres. (skip can let it go around the world, but unless you want to know the road conditions in Siberia, that is not really important for outback usage.) HF can be used via VKS-737 4WD Radio Network to connect into the phone service. Several other HF Radio Networks are also active across Australia.
I currently run a GME UHF CB radio in my Silverado, and I think it is great. I looked around various manufacturers and what people were putting into the 4x4s online. GME Radio site I decided on one of their 'Value Packs', but these are so similar that I actually ordered the wrong one. I wanted the one that lets you send your GPS location to other compatible units. This is the 390C Instead I ordered the pack with the handset that does not receive GPS. No big deal though, as I don't know anyone with a compatible set anyhow.
The GME XRS-370C4PG appears to offer everything I want in a UHF radio. $779. It requires 12v though.
This will only be powered by the 12v battery installation / charger via a 12v distribution panel located under the dash.
Installing the unit had three issues: 1) 12v supply (easy, via 12v permanent bus bar/ fuse panel). 2) where to mount the unit. 3) where to mount the antenna. On the antenna, I did NOT want it on the bull bar / front bumper etc. as the Mog itself would shield the signal to the rear. I wanted it up high, and folding down if it hit a branch. I decided on a mirror mount, with a folding bracket attached. However, before I could install it all, I got a roof rack from Mog Central - and this was even better.
I should say that I also have two GME 2 watt hand held UHF CB radios. These are great for when you are away from your partner, or when your partner is outside the Mog trying to give directions etc. Much easier than yelling, and much more distance. In a campground / caravan park, you can give directions from well away from the vehicle, without the rest of the camp hearing you.
5.4.15 Inverter
Allspark produce 24v inverters that are a lot cheaper than their 12v cousins. 3000 watt pure sine wave inverter. $799 (20250222)
There is a wealth of inverter products available, across a wide variety of price points. I want to be able to power anything that I can plug into a household outlet (240V 10A) - so that means the inverter should be at least 2400W. The 3000w class has many options available via a simple google search. Most of these are intended for 12v supply though. Enerdrive have great products that will 'pass-through' 240v shore power when available, create 240v / 3000w when shore power is not available, but also charge the 12v battery at 100A when shore power is available. They do have a 24v version, but this is 2800W, 70Amp charging, and $4,542 - more than $1500 dearer than than the 12v product.
Victron have a Multibus 24/3000/70 that can pass-through shore power, supplement shore power, charge 24v batteries from shore power, and also provide 230VAC at 3000W. This is $1,467.73 (20241005). Victron also have normal 24v 3000W inverters for $1,010.90 (20241005). While I do not anticipate charging the batteries from shore power, for $400 this is a great feature, so I think the Multibus product is the way to go. (Note, they also have products that include solar input also)
Just a word on cabling for a 3000w inverter. Even at 24v, 3000w is 125A. Allowing for some inefficiency in the product, call it 150A. The foot-amps table provides a guide to the cabling needed on both the power (24v) and earth (gnd) sides. In my case the inverter is some 8 feet from the leisure battery, so 8 X 150 = 1200famps => AWG 6 cabling or better is needed. As 150A > 70A, then this will also allow the charging current from the unit to the battery.
5.4.16 Battery Monitor(s)
I would ideally like to monitor three batteries: two wet cell, but able to be lithium. 2 X 24v both 600A, one 12V lithium at only 100A.
Batteries direct have a Hummingbird 4 way battery monitor. The RF part of this means that it can monitor the caravan batteries, in addition to the Unimog’s 3 batteries. It does not seem to show power, amperage, capacity or anything other than voltage. This does not seem terribly good. Only voltage, and only via $110 transmitters. Expensive for just voltage.
Ebay has renology 500A battery monitors. Larger than needed, and would need 3 separate ones, but only $99 for the whole kit.
I purchased 3 X Itechworld battery monitors.
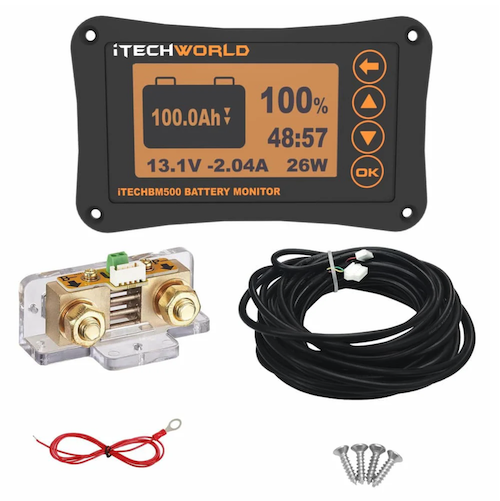
These Itechword BM500 Battery Monitors come with a shunt, some cable from the monitor to the shunt, a power cable and some screws. They can be powered by 12v, but also 24v (and 48v). It can monitor batteries up to 9,999 Amp-Hr. The Deltek 100d-730's I have are 100Amp-Hr, while the 12v lithium I have is 125Amp-Hr. It is not yet clear how I will mount these fellas. Photos of installations show them flush mounted to the 'electronics' panel.
5.4.17 Honda 240v generator
Yes, I understand people's hatred of campers running petrol generators at their camp all day / night long. However, I have camped several times where the caravan is under shade (no sunny spots available), and we have not been able to get our normal 120 amp/hours daily battery usage from the solar panels. We do get 40 or 50 amp hours under trees or on cloudy days, but not 120. We have 600 A/h of batteries, so one or two days battery drain does not worry us, but I wont drop the Lithium batteries below 50%. In this case, we pull out the petrol genny that I inherited. We generally only use this once or twice a year, but it comes in handy. Running it for 1 hour into a 70amp charger gives us 70 amp/hours, and that tops up the battery, while providing 240v for anything we want (such as the microwave).
We have the Honda EU20i generator. This is only 2000 watts, so it will not power all equipment. (A household powerpoint is 2400w or 10A @240v. This generator is only ~8 amps). It does however easily handle charging our batteries and any 240v items we have in the Mog or Caravan.
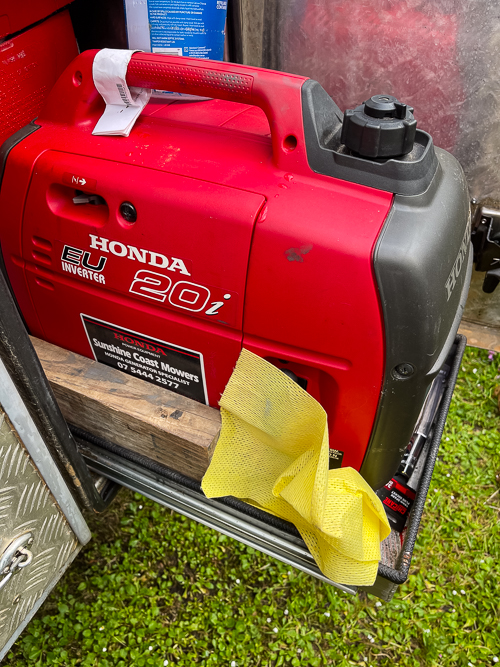
We could just run the Mog to charge batteries, and I know people who do this when required. I think the Honda is quieter than the Mog (@ 53dB(A) - by a long shot). At 70A charging vs 100A from the alternator (minus Mog equipment, so say 85-90A) - the Mog is slightly faster at charging the batteries. As I said, we inherited the Honda and therefore did not decide to buy it, but I do prefer it. Would I buy it again? No. You need to carry it (takes up space and weight) and you need to provide 4 stroke petrol for it. Everything else we have is diesel, so there is a 5 litre container especially for it. That is a lot of 'stuff' for something we have used twice (and even then, could have just used the two vehicle to do the same job).
5.5 Cabin / Fit out Mods
The following Modifications improve the habitat of the Unimog's cabin.
5.5.1 Door Pockets
The Unimog comes standard with a simple steel pocket on the drivers door, and no pocket on the passenger side door. The door is where the 'universal tool' is stored. Ultimate Mogs have Plastic pockets, that can be bolted onto the doors. The two big advantages of these are: 1) they can be put on the passenger door, and 2) they have two drink holders built in. They also have two universal tool holders as well.
5.5.2 Roof Console
Martin Godden produces a Roof Console that enables a lot of equipment to be fitted onto the roof lining. I got one to enable my wife and I to charge our phones & camera batteries, and contain the radio. The cabling for it will go up the inside of the drivers side A-Pillar, and inside it will contain a small bus-bar along with several 12v cigarette lighters. These in turn contain USB chargers (that can obviously be swapped out), that charge our phones, cameras, etc. I will post a video of its installation / fit out shortly.
5.5.3 Air-conditioning
I have driven in the Unimog when the temperatures are high teens (oC) through to high 20's. (oC) In the teens, the Unimog is fine. At high 20's it is acceptable. I doubt anything in the 30's would be nice though. For most outback travel, I think an air conditioning unit is required to be comfortable. More importantly, my wife told me to get it.
Unidan Air conditioning is available for $4950 not fitted (2023-12-01). This unit fits into the engine hatch. The nice thing about this is that it provides cup holders and some nice real estate for switches or gauges. Their unit is similar to what Defence put in the Air Force trucks, and I think they had some second hand Air Force air conditioners available also.
Several people have done do-it-yourself versions over the top of the cab. These are fairly standard truck air conditioning units, and they appear reasonably cheap, and not hard to install. However, in my case at least, these would obstruct the cupola opening, in that while they sit above the driver, the cupola hatch needs to sit there when it is open.
Ultimate Mogs have one that goes on the back wall of the U1700L with a bench seat ($4950) (extracted 2024-03-20). I am told that these are compatible with the standard seats, but are not compatible with ISRI air seats. If interested, I suggest talking to them to determine if it will suit your Mog.
Tom Hooper at Southern Cross Fabrications indicated (2021-20-27) that they are making one that will go in the dash of the Unimog, and is a replacement for the whole dash. I have seen his videos of this, and it looks fantastic. (look in the comments to his post for several photos & videos.) To date though, I have not seen any progress announced. Shame. Looks great.
5.5.4 Stairs
Johan Bester is a Unimog owner and fabricator. He produces stairs for the Unimog (and several other products) that can be mounted in a variety of ways. I purchased and installed a set of his stairs. (see video). They are simple to use, were simple to install and are a VAST improvement on climbing up the rear tailgate. I strongly recommend them. Stairs Installation Video Note in the photos below, I have 'man ropes' attached to the side of my stairs. These are not necessary, but we find them a nice addition. I am ex-Navy.
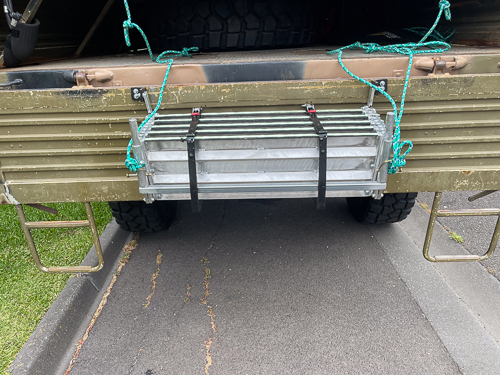
5.5.5 Sun shade visor
I don't know about other people, but I think the sun shades on the Unimog are the worst piece of rubbish that I have seen fitted to a car or truck. Not a hard mod: Replacement Sun Visor $120 each. I will fit Martin Godden's roof console before I look at replacing these though. I am not sure how much I will need a sun visor with the roof console in place.
5.5.6 Video
5.5.7 Camera installation
I want to be able to see down my left side (blind spot, but also tyre position), down my right side, behind the truck, and the hitch (for connecting hitch). That is four video inputs. I would prefer a 9 inch screen and 1080p resolution. If the system can record these inputs to a card, that would be nice. Elinz discount code $10offshopping.
5.5.8 Video Monitor
Elinz have a 9 inch camera that works off 24v and has 4 AV inputs. It is only 800X480 though. Amazon have the Camnex 9 inch monitor – 1920 X 1080 4 camera, dvd recording to 512GB TF card. $1372. My normal car (Chevy Silverado) has an Elinz 4 pin 2ch monitor 800X480 that sits on top of the rear mirror, and basically becomes the rear mirror. I love it. The normal rear mirror is useless as there is a canopy on the back, so the rear mirror just sees the window in the back seat. The monitor sits over the rear mirror, receives an input from a camera at the rear of the car, and acts like a rear mirror, showing what is behind the car. When the caravan is attached, a second video input on the display lets me select that, and it shows the view from the camera on the back of the caravan.
5.5.9 Rear vision camera
I cant see behind the Unimog I want to be able to use a ‘rear mirror’. That means some monitor mounted up high. It does not need to change when I reverse, but being able to switch video feeds (manually) from ‘behind’ to ‘hitch’ would be super handy. If I am close enough to the hitch to want to see it, then I don’t need to see ‘behind’ anymore, and vice versa.
I currently tow my caravan with a Chevy Silverado 2500HD LTZ, and it is this that the Unimog will replace (or augment). The Chevy is a 'ute' with a canopy on the back, so although it has rear windows and a central mirror - you cant see anything out of the mirror as it just sees the canopy. Over the top of the mirror is now a 'mirror' display connected to a camera on the rear of the canopy. It is brilliant: it works just like a mirror, but at night, it turns to infra-red, so you can still see out of it. When I connect the caravan, instead of just showing the van behind, I select 'V2' input, and I then see behind the van.
I want to have a rear vision mirror as per my Chevy Silverado. Same cable / set up. This needs a camera on the Unimog, a 12v source, and the mirror itself. The product appears to be an Elinz 7” clip on rear-view mirror monitor 2 reversing camera. $285 The equivalent that can be a rear mirror instead of attaching to one appears to be Rearview . It appears to have 3 camera inputs, 2 cameras, and be able to select from 2. So that is confusing. It operates on 10-32VDC, so should not have an issue operating off the ignition. The resolution is 800X480, which is less than I thought by looking at it – but it works. The mirror mounts to little stick on windscreen thingies. It is probably ok. It would be possible to adapt something better though. This could be rear vision for truck, and rear vision for caravan.
The camera for the reverse mirror of the truck needs to be close to 50mm. This camera gives a 60deg field of view instead of 120, so it is closer to a real rear view mirror. 60 degree ccd $79.
5.5.10 Rock / blind spot camera
The idea of these cameras is to be able to see where I am putting my front tyre. My wife hates skinny roads with large drop offs, and would hate some of the roads people go on. While I will try and avoid those roads - i am really not going to know about them until I am on them - and then I need to know & show her that we are safe with our tyre position.
5.5.11 Mirrors
The Mog mirrors are comprised of one tall mirror, with a reasonably large 'bubble' wide angle mirror stuck(?) to the bottom. The mirror can fold in and out, but is primarily adjusted by use of bolts at the top and bottom. The bolts can be used to adjust left-right, and if moved up or down on the poles, some rough up and down movement can be achieved too. I don't know how other people find these, but I need to move my head around a fair bit to see what is behind me, in the other lane, or where my wheels are for parking / reversing etc. I cannot seem to adjust them 'just right'. This is not a major issue for a single lane road, and while I need to be careful to triple check when changing lanes on a multi-lane road, they still work then. I would certainly prefer to have better vision though.
Hy-way Accessories (www.hyway.com.au) sell a range of truck parts that might prove useful. Maxi parts sell the mirrors. Shane Burke brought a set – they have the normal top and convex bottoms – just like I want. Check his page. I am not sure about indicators on them. Can get stick on indicators though. LED from the LED people.
Truck parts sell Britax mirrors for Hino – these are meant to fit on any pole that is 18mm-20mm. https://www.truckpartswarehouse.com.au/collections/mirrors/products/hino-combination-mirror-l-h-pro-500-series-2003-to-2007 The Unimog has 18mm poles – it means that some minor adjustment is required to keep the mirrors in place – modifying ‘the little plastic bumps off the bracket’ and / or using some thin rubber to sheet.
MogCentral Vexel Mirrors These are normal tops and convex bottoms, with the LED light built in. I have just purchased a set via online. I have not yet received them, let alone fitted them, so I can't comment on usefulness etc. Looking at them, I hope the top and bottom are separately adjustable. They appear to be.
5.5.11a Side mirror extenders
It would be nice to be able to see blind spots. Both for traffic, but also for trees / bush etc. Elinz also have several packages that would suit. 7” or 9” monitor. Up to 4 cameras. 24v compatible, so operate off ignition, mount on dash top. This could contain both side blind spots, and hitch camera. https://www.elinz.com.au/shop/quad-screen-reversing-camera-kit/6901 This also has recording to SD card. So 1) hitch, 2-3) both sides, 4) front bull bar area. Operate the screen normally in split screen mode. On reverse, show the hitch.
5.5.12 Heater Tap Valve
The Unimogs are designed and produced in Germany, and when they imported them, the continued the European practice of having hot water flow through the cabin heater. This means that the cabin heater is always, at least partly, on. In summer, this is overbearing. A simple tap from Mog Central turns this water off. The $49.50 kit comes with the hose clamps and it is quick to fit.
5.5.13 Tyre Pressure monitor (TPMS)
I need to monitor the tyres, and this includes the two spares. I am not 100% certain if I need them, but having 2 spares would make me happier. That is 6 tyres on the Unimog Then the caravan system also needs to be monitored. It has 4 tyres plus two spares. The caravan currently has a TPMS that includes internal tyres pressure sensors. They last about 3 years before needing the tyre to be removed from the rim in order to change them. External solutions are easier to install and have user changeable batteries – but they can also be stolen – and they need to be removed every time you change tyre pressures. I assume that they can also be knocked off if the tyre sidewall hits dirt / rocks. Neither internal or external sensors are a perfect solution.
I spoke to someone that installs car / caravan electronics full time. He doesn't think any of the car type systems work well. They all tend to loose connectivity with the sensor - especially on bigger cars (and not much bigger than the Mog). He recommended I look at truck based systems that have wired repeaters for underneath the truck and the caravan.
I looked at the ARB Linx system. While it looks like a good product - I don't have 12v as my primary system voltage, I don't have their fridges, I wouldn't be able to use their light controls for 24v (without extra relays for each device - defeating the primary purpose), etc. etc. While I like the idea, it provided no value for the Unimog other than the TPMS function, and, based on advice above, this was not what I would need.
Two truck based systems I looked at were: OBD2 (truck) and Tyredog. Tyredog had a large range of products, including 34 wheel B-doubles. Their TD-2700F-x system could handle 6 car (truck) + 6 trailer. Importantly, the system has a remote relay for the truck, and a TD-RY2700F series add-on trailer kits. The system is also both 12v and 24v, so I can use 12v on the Chevy & caravan and 24v on the Mog.
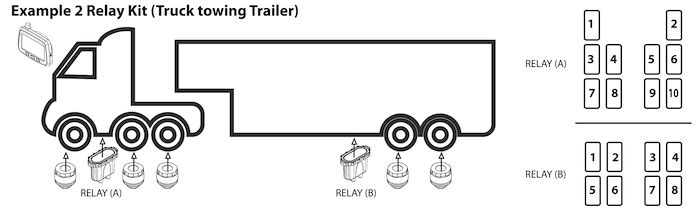
The basic layout shown above would appear to work. A relay under the Mog, plus one under the caravan. I messaged them the type of configuration that I wanted to do (two tow vehicles) and they suggested that I buy two TD-2700F-X06. If I understand them correctly, one display + relay + 6 sensors would go on the Unimog; one display (no relay, no sensors) on the Chevy Silverado; and one relay, 6 sensors (no display) on the caravan. Sounds good.
5.5.14 Cabin Steps (not stairs)
The Unimog has 2 steps either side for getting into the cabin. I am 186cm tall and I find the first step pretty high. My wife finds it too high, and I carry a collapsible stool for her to use to get into the cabin. (this then sits under the passenger seat). I would love a 3 lower step - but of course, if such a step was static, it would be hit by rocks, or when bogged etc. so quickly broken. Any lower step needs to move out the way of obstacles to not reduce the Mog's capabilities.
Unidan offer Triple Step Battery Boxes that look like a great option. The third step is attached with heavy rubber, so it will move out the way of danger instead of breaking. By containing the batteries, this also deletes the standard battery box and makes room for a fuel tank or something else. However, at $4,620 for a pair (extracted 2024-08-13). That is pretty expensive. Having two battery boxes would not only give you steps both sides, but also a second 24v battery location. The battery box - steps also sit further forward than the current battery box, which frees up that area for a tool box / fuel tank / etc.
Johan Bester (details above) manufactures a 3rd step that he sells (extracted 2024-07-12) for $350 each or $600 for a pair. Video of Johan steps. As shown in the video, these attach to the 2nd step, fold down when being used, and can then fold back up out of the bulk of the danger. Having to fold these back up is no worse than me having to fold up and put away my wifes current step. Plus, I believe that for most on-road type of travel, there would be no need to put these away. Even though this hangs down a fair way below the second step, it is still well above most rocks / bumps / pot holes. Leaving it down does involve some risk to damaging it, but I could replace one each year with the interest I would get on $4,620. I have not seen one of these, but having used Johan's stairs now hundreds of times, I can vouch for how well made they are.
Jason Firmstone not only added a third step to his Mog, but he also widened the existing steps. See Wider Access Steps for details of how he did this and several pictures. A very professional looking result.
Scott Davies is another Ozmog Facebook user that has developed some steps. Video of Scott's steps As per the video, these steps appear to be pneumatic or hydraulic, are auto opening and closing, and contain several steps. (While 3 steps are visible, it is hard to tell if these delete the old lower step or not.) Many people on Ozmog are keen to see these or to buy them, but I believe that Scott does not wish to manufacture them himself. I did see a post where someone indicated that they may manufacture them - but no details yet. The price / availability is therefore unknown.
MogCentral have developed a battery box / 3rd step also. This is a fairly new product. I had my Mog in at Mog Central in order to get the Overdrive fitted. I asked them to fit 2 of their battery boxes while it was there. I haven't had them long, but they appear perfect. The third step is about 125mm lower, and it has BOTH rubber and a thin sheet of steel ('tin'?) holding up the lower step. The steel sheet can be bent back into shape easily if damaged, and I guess they could be replaced in 10mins too if severely beaten up (but this would require more than a few hits). The black steel sheet makes the sides look nice, but also reduces the movement in the rubber holding up the steps. The steps themselves have a sawtooth type rough surface that provides lots of grip. They both contain 2 X Deltek batteries. A simple Allen headed bolt holds the battery tray within the battery box. Remove the Allen bolt and the inner trays slides out for any battery access.
I asked them to wire the drivers side battery box to the engine, and the passenger's side to the 'auxiliary' (but switched into the engine too), with 600amp isolation switches on them. In this configuration I can run the axillary lights / radios / fridges etc. down to zero and still have a starter battery at 100%. I can twin the batteries for charging, or for cold starting etc. If one battery dies for some reason - there is a full spare set ready to cut in, and finally, I can switch both battery sets to isolate in order to not have any power going to the cab / auxiliary circuits (both to ensure all systems off, but also as a theft deterrent). Ben put very large connector points at the top so that I can access power for my own electrics installs.
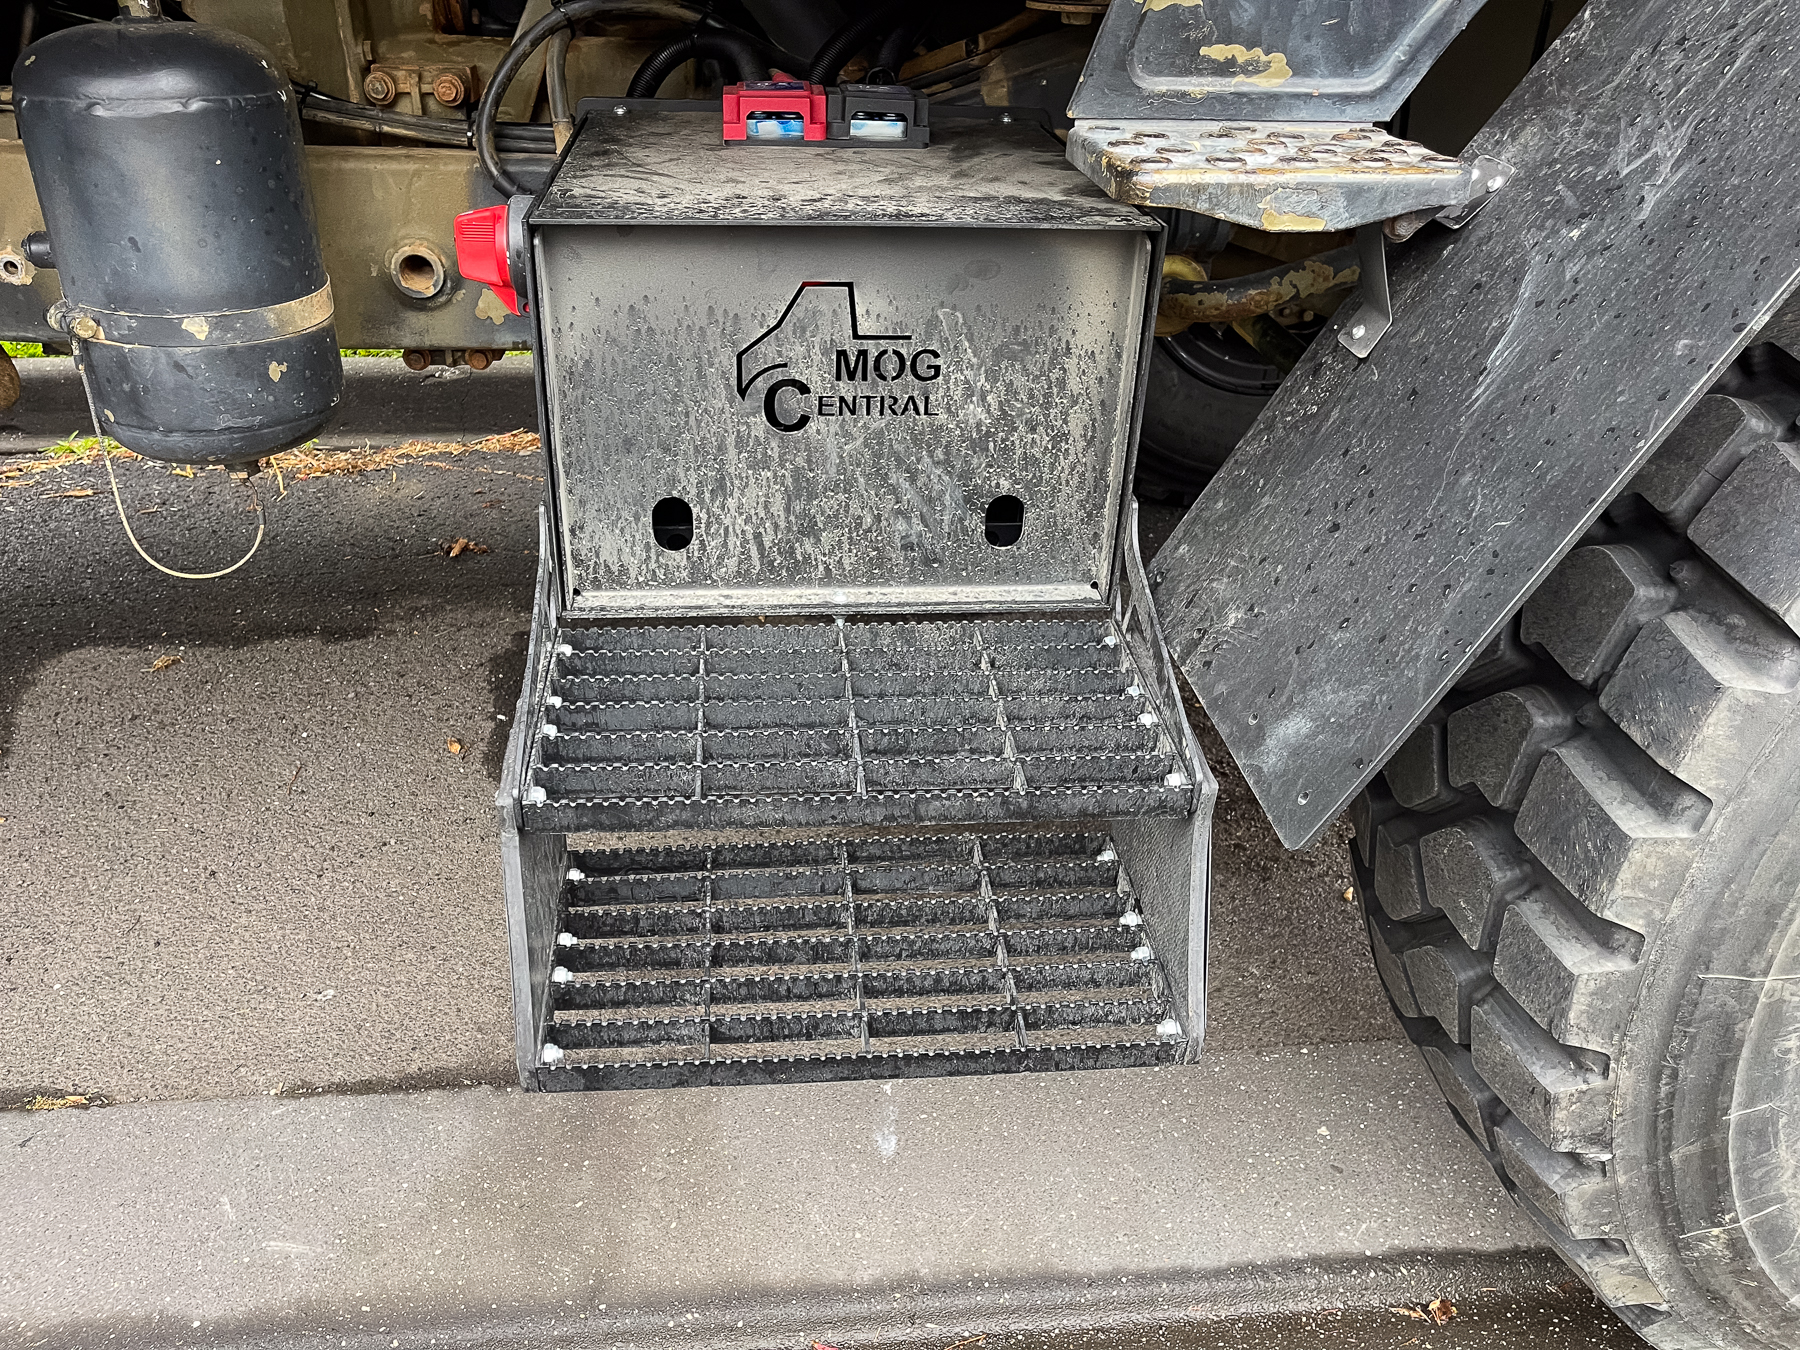
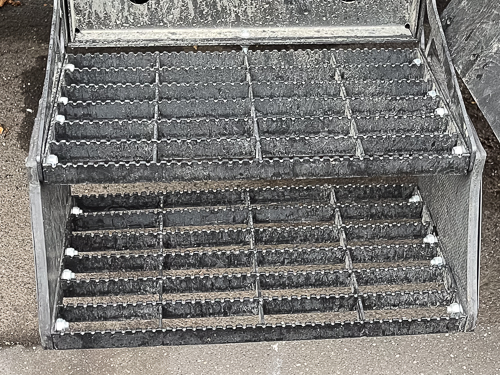
As can be seen from the second photo above, the steps (although dirty) have a very non-slip grip. The drop allows my short wife to reach the first step.
5.5.15 Roof Racks
I have been looking at roof racks for some time for the Unimog. This is a spot to store a spare tyre, store boxes, etc. but it is also a great spot to mount light bars / spot lights. I would however like to keep the cupola (roof hatch) and be able to use it - at times.
Unidan have Premium Scrub Bars that are a combination of cabin / windshield protection and roof rack. These are custom made though, so no details on price / availability. They do look well designed though, with snorkel protection, ladders, and a mount for a small crane to let you lower the spare tyre. The windscreen protection consists of two vertical bars, so this is obviously twice the protection of the single bars that I normally see.
A new reason has arisen for a roof rack. I put steps (battery boxes) on the Mog to help my wife get in. While the lower step of these boxes is just about right in height (not too high, but not too low), having mounted the steps she still struggles to get in due to the lack of handles up high. At Mogfest, we realised that the ladder for a roof rack would provide the perfect set of handles for both her and me. (I find getting in the drivers side easier than the passenger side). MogCentral have just started to produce a roof rack that has the ladder, but also allows the cupola to open. (I have not seen it, but Ben tells me that the cross bars are movable.) I am planning to put this on in early 2025.
5.5.16 Bull bar
I see plenty of Unimog's in pictures with great looking bull bars (they are called something different in the US - brush bars?). Now I understand that most animals are fairly low compared to the Unimog's front end, and that this makes a bull bar less important. However, I have hit several kangaroos, three wombats, a bunch of birds, etc. I have also had near misses on pigs, emu, camel and sambar (? big fellas) deer - none of which I would like to hit in the Unimog without a bull bar. Ignoring protection, they are also a great spot to mount aerials and lights.
Unidan do three different styles of Bull bar: the high style, low style and UGE. These are (extracted 2024-08-13) $8,690, $7,425, and price not stated respectively. The high style bull bar is the sort of bar that I would like. In this case it APPEARS to have incorporated head light mounts and winch plate. The website indicates: "THE ONLY ADR COMPLIANT UNIMOG BULLBARS IN AUSTRALIA!"; "Recovery Points: Designed with off road use at the forefront"; "Lighting Integration: With room for a 36LED Great White light bar and 2 x Blacktips LED driving lamps"; "Winch Ready: Mounting solutions for a Runva 20,000lb Winch or Carbon Offroad 20,000lb Winch"; and other features. If I wanted that winch, and those lights, then this might be an attractive option. While not cheap, it does appear a reasonable price. However, I already have a larger (better?) winch, with winch plate.
Southern Cross Fabworks also do a 'high style' bull bar. I have seen this available through Offroad tents for $10,000 (extracted 2024-08-13). While SCF are known for rock sliders, they don't list Unimog's on their own website. They are active on facebook though, and have certainly made some very interesting mods to their own Unimog.
MogCentral have started producing a new front winch plate that takes up to a 25,000lb winch, and is also a kind of a bull bar cross that incorporates new headlights.
Jason Firmstone's Dare to Dream website provides some great information on Frontal Protrusions (inc. bull bars, brush bars, winches, elephant ears, etc.) where he discusses what is and is not allowed.
5.5.17 Seats
Upgrading the seats is a common modification. Most people go one of two ways: 1) ISRI (or similar) air ride 'truck' seats; or 2) Ex-van twin passenger seats. Two air rides appear to be the most comfortable / adjustable, but they are only for two people. Fitting one air-ride and one pair of ex-van seats retains the 3 passenger configuration.
Mog Central have the ISRI air-rides for some $4180 (20240930) each. Unidan offer second hand non-air ride Mercedes Zetros seats on their website for $2,500 (20240930 on sale for $500, but out of stock). I thought that Unidan also offered the ISRI air rides, but I could not find it in a search of their site.
Note that many people have used various other seats, but they have had to manufacture their own seat bases to suit. They then need an engineering certificate to cover the installation. (You always need NHVR certification, but this is simpler if you use already approved components.)
You should also note that that it is my understanding that ISRI seats sit higher than the stock seats. If you are tall, this may be an issue.
For me, the existing seat is not all that comfortable, but neither is most of the cabin. I tend to get out and stretch my legs every couple of hours. I would 'like' better seating, but it has not yet reached high enough priority for my funding to cope with.
Seat Covers. Black Duck produce seat covers for the standard ADF drivers seat, and bench seat. These are a bit difficult to find on their website though. I found the Black Duck Unimog seat covers on PPD Performance Website $450 in a range of colours (20241005)
5.5.18 Fuel tanks
Unidan make a 240 litre. I will need to figure out where to put it. I think it replaces the current toolboxes.
Mark van Wijk posted on OZMOG that he 200L fuel tanks for sale at $500 each.
Ben at Mog Central might have different fuel tanks.
5.5.19 Roof increase
I have seen some raised Mog roofs with pretty good looking pockets etc. in that extra space. The roof box I have now will certainly go into a higher roof. I am torn between keeping the cupola - which I like - and sealing it over. If sealed over, then I could have a roof rack / platform up there (not sure about a wheel that high up) - but lots of good storage. However, with the cupola you really cant put anything on the roof as it would stop the cupola opening, or stop it clipping into the other side for storage when open.
Johan Bester has made a roof bars / roof rack thing with removable centre bars. This means that it can operate like a full roof rack, partial roof rack, or just roof bars as needed.
5.5.20 Scrub bar / roof rack / tyre winch
Bush bashing means having branches strike the front of the Mog. These might put scratches down the sides, but I wont be overly concerned at that. What I don't want though is a branch hitting the windscreen and busting it. 'Scrub bars' are normally about 25mm steel pipes at the side of the bonnet, that are intended to push branches away before they strike the windscreen. Lots of different (i.e custom) ones exist, and most tend to connect the front brush bar or bull bar up to the roof rack.
5.5.21 Under tray cabinets
Unidan do make these, but they are not on their website. I may need to make them myself, but I don’t really have the skills. I may want to design them, but go to a body maker that can make them for me.
5.6 Wheels (Rims and Tyres)
The Army shod the Unimogs with Goodyear Omnitrac 12.0 R20 (about 365/85R20) tyres. I believe that these are adequate road tyres, but both Army and post-Army Unimog drivers criticise them as being 'useless' for off road. Given I, and many other Unimog owners, buy the Unimog for off road, I believe that the tyres need to be changed. I will point out that I have little experience of the Unimog off road, on the OmniTrac or on other tyres, so my decisions are based purely on what others have said. There seems to be a vast array of choices that people have made on their replacement tyres, including monster 16.00 tyres.
A quick word about tyre age: some people are comfortable driving on very old Unimog tyres. I am not. Tyres have their manufacturing date stamped into them ('dot-code') in the form of week-year. e.g. 1421 meaning 14th week of 2021. Take a look at Why old tyres are dangerous, and how to tell the age of your tyre by Robert Pepper, a respected Australian 4x4 Auto Journalist. He talks of not using off-road or racing tyres after 5 years or so. I have always thrown away tyres before 10 years for cars, but before 5 years for my racing car (not that they tend to last that long).
- Goodyear Omnitracks 12.00R20
- These tyres are what the Army Unimog U1700L trucks come with. They are comparatively cheap, ok for tarmac (in my opinion), readily available second hand, and they fit the standard rims. Rumour has it though, that these are not that good off road. These tyres have diameter of 1133mm, with a rolling circumference of 3458mm (ref: Heuver website extracted 2024-03-12). That means that you get about 80km/hr out of them at a reasonable cruising 2500 engine revs per minute (rpm). Diameter = (2 X 12" X 100% aspect ratio) + 20" = 44" (1117.6mm diameter), 12" (304.8mm width), Circumference = 2 X pi X 22" = 150.79" (3510.3mm)*. * Note: this is the tyre circumference without load - do NOT use this to determine speed / distance of the tyre under load.
- 14.00R20 tyres
- There seems to a number of options for tyres in the 14.00 size. e.g. Big Tyre seems to have a range including the Advance ($1336, 1265mm diameter) and BKT earthmax ($1661) brands that are well known. These are about 10% bigger than the 12.00-20 size (1150mm for BKT) and this gives a higher top speed for the same engine rpms. There is definitely a question over whether they legally or practically fit the 10 inch R20 standard rims though. Their off road ability would depend on the tyre / tread - so variable. Diameter = (2 X 14" X 100% aspect ratio) + 20" = 48" (1219.3mm diameter), 14" (355.6mm width), Circumference = 2 X pi X 24" = 150.79" (3830.1mm)*.
- Michelin 395/85R20
- These may not be exclusively available through Unidan tyre Upgrades but many owners have purchased them from here. Unidan can also provide Hutchinson wheels to suit. This is important, as the Hutchinson are 'bead-lockers' that allow the tyre to run at extremely low pressures and still not come off the rim. Bead-locker rims need to suit the tyre though, and Unidan refurbish ex-US military rims to suit the Michelin tyres. I believe the Michelin tyres to be the most respected tyres available for the Unimog, but Unidan also have the cheaper Advance and Earthmax tyres. As at 2024-08-22, they are selling the Michelin XML tyres for $3,234 ea, Advance for $1,265 and BKT for $1,579.60. That means a set of 4 Michelin XML are some $7,876 more expensive than a set of Advance tyres. I do not *IF* they are better, or by how much, but I can say that an awful lot of Unimog owners buy these tyres, so at least they feel the difference is justified. Diameter = (2 X 395 X 85% aspect ratio) + 20" = 46.4" (1178.6mm diameter), 395mm (15.5") width, Circumference = 2 X pi X 23.2" = 145.77" (3702.6mm)*.
- Pirelli Pista P22
- Mog Central have Pirelli Pista 395/85R20 tyres as a package with newly manufactured bead-locking rims. These have a much more aggressive / agricultural / 'mud-tyre' tread compared with the Goodyear Omnitrac's, and these are 46 inch tyres compared to the 44 inch Omnitracs. This should add one inch (25mm) of extra ground clearance and about a 5% speed improvement for the same engine revs. I could not find any Australian reviews on the performance of these tyres. I do however rate both Pirelli and Michelin as tyre manufacturers. I have ordered 5 tyre / wheel combinations. Diameter is 1183mm with a rolling circumference of 3608mm (ref: Prometeon "Truck & Bus Tyres Technical Data & Regrooving" page 35 extracted 2024-03-13), which makes them 4% larger than the Omnitracs. The recommended rim is 10.00W. These tyres are tubeless with recommended pressures: tarmac 123psi, gravel 107psi, off-road 86psi, and sand 80psi. (Prometeon, ibid). While I do not know, I am guessing that these pressures are recommended for a fully laden truck though, and I think that slightly lower pressures would be better for my 5.5T Unimog. Most people on the facebook Ozmog group run around 60psi for road, and 30psi for off road.
5.6.1 Pirelli P22 tyres on new beadlock rims
Ok, the first thing to say is that brought these: Mog Central Forged 20×10 Alloy Beadlock rim with Pirelli Pista 22 395/85R20. Their price (2024-0-907) was $2,970 each (inc. GST and for both tyre and rim). I got six, so two spares. (see How many spares for why) Like other 395/85's - they require wider wheel arches, and longer wheel studs. Movie of them to come.
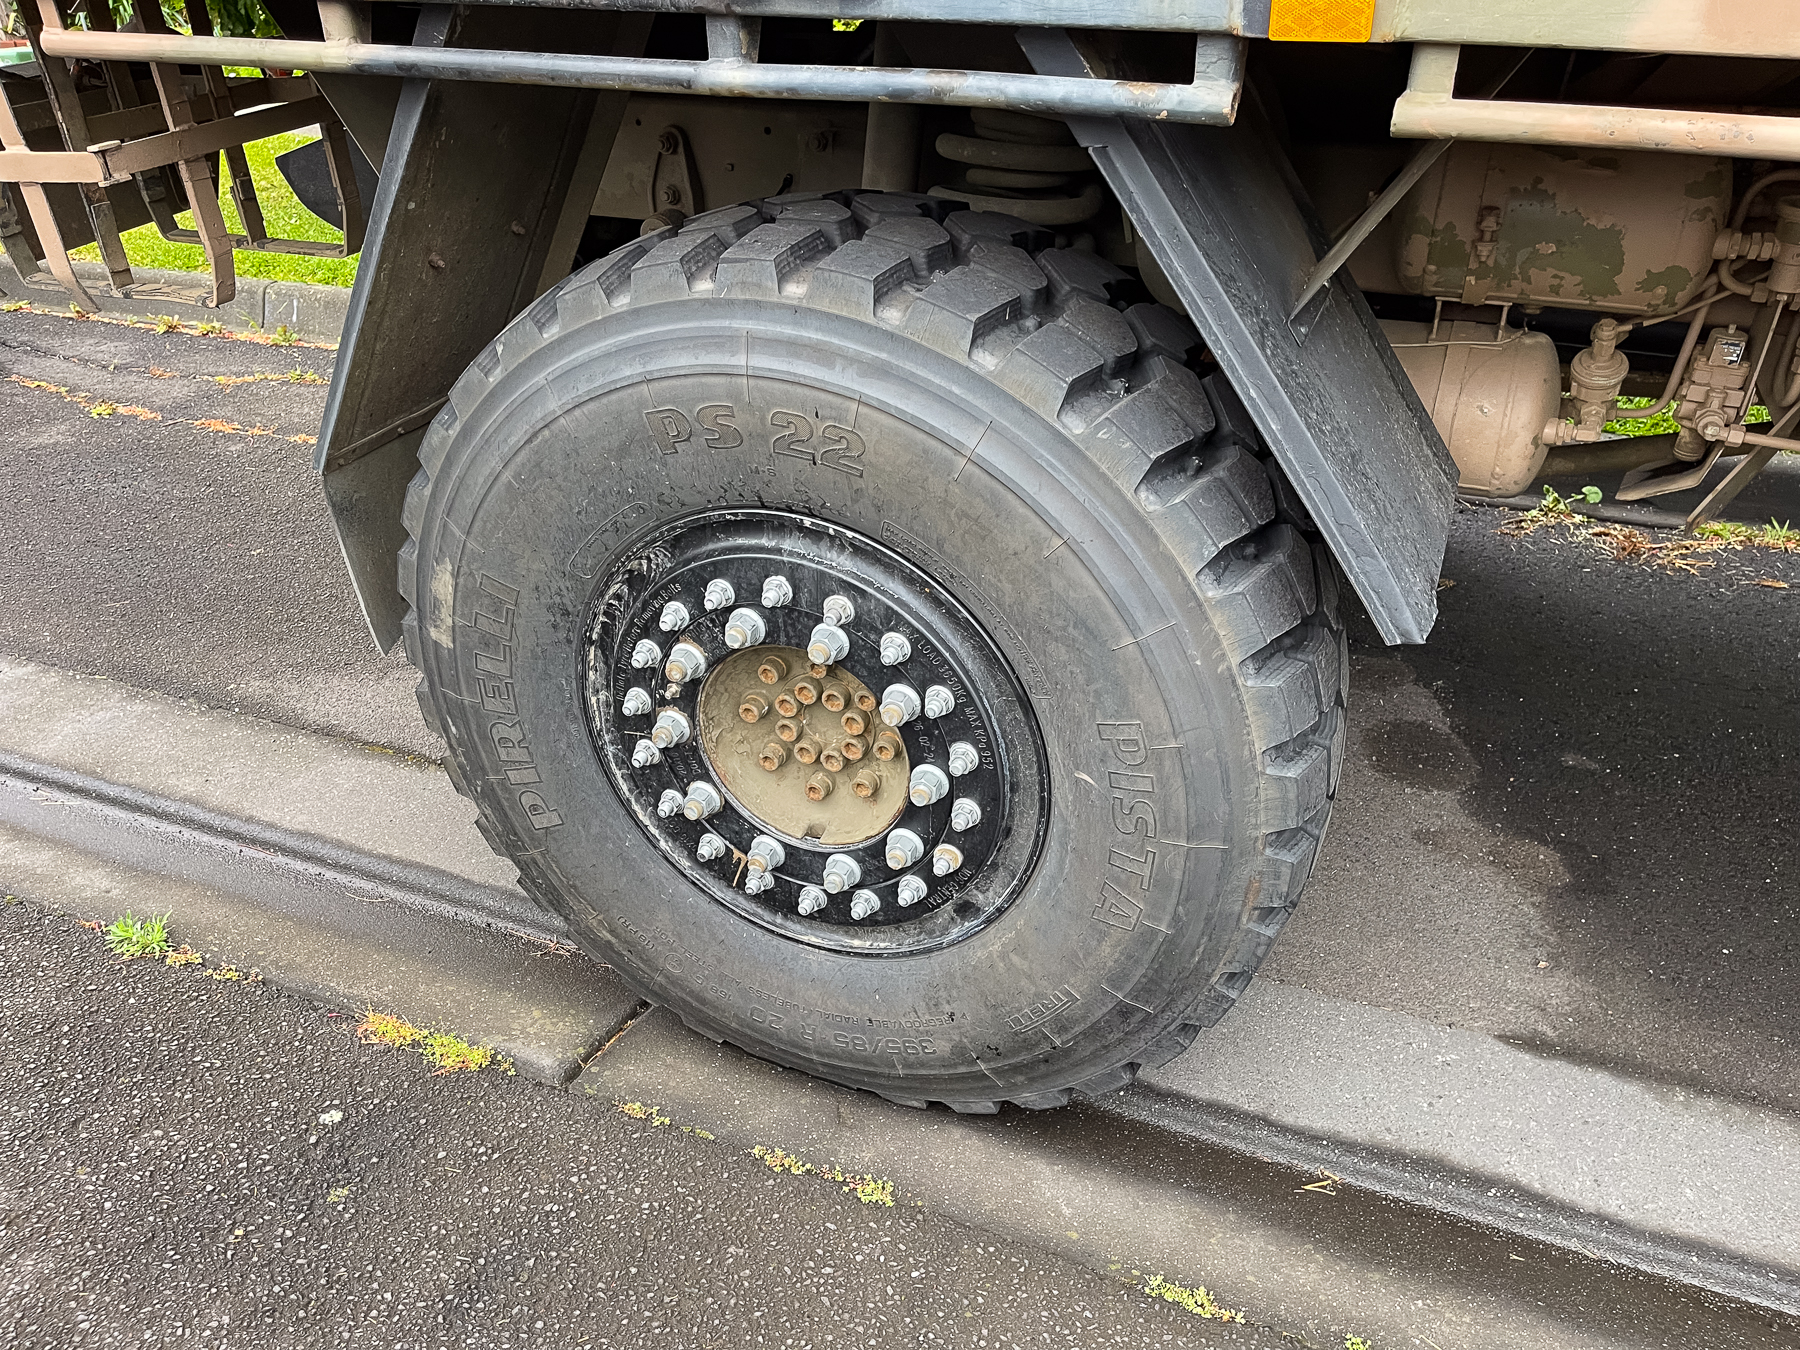
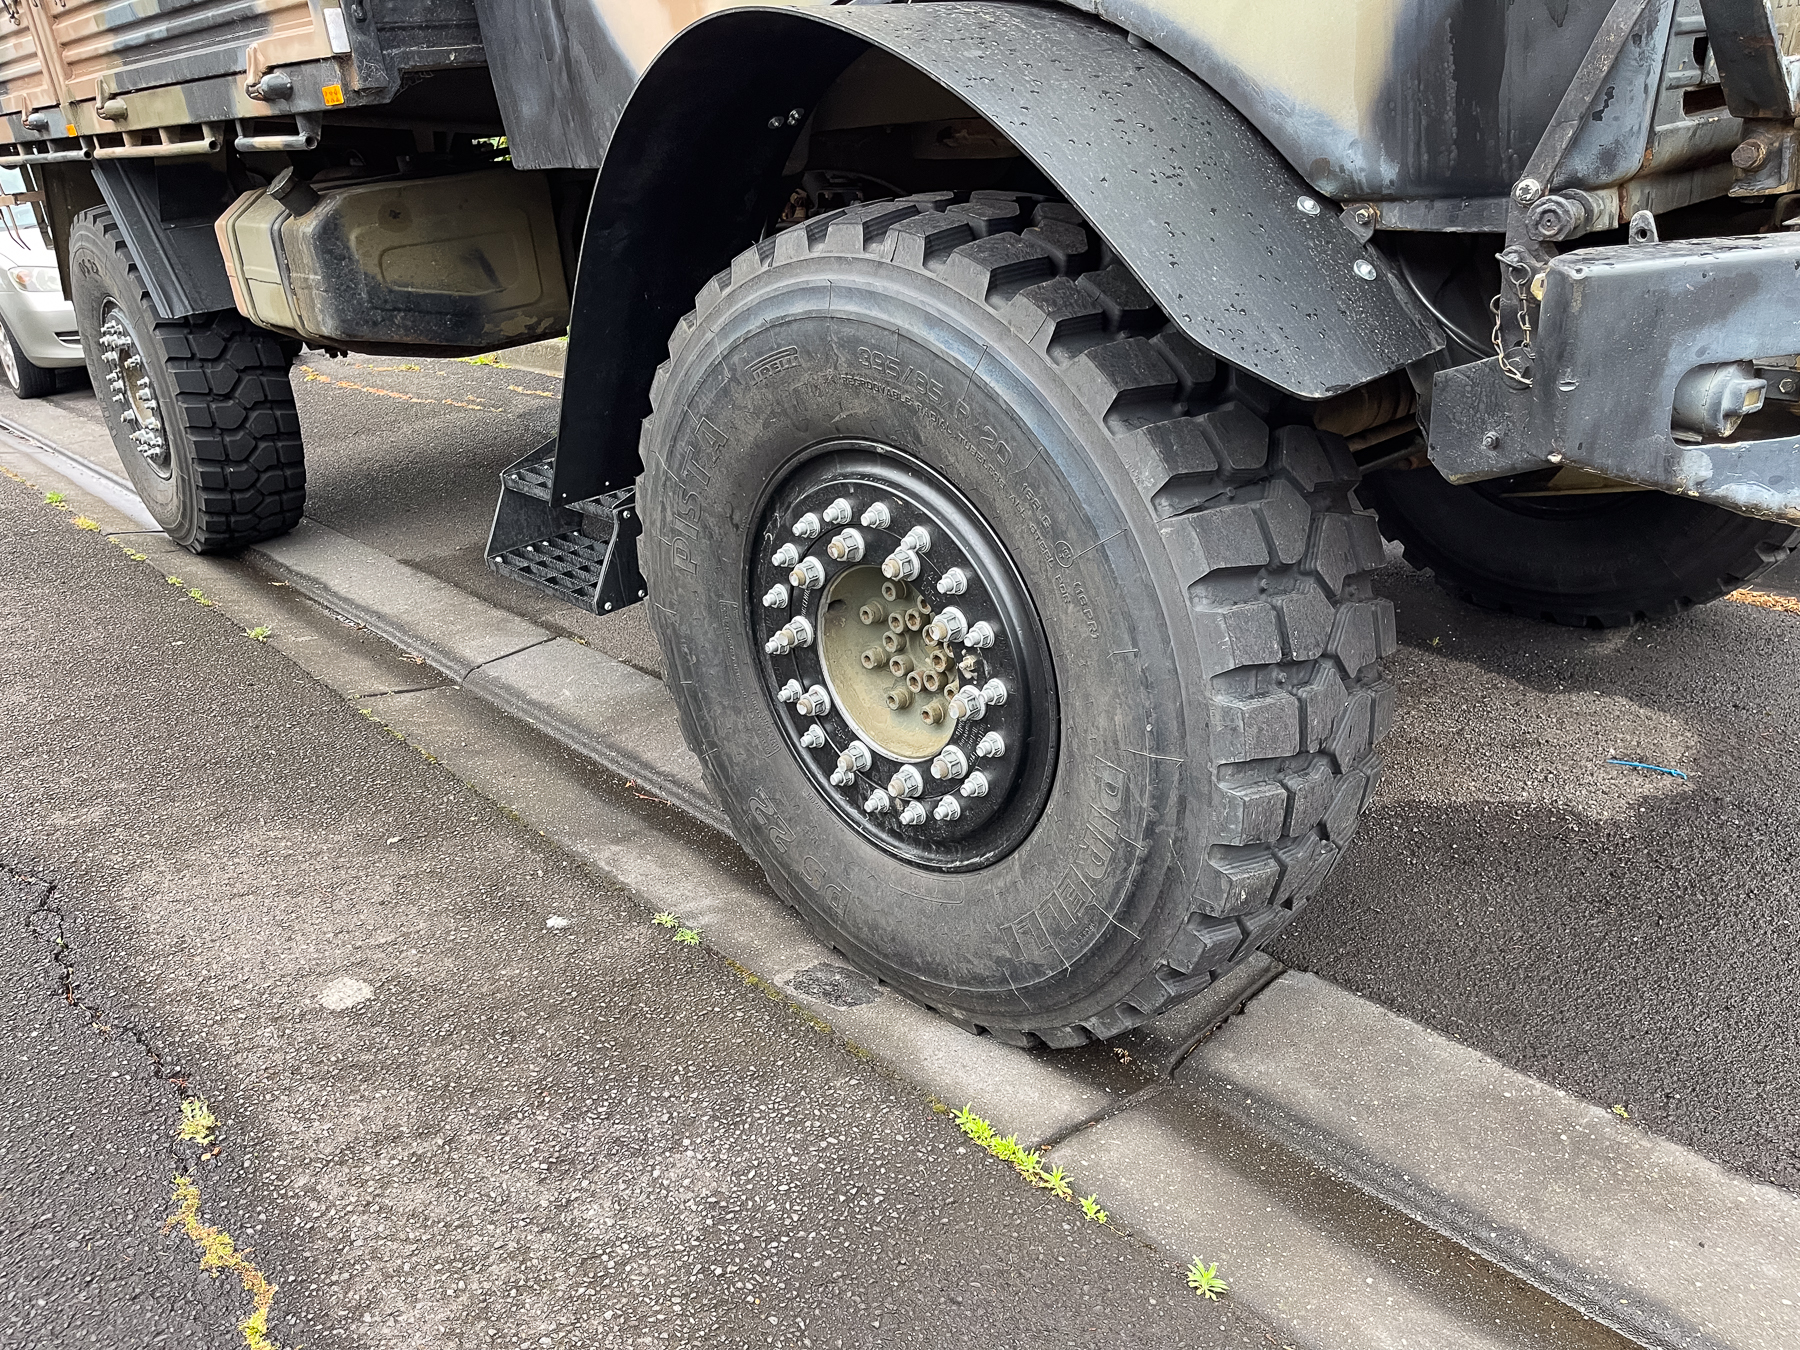
5.6.2 Winch for wheels
Some people have been able to fit the 395/85R20 tyres into the standard spare tyre location on the Unimog. This is on the passenger side of the vehicle, and just behind the cab. It comes with a tiny hand winch above it that works really well for removing the spare and putting it back in this location. I will try and put my new spare there, but it doesn't fit, then I will need a new mount in the cargo area. Lift and Lock have a small winch that can lift and hold 150kg. It is $150 (2024-10-15), and can clip onto the tyre. It can also be moved / removed to fit into a ring, or around something solid that can take the weight. Hopefully, the canopy hoops can handle this weight. I purchased one of these. It will certainly come in handy moving things, but I need to test it on the wheel. It MAY be able to lift it - but can it let me move it around??
5.6.3 Roof crane
Unimogadventures posted on Facebook (20240924) a short video of their roof crane. Basically, this is an off the shelf Splitzlifts roof crane from Healy Group that disassembles into a box on their roof, and can be assembled into a receiver that is welded into the roof rack.
Multiple receivers can be mounted (permanently) in different spots on the Mog, and crane can be assembled into any of the receivers. Unimogadventures indicated that they thought the model was a Splitzlift 900 - which the catalogue indicates can lift 900lbs (408kg). However, it can only lift this some 55cm. The more practical lifting position can lift 317kg some 118 cm. Unimogadventures indicated that they "specified it with a long enough strap to reach the ground, as the standard ones are a bit short", which indicates that the reach can be changed. Looks a great piece of kit.
5.6.3 How many spare tyres to carry?
In buying 4 Pirelli tyres on new rims, I decided to buy another wheel (tyre + rim) for a spare. Some horror stories on Facebook indicated that several people had let their tyres down for Offroad work, only to have the sidewalls punctured by stakes. (For those that don't know, Australia has many bush fires, and these burn small trees almost to the ground. What is left is a root system, with a hardy trunk growing up that diminishes into a tip. At anything from 5mm in diameter up to several metres, the 10-20mm (1/2 - 1 inch) versions are naturally occurring tyre stakes. They are about as strong as aluminium, and their tips are very pointed.) I had thought of purchasing a second tyre off the rim, with the idea that this could be applied to a rim if need be - but I created a facebook poll as to who had had punctures, and how many punctures. 73% of owners had never had a puncture. 21% had had a puncture of one tyre only. 6% had had a puncture of 2 tyres at the same time. Some good discussion occurred where the general thrust was that if you are using the Unimog on a farm / near home / road, then only one spare wheel is necessary. This is also the environment in which a puncture is rare. However, if you are traveling remote, and particularly unaccompanied, then 2 are recommended as it is these remote areas that have the hidden tree spikes that are so dangerous to sidewalls, it is also the area where you need to self recover. As this latter style of travel is what we are intending, I went with two spare tyres.
5.6.4 Where to fit spares?
The standard ADF trucks come with a spare wheel mounted horizontally on the passenger side, just above the gearbox. The also have a small winch that can lift the wheel off its 'bed', and lower it to the ground. (and do the reverse). There is some question on whether a 395/85R20 wheel will fit into the same location. On my truck though, with the new ceramic coated 4 inch stainless exhaust - there is no question. The exhaust passes above the gearbox where the spare wheel used to go. I now need to fit the spare somewhere different. As I have two spares, I need to fit two wheels somewhere different.
Fitting one spare on the rear wall. This is a standard 'expedition vehicle' location. The wheel is held high enough that it does not interfere with the exit angle of the vehicle. While it clearly would make the vehicle a bit longer, I have not heard of anyone being pulled up / fined / warned of this issue. The main issue is getting the wheel back down onto the ground.
5.6.5 Camber Correction
MogCentral sell a Camber Correction kit. For those that don't know, Mercedes design the Mog as a sort of agricultural do-it-all vehicle, and for use on farms / mines etc. it is useful to have a significantly positive 'camber'. i.e to have the bottom of the front tyres closer together than the tops (by 2.5 degrees). This is weird configuration. The only reason that I can see for it is when the front tyres are heavily articulated - such as one wheel going over a large boulder, or one wheel being in a deep rut.
For car racing / cornering, you want a couple of degrees of negative camber, and most cars run from about -1 to -2.5 degrees of negative camber to improve their handling in corners. Positive camber does not help cornering, but it does lighten the steering 'feel' especially at slow speeds and tight turns. In paddocks this is an advantage. It does however put a lot of pressure on the outside of the tyre - but in soft paddocks, that is not a problem.
We have the Mog as a 'go-anywhere' remote area tow-tug / camper, and when off road I am not upset by positive camber. However, to get to our remote areas, we need to traverse around 1,000 to 4,000km on tarmac just to get there (and the same return). Say 4-5,000km per trip average. Now I have not owned a Mog long, but I expect the tyres to last around 40,000 - 50,000 km (based on comments on the Internet about truck tyre life). I did post a poll on the Facebook OZMOG page, and I called it closed after 15 votes and 14 comments. The discussion was enlightening. Essentially, based on user comments, tyre life boiled down to two things: 1) weight and 2) how you use it. Those rocky hill climbs wreck the tyres, while sand and asphalt don't really hurt them. At light weights (i.e. no habitat / commercial load) several people were getting 100-120,000 km out of a set of tyres. However, 41% of respondents indicated less than 40,000Km. I can only assume that these were hard core 4 wheel drive tracks, or heavy vehicles.
At $1,375 each for 395/85R20 Advance tyres and $3,366 each for 395/85/R20 Michelin X-Force the cost of tyres is not small. Now, it is certainly debatable, but I think that the current positive camber means that the outside of the Mog's tyres wears much quicker than the inside, and that you could only expect about 80% of the normal life when driving on hard bitumen / asphalt. That makes the tyre cost about 125% times higher than it should be. I made up the table below in excel for me. Feel free to make your own table, but my view is that I can get payback on the $2,400 camber correction kit in only 157,091km. Given we do more than 80,000 km per year (down from over 130,000km) - that is about 2 years. It would be about half this if we used the more expensive Michelins. Now of course, if you say that you get 60,000 K's out of your tyres, or that the wear rate is only x%, then these numbers are going to change - but anyway I cut them, we are getting payback on the install. Time will tell.
Also note that the camber correction kit only works on the front two tyres. Yes, I know that you can get more kms out of the tyres by rotating the tyres, but this merely means that you wear 4 instead of two - so it doesn't alter the wear rate or mathematics. Please make up your own table, and use your own circumstances and assumptions. I know that some people just use their Mog on their farm -- no hard tyre wear, then likely no need for the kit; others only do local 4x4 tracks etc. The driver (pardon the pun) for us is that we need to drive to Cape York, Macdonnell Ranges, Karijini, Gibb River, Simpson, Oodnadatta etc. before we get to use the Mog as a camper / 4x4. However, you should also note that MogCentral are selling the Pirelli's now, but are unlikely to supply them in 2 odd years. The use of Advance or Michelin tyres would change the calculations.
| Tyres | 2 | $1,375 ea | $2,750 | for 2 tyres |
| Tyre Life (normal for tyres) | 45,000 km | $0.0611 | cost per km for tyres | |
| Tyre Life (with no camber kit) | 36,000 km | $0.0764 | cost per km for tyres | |
| Camber Kit | $2,400 | Capital Cost | ||
| Km to recover camber Kit cost | 157,091 | kms to save $2,400 | ||
| Wear life | 80% | |||
| Cost increase | 125% |
5.6.6 Blatson Wheel Loader
If two wheels need to be loaded, and onto the tray, then Blatson may have the answer. See video below.
There is very little available on this product. Blatson have a website - but only in name only - it is basically content free. Facebook forums are intrigued by the videos / photos, but no one seems to have seen or installed / purchased the product. I have sent an email asking them for information. My two biggest issues are: 1) the tyres in the video appear to be smaller than 395/85/R20; and 2) the loader appears to be wider than the Mog. It is also pictured without the sides and canopy - so just how wide is this??
5.6.7 Mog Central single / dual tyre loader
While Blatson load the tyres onto the tray, Mog Central have a solution where the tyre hangs out the back. MogCentral Tyre Loader. In this case I have seen the loader for a single tyre, but I was under the impression that it could not handle 2 395's. The tyre is held vertically, and lifted up by the winch. Solid Pins then hold it in place about level with the bottom of the tray, but behind, and outside, the tray. This clearly has the advantage of not using any tray space (or accommodation space if there is a habitat). Ben in a video talks of 2 tyres or a motorbike - so perhaps things have changed or I am wrong. I will find out.
5.7 Painting and rust control
5.7.1 Painting the Unimog
The base model Mercedes Unimog appears to be painted in the standard Bronzegruen Matt DB 6431 which is RAL 6014 #474135, RGB 71%, 65%, 53%, CMYK 0,8.5%, 25.4%, 72.2%.
NATO RAL 6031, RAL 6031-F9, or depending on who supplies the paint. It is 16% Cyan, 0% Magenta, 20% Yellow and 66% Black. (RGB 73,87, 70 or #495746 Hex)
A brochure says it may be painted in RAL 1011. In the US, it is RAL 1027, with RAL 1011 being a special colour.
How to find Your Mercedes Benz's Paint Code:
Paint codes can be found on the radiator support, on the underside of the hood, or inside the driver side door jamb. Normally the paint code will be three numbers, but older codes might be prefixed with DB. Well, I don't know about other people, this did not work for me. I know the Mog's were built in Europe, and then modified / finalised in Australia. As the modifications were painted, they were clearly painted in Australia, but I also expect that they were painted in Europe prior to shipping to Australia. The contract for these would have been a standard ASDefCon contract, in which case the paint job would have been custom. Of course, OVER the 'base' paint job, the ADF applied its Infra-Red Camo paint. I am not interested in the IR paint (which is not available anyhow), but Protec provide the non-IR version of the camo paint. It's the colour of the base coat that interests me. I will paint the cabin in this base coat colour to retain its original look.
5.7.2 Air Compressor (for painting)
What air compressor is needed?
The chart below indicates minimum 16cfm @ 90 psi. Other forums indicate 20cfm @ 100psi – but those are similar. Within the chart, the spray gun icons only indicate 6-7 cfm @ 90 psi – so it is not clear why they say 15.8. The tank capacity is not a major issue.
Total tools has a more text based system, but they indicate that 90 psi will cover virtually anything, and that 10cfm covers most tools, but spray guns require 12-14 cfm. Divide l/min FAD by 28 to get cfm. This means that I need around 280 l/min for most tools and 330-400 for spray painting. I cant see any 2 or 2.5HP devices that cover this. Note that the chart above says 6-7cfm for spray guns, which is only 170-200 l/min.
The total tools Iron air 100L, 3.0 HP TTD16100OF is a 10amp plug, 200l/min free air delivery, 85-115psi machine. It does have a 100L tank though. This is a barely adequate flow, but with 100L tank, it should be able to handle short painting bursts well -- and it is unlikely I will be able to paint for much more.
The 18100OF model looks very similar, but is another $200. It is 260l/min free air delivery. This is better. Still 10A plug. 2 X 1100 watt motors. 145psi max.
The ITM 3.0HP unit requires a 15 Amp plug.
Ironair 50l 2.5hp 2 Coupler Belt Air Compressor Tb1350det https://www.totaltools.com.au/126692-ironair-50l-2-5hp-2-coupler-belt-air-compressor-tb1350det This is only $489. 190L/min FAD, 10 amp plug, adjustable 85-115psi. a website says U-Pol state that you need a 8 cfm 40-90psi compressor to get the job done.
The Raptor FAQ says: “WHAT SIZE AIR COMPRESSOR DO I NEED TO SPRAY RAPTOR?
“A 6 HP compressor that generates 150 PSI line pressure should provide sufficient air supply, but is dependent on the application equipment / gun (Shultz type or gravity feed HVLP) used to apply the RAPTOR.” -- well I am not going to get 6HP from a 240v 10 amp plug.
5.7.3 Protec Camo paint
(http://www.mapleleafup.net/forums/showthread.php?t=12627)
Protec Paints are the current suppliers to the ADF, and their Mil Enamel has some excellent properties (http://www.apas.gov.au/PDFs/0165.pdf ). Scroll down and read the specs for oil proofness and weather resistance! Unfortunately, their Mil paint only comes in 5 shades; Green, Black, Tan, Pilbara red, and Desert Tan. The following document provides details on the normal / adf paint coating. The paints are available in 4 litre containers. Easy clean up, prep and recoating.
http://www.ppgcpc.com.au/images/uploads/tech_data_sheets/342_CAMOUFLAGE_ENAMEL_TDS_15-09-20182.pdf
PRODUCT DESCRIPTION
A low gloss, heat and petrol resistant alkyd finishing enamel with specified Infra Red Reflectance (IRR) properties for use on service vehicles and equipment to provide a disruptive pattern (DPP) system. Approved to APAS – 0165/1
AVAILABLE COLOURS
342-1166 Camouflage Green
342-5265 Camouflage Brown
342-7165 Camouflage Black
342-5239 Camouflage Pilbara Brown
342-5726 Camouflage Light Tan
https://paintmobile.com.au/search?type=product&options%5Bprefix%5D=last&q=ppg+342
Paintmobile stock the PPG 342 paints. Camouflage Enamel Green Brown and Black. 400g spray cans $32.95 John Citizen brought about 5 of each to do his truck. That’s about 2 litre of each paint. They also sell cans 4 litre for $139.95
5.7.4 Raptor Paint
I should say that I am NOT going to paint my Unimog as some expedition vehicle. I am going to keep it as 'an old army truck'. That said though, I want to able to take it bush and not worry, and I don't want it to rust any more than it has already. I will Raptor coat exposed surfaces, even if I then put camouflage back over the top.
Raptor is a two pack paint. The professional spray gun allows the paint to be thin – paint like, or thick texture like. They set the spray gun (adjustable) to 40psi, with the tip turned 4 rotations out. The gun is held at 10 inches from the work surface, and sprayed with a 50% overlap. The paint can be reduced (thinned) with U-Pol System 20 reducer. They then use a HVLP gun to create a more matt finish. In https://www.youtube.com/watch?v=-IeIWWjoQlw&list=PLP4NuvXrMqzS6FIwRfiWuI4M3xsgdDaRn&index=6 they recommend raptor thinned at 20% with system 20 thinner, and sprayed with a HVLP gun using a 1.6mm tip.
Their anti-corrosive primer can be painted on bare metal (buff it first with 180 grit or red scruff pads). Two coats should be used with 5 mins between coatings. Painting with top coat can occur after 30 mins. (if more than 12 hours has elapsed, abrade the primer with 400 grit sandpaper to achieve adhesion.) Once activated, the can lasts 4 days. https://www.youtube.com/watch?v=OvK5YjDJmug&list=PLP4NuvXrMqzS6FIwRfiWuI4M3xsgdDaRn&index=2
5.7.5 Rust repair
The Unimog has lots of minor rust showing through. These need to be fixed or they will just keep growing in size / looking ugly. I do NOT intend to make everything ‘like new’ – but I do want to ensure that it will not decay in any way. i.e. that it is serviceable and sound.
Step 1 Get to bare metal.
The rust spot will have good paint covered metal around it. You need to clear away the paint and expose the metal so that you can see exactly what you are dealing with.
Step 2. For minor surface rust - clean off surface rust.
Most of the rust will simply be where the paint has been scratched, and the metal has been exposed. A light rusty surface appears. This can be sanded off. A dremel tool (small spots) or Ryobi battery die grinder can be used with either an abrasive wheel or a wire wheel to clean the spot up.
Step 2 – alternative – minor dents.
Often something can hit a panel and cause a dent, which can then rust. This is the sort of branch scrap or car park dent. First you need to remove the rust, then you can fill the dent with ‘bog’ or body filler to get it right.
Step 2 – alternative – For rust holes.
The big issue here is that the rust is on BOTH sides of the metal and through the metal. You need to fix both sides AND the hole. If you cant get access to one of the sides, then might be in trouble. I know I have two holes in my cupola, and I may have a hole in my windscreen surround. After cleaning both sides, I will try using a Mig welder to deposit metal on the edges of the holes and fill them. Thankfully, the holes (that I know about) are only 2mm or so in diameter. A piece of aluminium or copper held on the other side should stop the molten weld metal falling through. I then need to figure out how to paint the other side.
Step 2 – alternative - large rust areas.
If the rust has eaten through areas of the panels, then you cant ‘fix’ the panel – you need to replace the area. This means cutting it out and putting in some new sheet metal via mig or tig welding. I have not seen any such areas on my Mog, but I have not lifted the floor mats yet.
Step 3. Use some phosphoric acid to ensure all rust is gone.
Ok, you are worried about ‘acid’. This is not a powerful acid and it turns rust into metal (Iron Phosphate). You typically buy it in automotive stores or hardware stores under brand names that say ‘rust remover’ or similar. The bottom line is that you put some on, leave it for a hour or so (you should only use it fix very fine surface rust – NOT deep rust holes) and then remove it with a slightly wet rag. Clean the area with grease remover.
Alternative and better Step 3.
I watched a YouTube video on repairing rust. https://www.youtube.com/watch?v=Iu2TD3OUI3Q In this video (minute 6:19), Edd China compares various anti rust products and shows that Evapo-rust is a completely different product to the bulk of the anti rust products. The others are based on Phosphoric acid, and the convert rust to Iron Phosphate – the black surface. Evapo-rust actually turns rust BACK into metal! And it is pretty quick. I then found videos that showed that Metal Rescue gel is easier to apply than Evapo-rust gel, and potentially better. I brought one can of Evapo-rust gel from Repco – it is all that they had in stock. I have since found it in several stores. It seems to work well, and be easy to remove. I have not tried it on badly rusted areas though.
5Step 4. Etch primer.
Make sure it is a non-acrylic primer. Acrylic primers are used for cheap paint (the fence) not for cars. Primer dries fairly quickly and you can give it a second coat only 20 mins or so later. Give it a couple of coats. Make sure you are happy with the finish.
Step 5. Paint when ready.
5.7.5 To prepare rusted surfaces – i.e. the Unimog:
- Remove all loose rust or flaky material with coarse abrasive or a grinder.
- Remove all loose rust or flaky material with a coarse abrasive or a grinder.
- Use a sander to remove any light rust or surface rust with coarse abrasive like 60-80 grit to remove any imperfections.
- Once abraded, thoroughly degrease.
- Activate and apply RAPTOR Epoxy Primer according to TDS.
- 2-3 coats should be applied, with a gun, an aerosol or a roller.
- From 60 mins after application of the final coat, up to 7 days, the Epoxy Primer can be directly over coated with RAPTOR.
5.7.5 Where to buy Raptor, and what to buy
Olarenshaws paint shop is in the western suburbs, just off Ballarat Rd, and appears to be an automotive paint specialist supplier. https://olarenshaws.com/automotive-paints.html They are able to tint the Raptor to my colour. I will need to take the jack into them and leave it for a few days though to let them do the matching. They have lots of knowledge and are helpful – but also have lots of people doing custom jobs going there, so they are busy. They asked that I ring about a week before I need the tinted raptor and advise them that I want a tinted kit + adjustable gun + 2 pack thinner. This would give them time to restock as required, and hold for me. They had the black 4 litre kit in stock when I was there, and also the Raptor roller kits + measured mixing cups. I will measure up small amounts and paint the underneath via a number of mini paint jobs using the roller.
5.7.5 Painting Process
5.7.5 Etch primer
Raptor sell this in a can. It is probably available in tins too. On the video’s they use U-Pol acid #8, which is not exactly the same as Raptor etch primer. Not clear on the difference.
5.7.5 Undercoat
Use Raptor undercoat. Apply two coats. Most of the Unimog can be done with little roller. Spray painting the undercoat.
5.7.5 Raptor top coat
Two part mix. Can obviously do this with one of their rollers when working on the underside. For the top coat though . . . Protec camo spray paint may then be used on top of the raptor.
5.7.5 Sandblasting
Bunnings has this https://www.bunnings.com.au/ozito-23kg-portable-sandblaster_p6290557 It needs 80-100litres / min @50psi. I need to check out total tools. They have tools for $60-$160, but they also have the replacement nozzles and grit. Total tools also has products and 5kg soda media. Looking at YouTube comparisons of soda vs sand / glass blasting – it appears that soda is more gentle, and great for paint removal where you want to keep the metal ‘untouched’. Soda wont really harm / remove rust to any degree. Sand on the other hand will remove rust, albeit slowly. The overall impression from these YouTube demonstrations is that sandblasting is very very slow with home type products, and even slow with top quality professional products. Both use a lot of media, but in the professional case, it is easy to sweep up and re-use the media. In small home areas, that is probably not practical.
5.7.5 Spray gun
https://www.supercheapauto.com.au/p/blackridge-blackridge-gravity-feed-spray-gun-hvlp-600ml/572924.html#q=spray gun&lang=en_AU&start=5 600ml tank, HVLP $99.99 Olarenshaws have a better range of guns. I will buy one from them. Note that I need a lot of thinners to clean the gun.
5.7.5 Air compressor. (for Painting)
I would prefer it to be 3HP+. Total tools do a colt 3HP 50L one for $999. 320L/min, 205L/min. 240V, 10A, oil free drive. Repco has the Antlia 2.5HP, 116psi, 180L/min, 40Lite tank. For $450 they have the Chicago 2.5HP, 235L/min (8.3cfm), 50L tank. 10Bar = 145Psi. Also Antila 2.7HP 190L/min 50L tank, 190L @ 8Bar (116psi). $587 Edisons has the Unimac ACM-500s for $499. 50L tank, 86-116PSI, 200L/Min. Oil free. 10A plug. It has free delivery. Total tools has an Ironair 100L 3.0HP 240v 10A, oil free compressor for $899. 6-8 bar, 85-115psi. 200L/min
Lacking a shed or the room to build one - and also lacking the ability to strip the Mog, drive it into a rented booth, paint it in a day and drive back out -- I have decided I need to paint the Mog: 1) in little bits - a section at a time; 2) in a paddock, or bush camp. Somewhere I am not going to get any over-spray onto a neighbours car or house. This means that the pump will not be powered by 240v 10amp mains. I have a 2000w Honda EU20i generator. This needs to be the power source. That limits the air compressor to (2000w = 2.682HP) about 2.5HP. Total Tools have a IronAir 36L 2.0HP SUPER QUIET DIRECT DRIVE COMPRESSOR TTD1240AL $499 (2024-11-19) that has 140L/min of Free Air Delivery (FAD), 85-115psi (6-8 Bar) pressure and 36L tank. That tank will not let me do long paint runs, but I very much doubt that I will do that anyhow. Duty Cycle is not stated, and would be important - but I don't have a big duty cycle anyhow :-) . HVLP car spray guns require around 20-30 psi, conventional spray guns around 40-60, so the pressure will be fine. However, HVLP spray painting requires around 8-12 CFM (1 CFM = 28.3 L/m) (226-339 l/m), and conventional 10-15 CFM (283-424 l/m). This means I won't have the air delivery to paint much - nor the reservoir size to compensate for the low air delivered by the compressor.
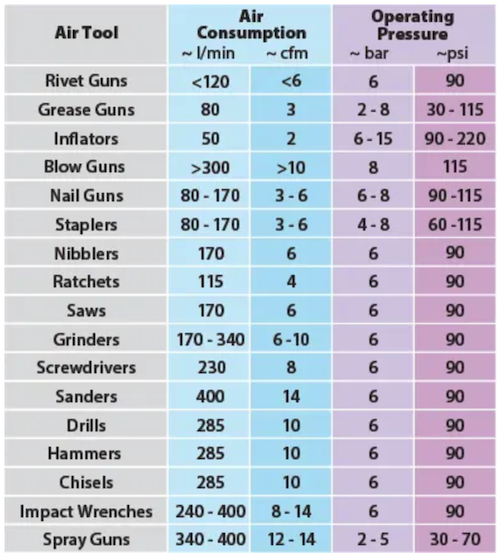
5.8 Lights
Now the first thing to say here is that I see a lot of rubbish online about lights. I see people making all sorts of claims that, from an engineering point of view, cannot be real.
Basically, lights consist of three key parts: 1) the light source or bulb, 2) the reflector, and 3) the lens. The light source's job is to produce the lumens (light volume), and the job of the reflector and lens is to determine where this light goes. Without the light source producing light (lumens or candela), the reflector and lens can't do anything. Light sources: halogen and led for us, have physical limits. Some are better than others, but nothing escapes physics. Once the light source has produced X candela of light, the reflector points this forward, and the lens then determines where it goes. The reflector-lens combination may spread it wide (e.g fog lights), everywhere (e.g. working lights), or point it down the road (e.g. driving lights) - but if it goes in one spot, then it means that there is less light to go in other spots.
I have never seen a perfect light. My old 100W Cibie Super Oscars put a lot of light down the road, but were useless to the sides. I have some nice fog lights - but their light goes onto the ground just in front of the car, and to the sides. I cant see 20m down the road with these. I view all lights as trade offs.
Night Operations, Convoy Lights, Black-out Lights, etc. In addition to the normal car / truck lights, the army installed a second set of lights. These are referred to differently depending on the branch / experience of the person, but they are intended for use when it is possible that an enemy might spot the truck (or convoy of trucks) and attack. Basically, the normal lights are 'locked-out' to avoid inadvertent operation, there are no real head lights to show the way, but instead two masked front lights, two masked rear lights, two masked brake lights, and a convoy cross light. The 'masks' mean that these are only visible from right in front of, or right behind the vehicle, and at the right height. They allow vehicles to SLOWLY follow each other down a road, without, hopefully, anyone at the side or particularly above seeing the lights.
5.8.1 Headlights
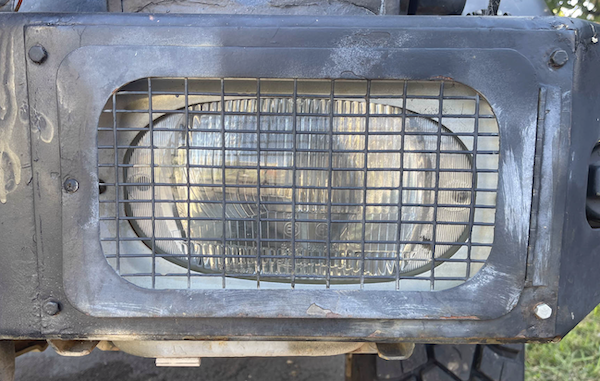
I have not seen many people complement the Unimog's headlights. The lights are 7X5 Inch lights. The bulbs are H4 with a P45T-41 base, and they appear to come standard as 70W / 75W (low beam / high beam). I tried to find official details on the bulb specifications, but couldn't. A standard 55-60 watt H4 produces about 1100-1500 lumens (candlepowerforums.com). The P45T base is important. It appears that this was the early H4 style lamp, and it was quickly replaced with the P43T base - which can be considered as the 'standard', newer, or most used H4 bulb base. The two are incompatible. The 43/45 indicates the diameter of the base with the P43T having the three aligning tabs. A warning to any Unimog owners - do NOT simply buy 'H4' bulbs and expect them to fit - they don't.
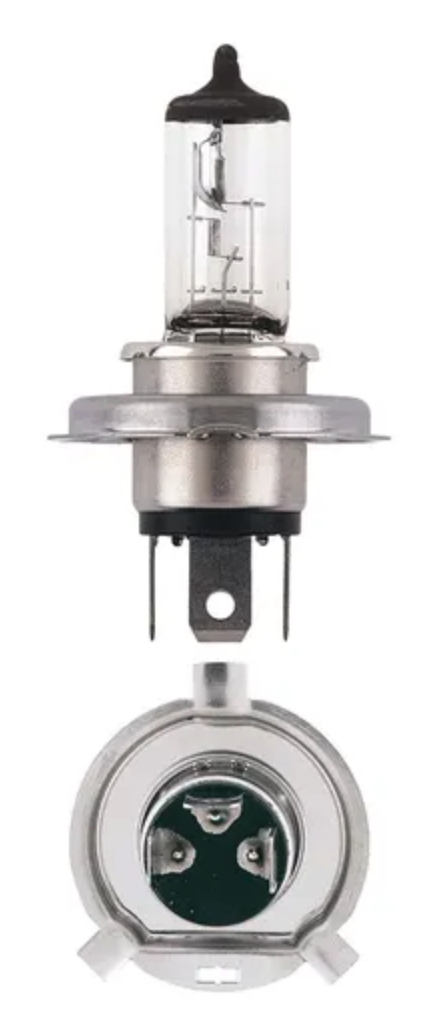
Bulb replacement. A quick visual inspection can tell if the headlight lens and reflectors are ok. Provided that they are, then improving the lumens from the bulb, would provide a commensurate improvement in light on the road.
Narva provide 24v 75 / 70W P43T bulbs. I could not see the lumens specs on these, but I would assume that they produce commensurately more light that 60W halogen, so about 1750 Lumens for the 70w high beam. Interestingly, they appear to be 75w halogen low beam compared to the standard 55w, so this would mean about 1875 lumen compared to the standard 1375 lumen.
J.W. Speaker provide H4 P43T LED globes that are claimed to produce 3600 lumens (I think for a pair, i.e. 1800 Lumens each) This is basically the same as the 70w Narva light output of 1750 lumens.
Stedi H4 LED bulbs produce 1750 lumens (each), but they are P43T and NOT P45T-41 base compatible. Both of the LED bulbs would have greater expected life and significantly less current draw. I for one do not care about the current draw on headlamps. (75w @ 24v ~ 3amps draw).
Bulb adapters. Someone on the Ozmog facebook page said it was possible to 3d print p43t - p45T adapters. Lacking a 3D printer, I went onto Ebay and found the adapters below. (Ignore the Fiat / Citroen reference, this is merely because those 'old timer' cars also used the earlier version of the H4 globe. Please note: I have not yet fitted these, so I cant comment yet on whether they work or not.
Headlight replacement. Many Unimog owners have chosen to replace the whole headlight unit. Most replace the 7X5 rectangle unit with one or two round headlights. Pat and Jele Seven Inch Headlight Upgrade is a great video of such a replacement.
Hyway accessories sell a maxilamp 5 X 7 in led headlamp pair for $614.60. No real details on specifications etc. though. Pro Vision Lighting has a 5x7 inch DRL Indicator, L2800 Low Beam, L2800 High beam, 9-32v, H4 connection, for $220 each. Their Road King is even better – 3000L low beam, 5500L High Beam. Black with DRL / parker. Their Trooper has DRL + Indicator, 3600LM + 5000LM. Other lights
Unidan have a 7X5 upgrade - $2307 though. They have JW Speaker H4 Led’s for $196. They have Unimog headlight mounting for the 7 inch round lights. Headlight Mounting Kits The 7inch round headlamps are JWSpeaker 8700 evo J2 lights. These offer high beam, low beam, DRL and ‘FP’ or front P . . . parking lights. They have a mounting ring – which I am not sure is required.
Mogcentral has (did have?) 7 inch ‘Thunder’ headlights. These have high and low beam, and top and bottom DRL. It also seems to have park and indicator functions – the DRL changes colour. – lower price than JWSpeaker too. 24V. 40w high beam, 30w low beam.
https://mogcentral.com.au/product/7-headlight-holder/ is where Mog central DID have round headlight holders. Unfortunately, they are not there anymore.
Savage have a similar lights to the Thunder.
I am keen to go with Stedi lights. Stedi 7 Inch IRIS Chrome LED Headlight ADR compliant. RHD beam. High & Low beam, full halo parkers. No indicators or DRL built in though. I will use the parkers as DRL and parkers. Stedi also have simple H4 headlight bulb replacements that have twice the lumens. However, these DO NOT FIT!! They are a H4 lamp, but the Unimog uses H4 lamps with a “P45T-41” base. (never heard of it). The H4’s from Stedi do not fit. They ‘swim’ around the locating hole and do not locate, and the spring that should hold them in place does not fit.
Martin Godden posted on Facebook photos of Mog with 4 Narva 5 3/4" headlights. I believe that he manufactured a 'backboard' for each pair, but then used 4 Narva 5 3/4" Headlamp Housing to hold the lights and 4 of the High / Low Beam with DRL & Parkers or High Beam with indicators lights in some sort of mix. This looks a great answer, as you can have indicators, DRL's, parkers, high & low beam, some 6000 lumens per light and ADR compliance. They work from 9v-33v (so will work on the 24v nominal Unimog), and they draw 1.0Amp at 24v. The lights are also some $370 - 700 ea vs some $2000 ea for JW Speakers that are not ADR compliant. Brilliant job Martin.
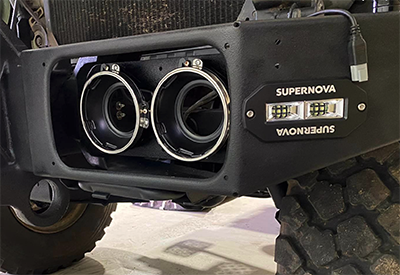
5.8.2 Driving lights
There are literally thousands of options here. I don't want to break any laws, and I don't want to spend a fortune on lights. I have no need to see a fly at 5km to be safe. I merely want to be able to see something, and stop or slow down soon enough to avoid an accident. I want to be able to see a corner at ~800+m, and a roo at ~500+m. Importantly, I also want to be able to see around 60m either side of the road out about 400m.
Trying to find the right answer on the internet is virtually impossible, as there are so many fraudulent claims and ill-informed opinions. Whoever brought something, clearly believes it is the best answer.
After a lot of looking,I have boiled this down to 1 light bar, or 4 round lights. I am going to use Stedi products. I already have them on my 4x4, and they are well made, with good light coverage. (Also, after two other firms products had limited life, I trust them) Their light bar is ST3303 Pro 39 inch 60 LED light bar. $889.99 1 lux at 959m, with a 153m width to the beam. 33,600Lm effective. The Stedi Type X Evo flood are 1 lux at 667M, with a 140m wide beam. 11,920 Lumen (pair). The spot are 1470M for 1 lux, and 11,920 lumen a pair. i.e only some 24,000 lumen for 4 vs the 39inch’s 33,600. The spots have more reach, but 1km vs 1.4km is not a major issue. I definitely don't want 4 spots, as they wont have the side coverage. I can mount the light bar, recessed back from the brush bar, or even behind the brush bar. The light bar has two electrical feeds – one from either side. These are 2 X 20A at 12.5V, so I assume about 2 X ~10A at 24v. I can use 2X30A wiring from 24 aux battery, and 2 X 30a relays switched from a small relay controlled by the high beam, and feed from the Auxbeam. I will use brown endcaps. Wiring concealer? Rhino rack platform bracket which I may need to modify.
5.8.3 Reversing lights
I need to be able to see behind me to both back up and also to attach the caravan. LED Autolamps 338 Series is the sort of thing. In the Stedi range is the C-4 Black edition. It comes in spot, flood and diffuse. (spot 217m for 1 lux, 24m width; flood 125m for 1 lux, 34m width) All are 4,200Lm, 24v compatible) They also have a hyper flood light, 14inch 10,800lm, 120W, 72m for 1 lux. 38M beam width. The Stedi ST3303 23.3 inch Flood is 24v, 32 Led, 17,920 effective lumens with a 500 spread. This is actually a driving light, but it would work great as a reversing light. Unfortunately, unlike their other lights, Stedi don't give charts of the coverage of these lights. They do give a night-shot though, and that shows this light to do what I want. Current draw is 16.7A @ 13.5V => ~9A at 24v. I can use 1 X 30A cable from Auxbeam, and a 30A or 20A compatible switch to manually provide power.
5.8.4 Side / camp lights
I would like to have some lights at the side for camping. These should be red or orange. i.e. 2700K or lower kelvin temp, with a low current draw and wide beam. The low kelvin temp is good to keep away the insects, and the low current draw means that they can remain on for a long time without affecting the battery. Stedi Micro V2 is 2600 lumen with a 1200 spread. 2.0A draw at 24v off the 24 aux battery, which would mean direct from the auxbeam feed using 15A wiring. $89.99.
5.8.5 Small corner lights
The Eco Safety Group have a large range of truck lighting solutions. LED Autolamps also have the sort of thing that I am looking for. Note that the Stedi lights are no more expensive and appear much better. The C-4 range in flood or hyper flood would look about right. Martin Gooden used SuperNova lights, that are now Altiq. These look really nice (see above photo).
5.9 Unimog Overdrive
The Unimog is slow and under powered. (Note, two separate issues. Even with significantly more power, it could not go faster as it is rev limited.) On a flat road it will do about 85km/hr, but a hill will slow it up and it is not uncommon to have to drop back to 7th gear and about 60km/hr to get up hills. There are three options for increasing the top speed that I know about: 1) increase tyre size, 2) change the final drive gears, and 3) put in an overdrive gear.
While I could be convinced to have 14.00 tyres over 395/85R20, there is not a lot of difference here. The tyres that I am getting (Pirelli 395/85R20) are about as large as you can reasonably go without affecting the ability to turn (scrubbing), geometry and handling. So, No to anything bigger.
Changing the final gear ratios via Unidan High Speed Crowns will increase the Unimog's speed in every gear, and cost circa $15950 (extracted 2024-03-22) before fitment. The great advantage of this modification is that the Unimog can reach 110+ km/hr with this mod. While 110km/hr is not legal for a Heavy Vehicle - the mod would mean lower engine revolutions and engine wear at 100 km/hr. It should be noted though, that these higher speed crowns increase the speed of all gears - including the low speed gears. Effectively, first gear would work like second gear does now, 2nd like third, . . . . and 8th like a new 9th.
The Mog Central Claas Overdrive add-on gearbox will keep the Unimog's current 8 gears (and ratios), but effectively give it another 8 that are 22% higher. This mod is more expensive ($22,000 2024-03-22) to buy, but it should be commensurately cheaper to install. While the overdrive can be used on any gear, it is most useful on 8th gear, where it will effectively provide a 9th gear. A 22% step up on 7th gear would roughly equate to 8th gear, so I don't see any reason to use this on other gears. It will mean that all the low gear ratios remain the same for rock crawling, but will mean that the Unimog can sit on 100km/hr - provided the road is flat.
Mog Central Claas Overdrive Yeah, I am getting one of these. I am going to Mog Central to get it fitted. $22,000 prior to fitting. Update, missed out on first batch. I thought you had to order when they were in – no – Ben took orders prior to them arriving, so they were fully allocated on landing. Next batch 6 months away, I am in for these though. Circa July 2024. Note for readers: If you want one, order it with Ben PRIOR to them arriving. He doesn't keep a lot of stock, and they are popular.
Mine was installed - very nicely - by Ben at Mog Central. Given you need to lift the cabin, this was not something I would try from home (let alone lifting the overdrive, the tailshaft, etc.). However, if you wish to install it yourself and have the equipment, this is the install instructions from Ben: Unimog Overdrive installation Instructions
Now as to what speed / affect the overdrive is likely to have, I could not find the gearbox ratios for the U1700L, but I could find them for the U2450 MRV in MRV-UHB2.pdf in para 1.9. I believe that they share the the same gear ratios. Based on 2800 rpm limit, and my experience of sitting on 85km top speed on standard Goodyear tyres, I created the table below.
| MRV | MRV | MRV | MRV | MRV | MRV | |||||||
| Ratio | Main box ratio:1 | Speed@2800 | Working set box ratio:1 | Speed@2800 | Main box, Overdrive ratio | Speed | ||||||
| Forward | 1 | 13.01 | 6.5 | 41.49 | 2.0 | 10.1 | 8.4 | |||||
| 2 | 9.02 | 9.4 | 28.77 | 3.0 | 7.0 | 12.1 | 2800 | 85 | 32.9411765 | |||
| 3 | 5.96 | 14.3 | 19.01 | 4.5 | 4.6 | 18.3 | 2800 | |||||
| 4 | 4.38 | 19.4 | 13.95 | 6.1 | 3.4 | 24.9 | ||||||
| 5 | 2.97 | 28.6 | 9.48 | 9.0 | 2.3 | 36.7 | ||||||
| 6 | 2.06 | 41.3 | 6.57 | 12.9 | 1.6 | 52.9 | ||||||
| 7 | 1.36 | 62.5 | 4.34 | 19.6 | 1.06 | 80.1 | ||||||
| 8 | 1 | 85.0 km/hr | 3.19 | 26.6 | 0.78 | 109.0 | ||||||
| Reverse | 1 | 12.6 | 6.7 | 40.19 | 2.1 | 9.8 | 8.6 | |||||
| 2 | 8.74 | 9.7 | 27.8 | 3.1 | 6.8 | 12.5 | ||||||
| 3 | 5.78 | 14.7 | 18.42 | 4.6 | 4.5 | 18.9 | ||||||
| 4 | 4.24 | 20.0 | 13.51 | 6.3 | 3.3 | 25.7 | ||||||
| 5 | 2.88 | 29.5 | 9.18 | 9.3 | 2.2 | 37.8 | ||||||
| 6 | 2 | 42.5 | 6.37 | 13.3 | 1.56 | 54.5 | ||||||
| 7 | 1.32 | 64.4 | 4.21 | 20.2 | 1.02 | 82.6 | ||||||
| 8 | 0.97 | 87.6 | 3.09 | 27.5 | 0.75 | 112.3 | ||||||
A few things this shows:
- The Unimog IS actually faster in reverse than forwards. I thought that was a joke.
- The top speed should be about 109 (110km), with the standard tyres. The 395/85/R20 tyres are about 4% larger, so that would mean about 113km is possible.
- When registered as a National Heavy Vehicle, the Mog is limited to 100km/hr, which would appear to be 2570 rpm. (again, on standard tyres)
5.10 Turbo and Exhaust
Mog Central have a turbo - inter cooler upgrade and stainless steel exhaust available. These produce more power, but the stainless steel exhaust also avoids all those rust issues. I did intend to paint the stainless exhaust with a high temp matt black paint to fit in with the Black Raptor - but I then found out that Ben ceramic coats them black anyhow. No need for anything more. Now does this provide 'enough power' to the Unimog? well, I doubt it. I do think it will make a slug less sluggish though. I drive the Unimog in the city, and starting from intersections or traffic lights is very slow. I am confident that this upgrade will improve the situation. I am also confident that it will improve the ability of the Mog to climb hills, especially when towing the van. However, I am also confident that it will not solve all power issues - so who knows how much it will help? I decided to get one fitted while Ben has the Unimog at MogCentral. I don't think this is a necessary mod, or even close to my highest priority, but given Ben already had the Mog, and it would be nice . . . .
Ok, and update post fitment. First thing to note is this was done at the same time as the overdrive installation, so while the two are different, the 'drivability' is a bit of each. First the gearbox - gear 8 overdrive ("8.5") works exactly as planned. No issues doing 80-85km/hr in 8th, dropping into 8.5 and zooming (yes, zooming) to 100km. I am shocked at how easily it accelerates from that low 80's. The one thing I did NOT expect was how useful gear 7.5 is. Before it was gear 8, and then if I could not hold gear 8, drop to gear 7. Down from ~80 km/hr to mid 60's. I could do most things in 7th gear, but I needed things right to move to 8th. Now, apart from starting up, I basically only use gears 7.5, 8, and 8.5. The Mog has great torque down in the low 2000's rpm, but runs out up high 2000's. IF you keep in the 2000-2500 range and just bounce between those gears, you can do anything from 60 km/hr in town, hills, and highway to above 100km/hr and perhaps the theoretical 110+. Now specifically on power from the Turbo-Exhaust. Even with just 8th gear, I would have to drop to 7th gear on any 'good-sized' hill. With the power, and that improved torque down low, I can hold most hills in gear 8.5. I have had to drop to gear 8 on big hills - but I have yet to need to drop lower. What would not come through on any power / torque graph or number - is how much easier this makes the Mog to drive. It is simply much more pleasurable. It is still no light weight Lotus, but it does feel much lighter / more car like. City traffic is not as bad, and hills 'disappear'. Yep, I love it.
5.11 Towing Mods
In order to tow the caravan, I need to have the tow receiver, the 12v signals for the caravan, 12v charging for the caravan, braking, the video feed from the caravan to the mirror camera, the drop hitch with Hitch-ezy male connector, and some place to connect the chains and breakaway. This is not a simple mod. . . .
5.11.1 Tow Receiver
While I will have camping gear in the back of the Unimog, I do not intend to camp out of it the whole time. I will instead use it as a 'tow tug' for towing the caravan. To do this, I need a Mog Central Tow Bar $575
The tow bar requires a drop hitch sized to suit the caravan.
5.11.2 Drop Hitch
The Unimog receiver is at 660mm above ground and the caravan at about 400mm height. I want the caravan to be about 25mm down at the hitch point. Silverado is at 375mm. That is an 11.25 inch drop from the Mog's receiver. I need to align these while towing 5 ton. I suggest any reader that is looking for a hitch for the Unimog watch the Nowhere Bound Touring YouTube video. Nowhere bound touring do a comparison of 4 drop hitches / shock reducing hitches for trucks – (Shocker Hitch, Hayman Reese Load Distribution, Gen-Y & AirSafe) they strongly recommend the Air Safe. While I think you can find someone on the internet that would recommend anything, the videos comparisons here are pretty clear.
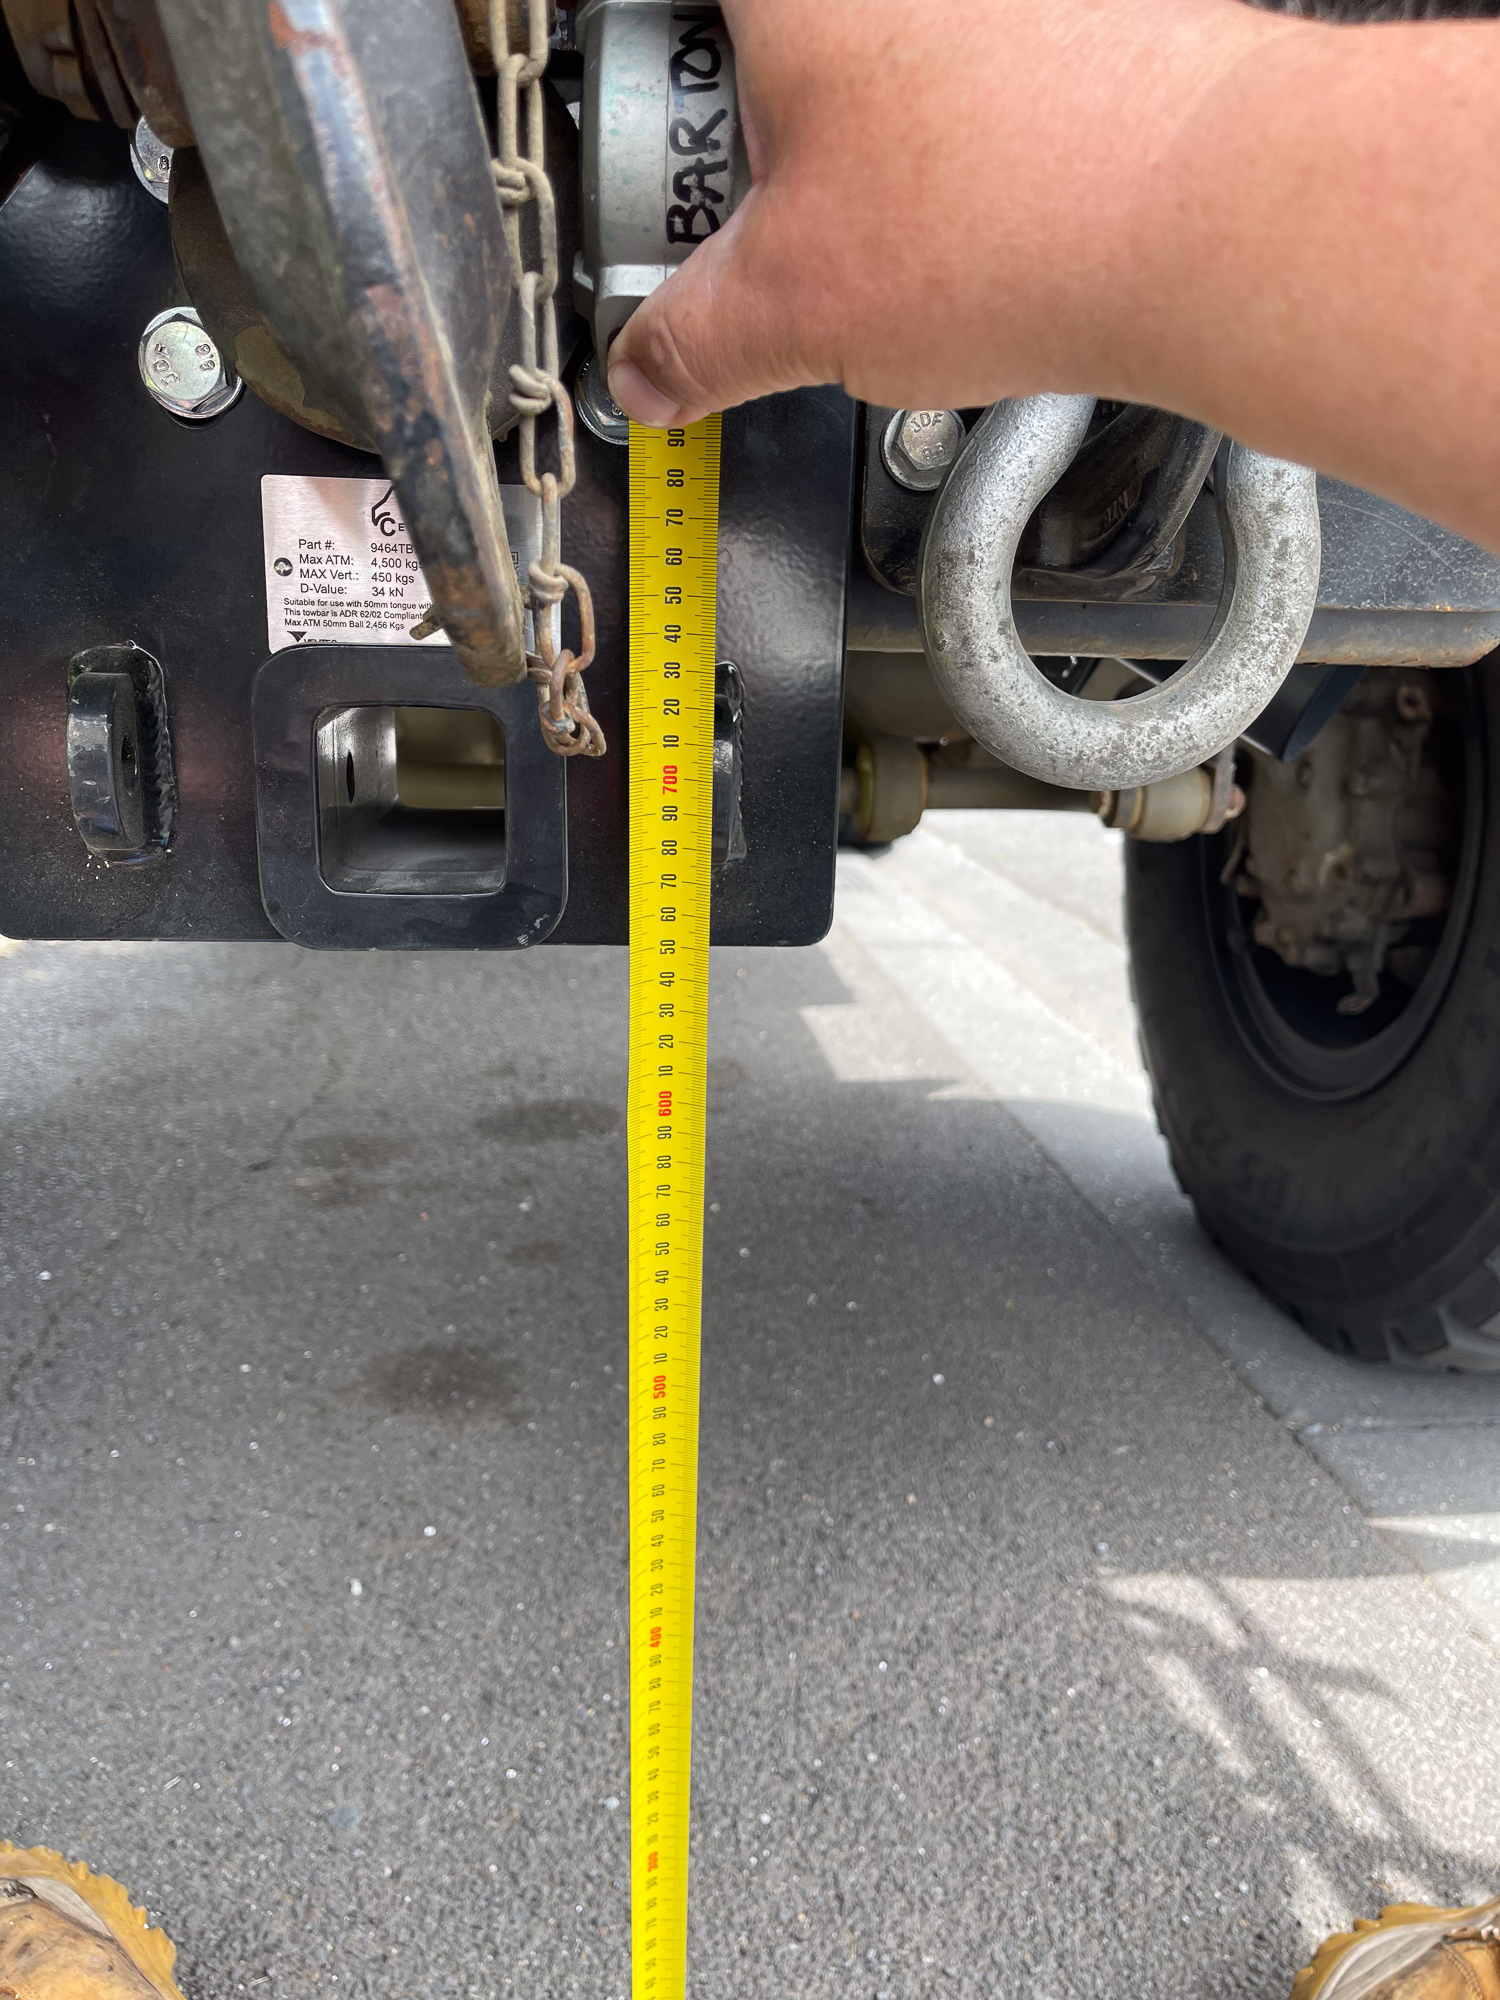
Gen Y is a common and an obvious choice. Gen Y hitch This definitely fits Australian items. Up to 10 inch drop. Definitely not cheap at around $2,430 (2024-08-25). The Gen-Y uses 'Torsion Flex' to control bounce, and their range includes hitches up to 7,000kg. The key issue here is that I believe that the torsion element is very dependent upon the right torsion-to-weight ratio. i.e. a light van on a big torsion set up would not move it. Similarly, a heavy van on a light torsion would simply max it out. The same is partially true of an airbag device - except that the air bag pressure can be changed by adding or reducing air. In this sense, they may be 'tuned' to suit the down force.
The Shocker HD Max Black Super Drop Air Hitch 20,000 lbs GTW is another shock reducing drop hitch. They use air bags to reduce the shock. This one has up to 12.5 inches (317mm) of drop. They have a 9 inch (228) drop one too – but I think it is 5th wheeler only. Shocker Hitch One thing that Shocker Hitch have is a wide variety of connectors, and the ability to add sway bars.
Air safe hitches Class 6 hitch – with a drop down to suit my van. I see that they have a 6 inch drop, but nothing larger is listed. The Air Safe, like the Shocker, use an airbag to soften the bounce, but in this case they have two shock absorbers also. It should be noted that Nowhere Bound Touring use a normal (Isuzu NPS?) truck that does not have the height of the Mog. I found the Class 6 hitch online for $4,199 (2024-08-25)
While I do recognise that the Shocker hitches would reduce the bounce of the caravan on the tow vehicle, I doubt that this is a major issue on a 12T GVM Unimog. I think the opposite is more likely to be an issue - the Mog impacting the caravan. I see caravans that have broken hitch necks, and they have broken where the A-frame meets the rectangular van chassis. Both of these would be due to flexing from hitch, and anything that could be done to reduce impact loads on the hitch would have helped.
I found Mister Hitches. They appear to have a good range of 4.5T drop hitches. Their Extra Long Shank (MHWDS1014) is far cheaper than the shock type hitches above (~$400), can drop 229mm, and will take the 1.25 inch version of the Ezy-Hitch pin that I intend to use. They also have the MHAB45-S3 with a 370mm drop that can take the Hitch-ezy and 4.5T rating. These are not shock type hitches though.
I went with a Shocker HD Max Black Super Drop Air Hitch (option 2 inch receiver, no ball mount) and then Set of Hitch pins; Black Combo Ball (for being able to tow trailers etc.; and a Off-Road Hitch Ball Mount for use with the Hitch-ezy 7/8 inch shaft. Now these only ship to the US, so I sent them to Shippit, who then forwarded to me. In my opinion, this unit is not as good as the Airsafe hitch as it has the air bag under the receiver instead of on top. This is not the best from the point of view of rocks, but (hopefully) it does mean there is a chance I can leave the pintle on. This is not clear, as the top of the hitch is still well above the receiver hole.
Having shipped the Shocker Hitch from the US to Australia - and fitting it nicely - I found that the Shocker Hitches are available here. I don't know how I missed that, but if you want one, I suggest you research on the US website, and then buy locally: ShockerHitch Australia
5.11.3 Chain and Breakaway connectors
It is illegal to tow something without a secondary connection device and a 'breakaway connector'. I might be able to put carabiners onto something, but I would much prefer to have hammer-locked hooks attached to permanently mounted rings. Something that cannot easily disconnect or be stolen. I need to sort out what I am getting, and where it is going. The laws around this are also hard to understand. It appears that each of the connectors need to be rated to 1.5 X the trailer ATM. For a 4.5T trailer (caravan), that would mean that they are each rated to 6.75T (or 7T). Some investigation is needed here, but with this weight, it is clear that I wont be buying some simple clips from the local car shop.
George 4x4 hammnerlocks has a fair range of hammerlocks and hooks - but their range tops out at 4400kg. They specifically state: "FOR TRAILERS, CAMPERS, OR CARAVANS WITH AN ATM NOT EXCEEDING 4400KG, IT CAN BE USED AS A QUICK CONNECTING LINK, QUICK RELEASE, OR CHAIN EXTENDER."
The Highmount Guy has 5.3T sling hooks and hammerlocks. ($69.99 2024-11-12)
5.11.4 Caravan Brakes
Any caravan or trailer over 750kgs needs a brake signal. This needs to be proportional to the degree of braking in the Unimog. This means an electrical brake controller. Importantly, the Unimog is 24v, and the trailer 12v, so the brake controller needs to run on 24v, but still provide a 12v proportional signal to the 12v only trailer. The Redarc Tow-Pro Elite V3 (EBRH-ACCV3) seems suitable. Their Instruction Manual provides the details on installation. The TPSI-00 is a switch insert to allow the brake controller to fit in a switch. RHWK-00 is the remote head wiring kit.
Operation is fairly simple: as the Unimog brakes, an accelerometer inside the Redarc senses the acceleration (i.e. negative g force) and puts out a signal. The dash mount controls the gain (volume) of this signal. IF the signal is too big, then the brakes will be applied going down hills, or coasting to a stop. If the gain is too low, then the caravan brakes will only come on when the Unimog is hard braking.
I do have 24v permanent available near where this will be mounted, but I don't want this to draw current when the engine is not running. (Clearly, it does not need to brake the van when the Mog is stationary and off.). I will supply this from the ignition switched circuit via a 25A fuse.
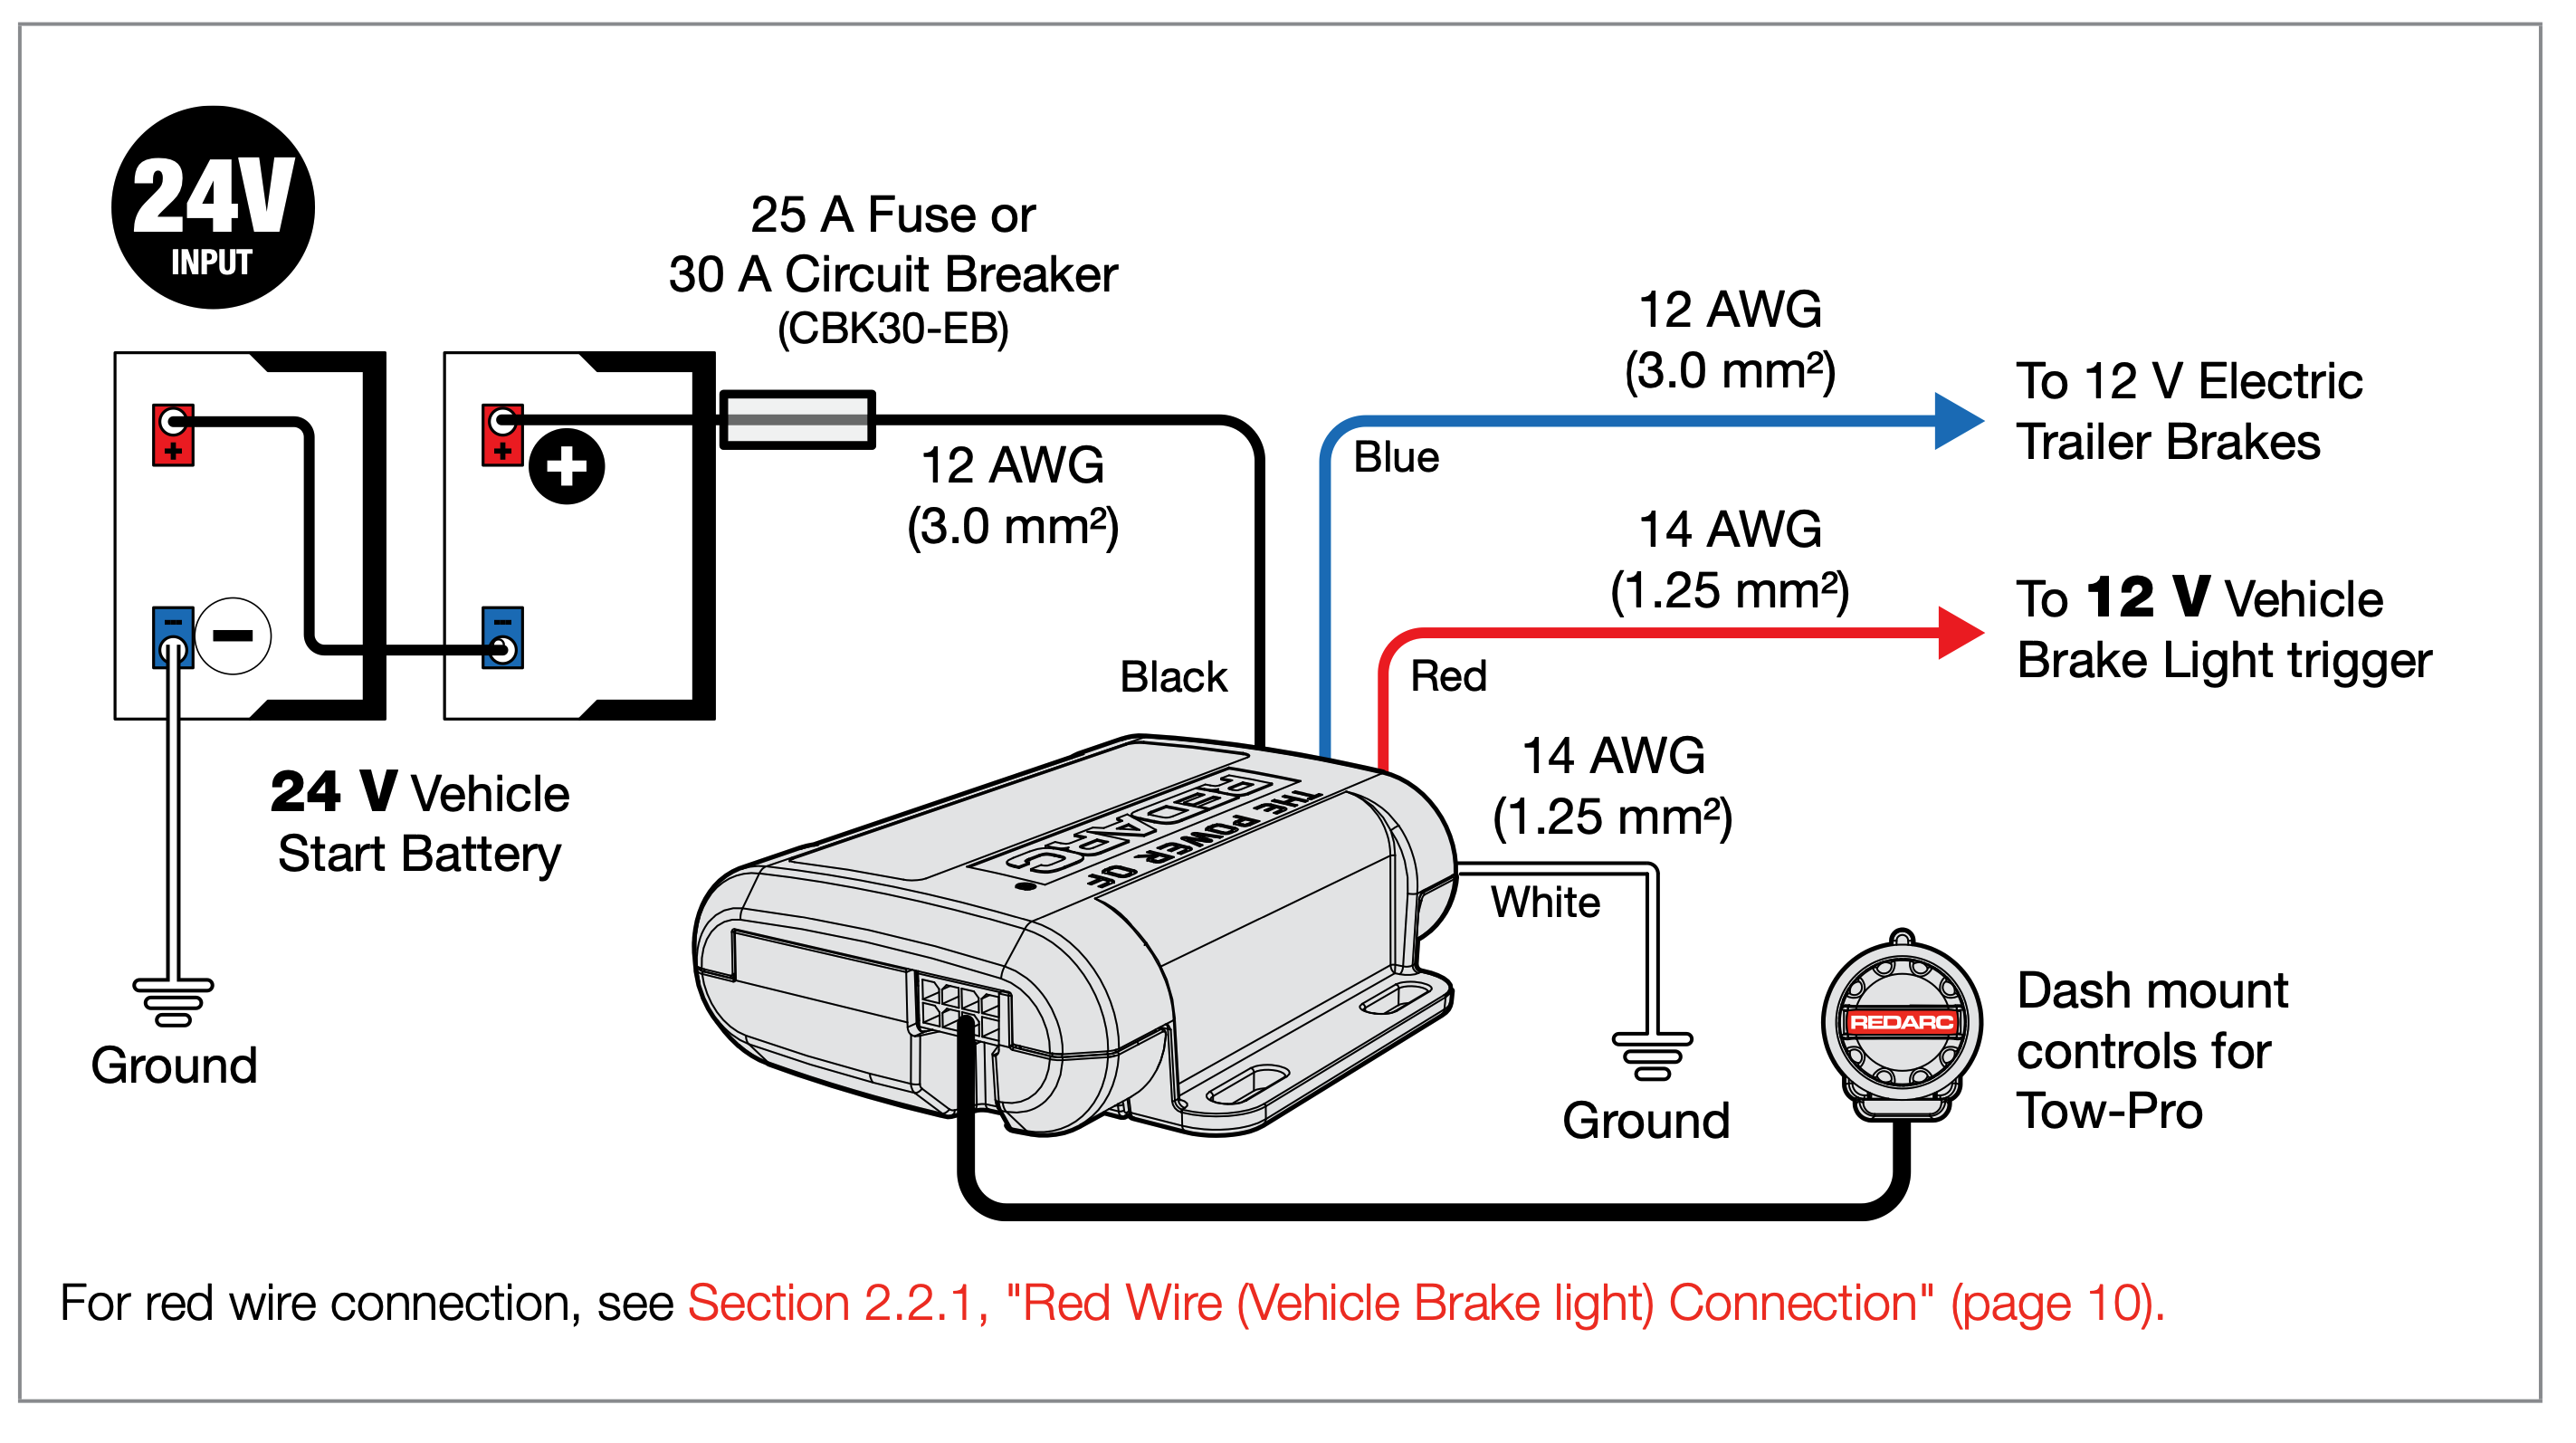
Figure 1 Redarc Tow-Pro electrical installation (from Redarc Installation Manual, extracted 2024-03-12)
5.11.5 12v caravan Signals
The rear of the Unimog has 24v power, brake lights, lights, and indicators. The caravans and trailers generally have 12v electrics designed to match cars. Redarc produce a product to reduce the Unimogs 24v signal to 12v to power the caravan signals.
The electrical turn and brake signals to the trailer need to be dropped from 24v to 12v and then wired to the plugs. Redarc produce a range of VRX(Rev) products that drop the voltage. The "Rev" in the name indicates that they include the reversing lights. The VRL(Rev) model allows 80W in the tail / clearance lights. Without knowing the load here, that seems more than sufficient. Redarc Trailer Light (Voltage) Reducer
According to the Instruction Manual The device needs a 30amp circuit breaker, but then 10amp fuses on each of the 5 outputs.
Kickass has some nice products to allow Anderson connectors for the power. 50A Weatherproof Anderson. I really need to have 24v, 12v
Kickass 12 Pin trailer. 12 Pin Flat Trailer Socket
5.11.6 12v Trailer Power supply
The trailer can be connected via 12 pin plug for (some) 12v power, or via an Anderson connector. My preference is both. The 12 pin plug should not be carrying substantial (greater than say 5 amps) current. An Anderson is typically 50 amps, and I would like more than 30 amps going from the Mog to the trailer (caravan 600A/h Lithiums). Adding an Anderson is easy, it just needs to be clearly marked, and supplied with, 12v power instead of the Mog's 24v.
Examples
1. A 12 volt system at 10% drop with a 40’ circuit x 45 amps = 1800 Famps. A wire size of 8 is required.
2. A 24 volt system at 3% drop with a 10’ circuit x 100 amps = 1000 Famps. A wire size of 6 is required.
https://enerdrive.com.au/wp-content/uploads/2015/11/9743-1.pdf
Figure 2 Foot-amps electrical wire selection guide
Figure 3 Electrical Cable gauge selection guide
The 24v signals need to be dropped to 12V to suit the caravan / trailer. The plugs are wired as follows: (Note, Narva have a good diagram of this)
5.11.6 Trailer Plugs
I intend to tow my caravan, which has a flat 12-pin plug with custom wiring. However, if I tow a trailer, it will typically have a flat or round 7-pin plug. I figure I should wiring up sockets for each type.
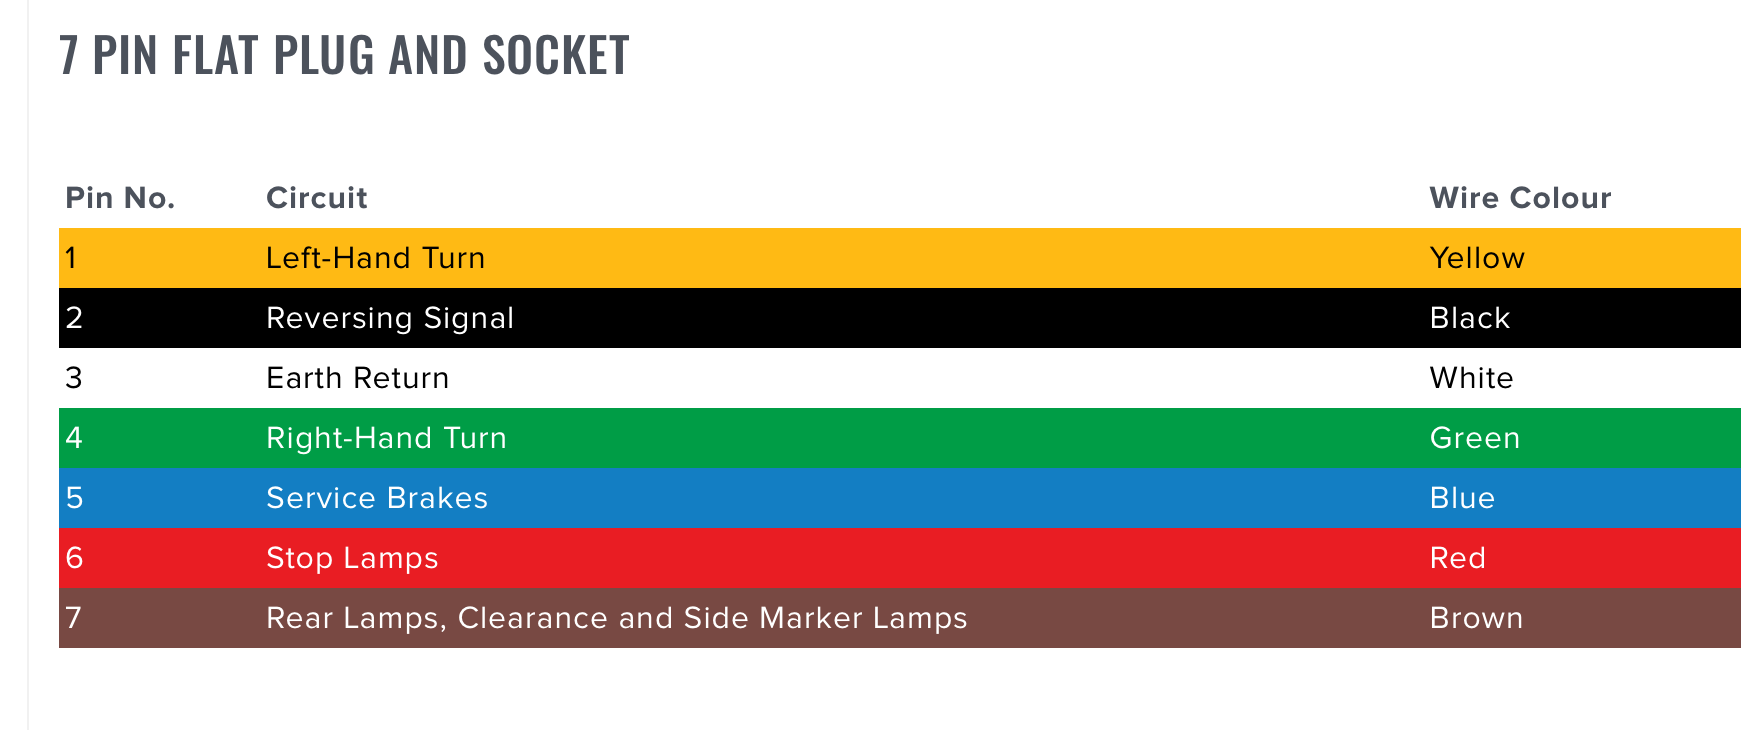
Figure 4 (from Narva 7 pin flat plug and socket wiring, extracted 2024-08-03)
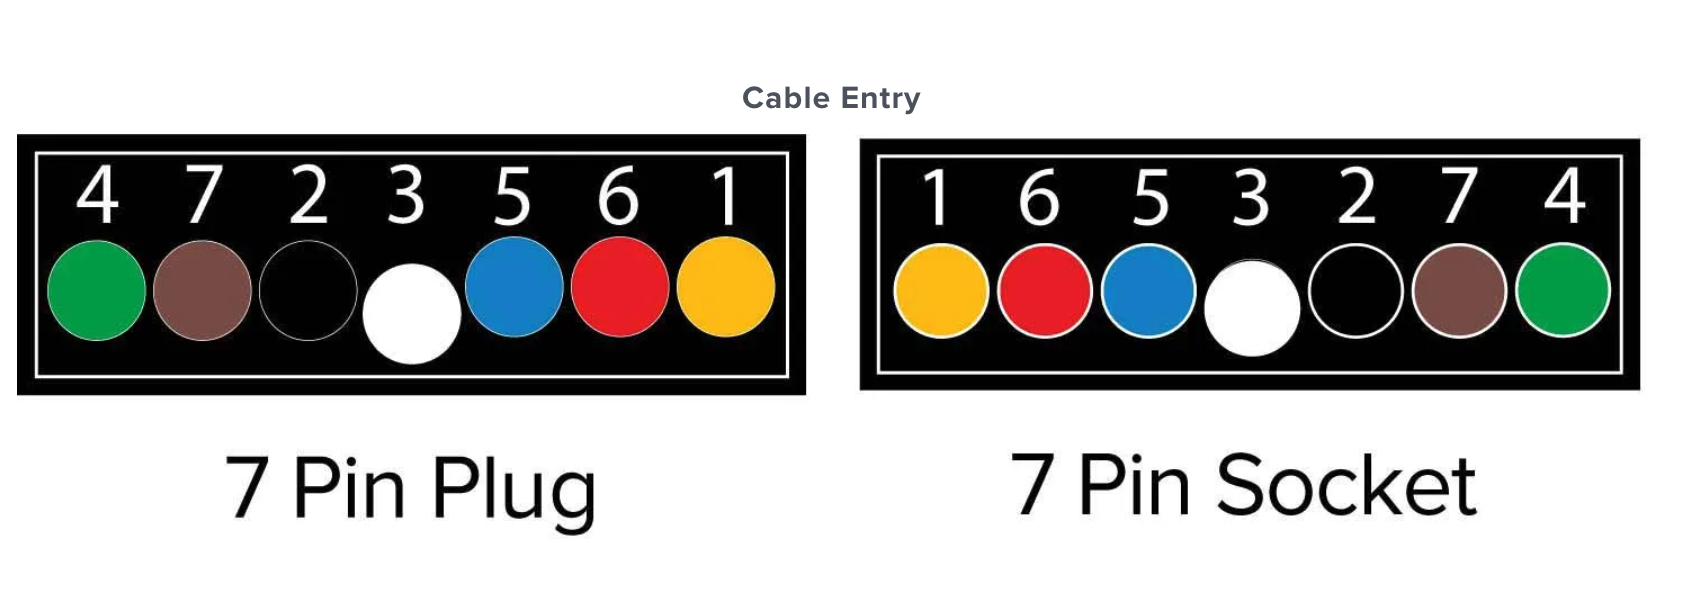
Figure 5 (from Narva 7 pin small round plug and socket identification, extracted 2024-08-03)

Figure 6 (from Narva 7 pin small round plug and socket wiring, extracted 2024-08-03)
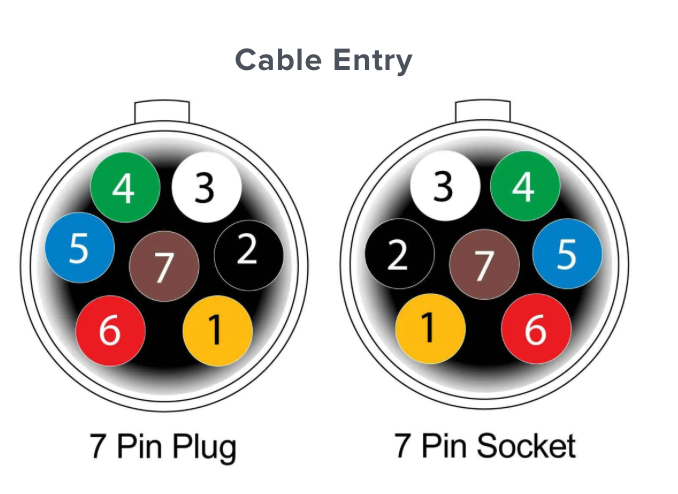
Figure 7 (from Narva 7 pin small round plug and socket identification, extracted 2024-08-03)
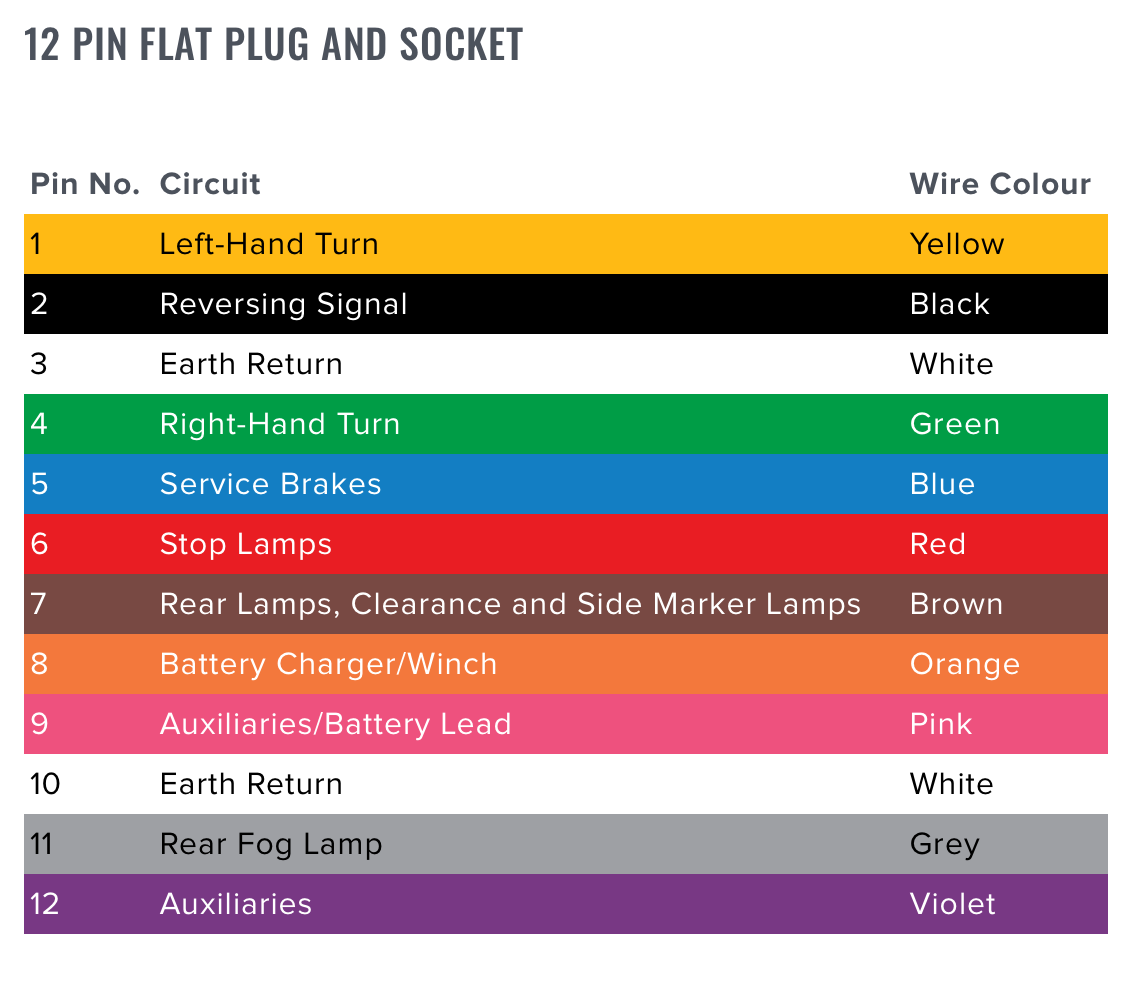
Figure 8 (from Narva 12 pin flat plug and socket wiring, extracted 2024-08-03)

Figure 9 (from Narva 12 pin flat plug and socket identification, extracted 2024-08-03)
The custom version of the 12 pin flat used in Bushtracker caravans is listed below:
- Yellow - Left-Hand Turn
- Black - Reversing Signal
- White - Earth Return (linked to 10)
- Green - Right-Hand Turn
- Red - 5mm Service Brakes
- Red - Stop Lamps
- Brown - Rear, Clearance and Side Marker Lamps
- either blank, or Yellow for Sound in Motion Power
- Red - 6mm, Power from cars ignition
- Black - 6mm Earth Return (linked to 3)
- either blank, or Sound in Motion Red - 2nd camera / tire monitor
- either blank, or Sound in Motion White Video
Wikipedia makes the following statement: "Trailer connector according to NATO STANAG 4007. NATO uses a 12-pin connector according to STANAG 4007. However, note that there are often deviations from the standard depending on which country it is applied, which means that the table below may not be accurate."
The NATO round 12 pin round 24v used on the Mog is - hopefully, but not tested - listed below (reference Wikipedia for first column and Land rover Defender website for second column. I believe that neither are to be trusted, so I am belling my own wiring for the plug. See Wikipedia for a diagram of what pin is what.
| Pin | Stanag 4007 | UK Defender | My Mog |
|---|---|---|---|
| A | Blackout - Disconnect power to all normal lighting. Only specially designed lamps according to STANAG 4381 is allowed, but shall only be activated if terminal C is active. | Convoy Light (to be interconnected with C & H) | Convoy Light (1 of 3) |
| B | Left Turn Signal | Left Hand Stop Light | Stop Light / Brake Light |
| C | Blackout marker lights according to STANAG 4381 | To be interconnected with A & H | Convoy Light (1 of 3) |
| D | Ground | Earth | Earth |
| E | Tail lamps, clearance lamps/outline marker lamps and registration plate lamp | Rear Lights | Rear Lights / Clearance Lights |
| F | Blackout stop lights according to STANAG 4381[2] | Blackout stop light | Blackout stop light |
| H | Rear fog lamps | To be interconnected with A & C | Convoy Light (1 of 3) |
| J | Right Turn Signal | Right Hand Stop light | Stop Light / Brake Light |
| K | +24V or +12V[NATO 4]; via ignition lock OR permanent[NATO 5]. | 12 or 24v feed | 24v permanent (i.e. not ignition switched) |
| L | Ground | Reserved | ? Not tested |
| M | Stop Lamps | Left-hand Turn light | Left-hand Turn light |
| N | Reversing Lamps | Right Hand turn light | Right Hand turn light |
| . |
Pins are rated for 15amp at 24v. 30A maximum current is achieved via two earths.
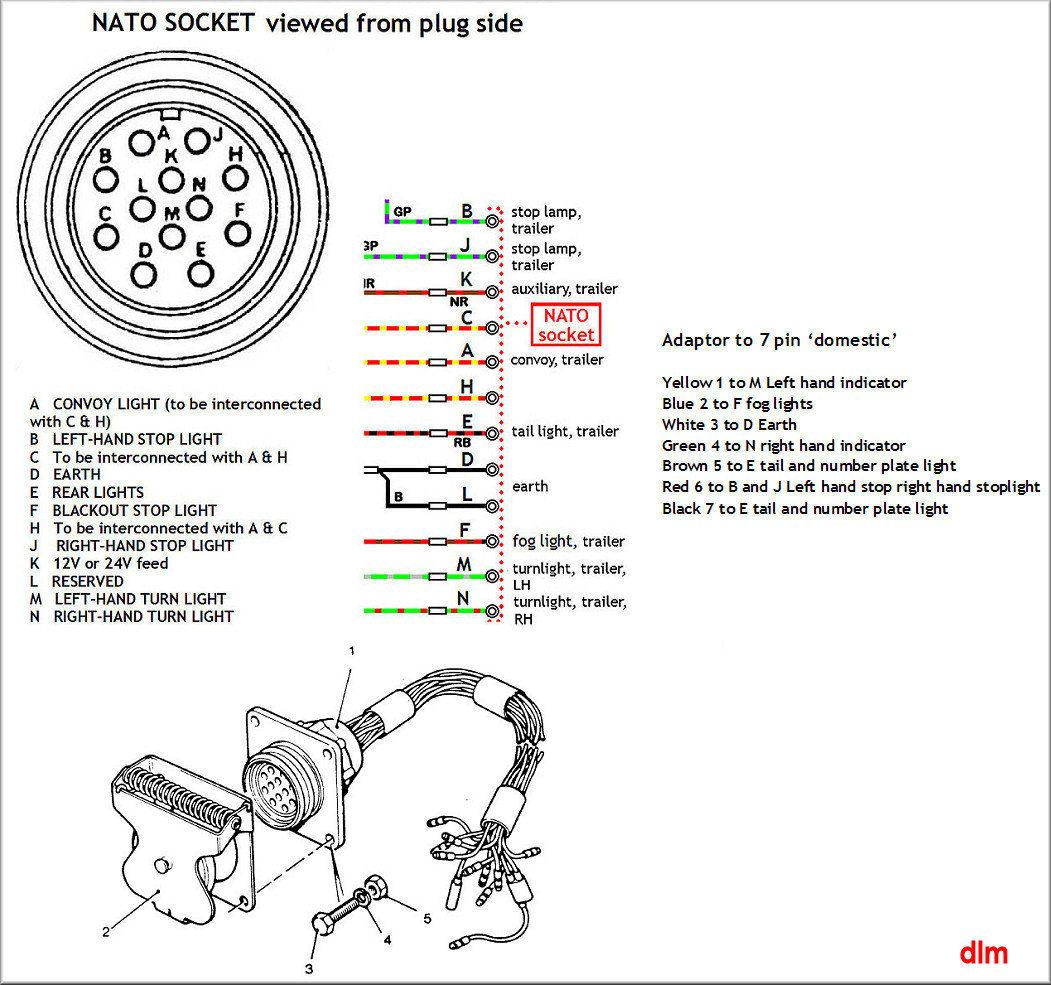
5.11.6 Caravan & hitch Video
I need to have a rear vision camera that can see what the caravan sees out the back. I also need a camera on the hitch. I will never be able to connect the hitch without a good camera showing the hitch from roughly above.
5.12 Service kit
While not exactly a modification, I feel that I need to be able to service the Unimog both at home, and on the track. I wont say that I would PLAN to service the Unimog at some remote location, but I feel that I would need to carry spare fuel filters, air filters, etc. and be ABLE to change them at some remote location if the need arises. I got the Mog Central Filter Service Kit + Oil. It is basically just a heading, under which you can select everything required. I did not get the oils from Mog Central as they were available in Melbourne at a similar price, but with no postage required.
Actually, I picked them up while I had the Unimog in at Mog Central.
5.12 Fuel / water separator
The Unimog might have two oil filters, but it doesn't appear to have a fuel water separator. I have seen far too many cars get caught out with bad fuel to risk driving in the outback without one of these. Fuel Water Separator.
5.12 Tyre inflation (& deflation)
For going off-road, onto sand etc. you need to be able to change the air pressures in the tyres. On the highway, the pressure needs to be high(er). High tyre pressures improve fuel economy but also reduce the extent to which the side walls flex. Flexing the sidewalls heats the tyre up, which heats the air inside up and increases the tyre pressure. If the tyre pressure is too low for the speed being done, then the flexing of the sidewall will increase the temperature to the point that the tyre or inner tube disintegrates. At low speeds though, this heat will not build up, and having lower tyre pressures means that the tyre contact patch increases - i.e. you get more grip and you lower the pounds per square inch on the surface (which means less track impact / sinking in sand etc.). The issue is how to change the tyre pressures? Lowering tyre pressures is normally not an issue, but it still takes several minutes and the process needs monitoring if you are not to go to too low a pressure.
5.8.10 Tyre inflation hose / gladhand
Trucks have a 'gladhand' (or two) for connecting high pressure air to trailers. Mog Central's glad hand hose allows the driver to attach a hose to the gladhand and use the Unimog's inbuilt air compressor to add air to the tyres. I brought one of these. I have yet to try it. Need to video me trying it. Need to have air thread locker from Bunnings.
5.8.11 Rapid Tyre inflation and deflate
Sam Keck is an active Facebook Ozmog user and Unimog Owner. He has developed a Rapid Tyre Inflate and Deflate system that consists of two air chambers (one either side of the Unimog), both being fed from the Unimog's compressor, and both feeding air to two tyres and having a pressure gauge and dump valve. His video shows that these can quickly increase or decrease the pressure in the tyres. He indicates that he will manufacture these, but I have not yet seen the web site. I am keen to try them and review them when he starts selling them.
5.8.12 4X4 air compressor
As most 4X4 cars don't have an air compressors built in, portable air compressors that operate off a cars 12v battery are popular. These tend to be slow to connect, and slow to inflate. On a normal 4x4, which has (31 - 33 inch tyres, some well known brands of these units are known to fail regularly. For the much larger Unimog tyres, with their much larger pressures, I suggest only quality versions of these products would be likely to survive. Thankfully, I already own a portable 4X4 compressor. I would need to wire it to the 12v battery system, but I can try it.
Rapid Tyre Inflation System (RTIS)
Unidan have a Rapid Tyre Inflation System that appears to consist of two boxes that each contain two coiled air hoses. The system appears to use the Unimog's air compressor for the air (like the gladhand), but it is permanently fitted and therefore quick to deploy. The Unidan RTIS video indicates that it can raise tyre pressures in 12-15 mins compared with the 45-60 mins required for portable air compressors.(20 psi -> 80psi) Nitto air fittings are used to improve the airflow.
Central Tyre Inflation System (CTIS)
New Unimogs come with a built in tyre inflation system. Unlike the methods above where the Unimog has to be stopped, inbuilt CTIS systems can change the tyre pressures while underway.
- details about Morwell.
5.10 Air On Board / Compressor / tank
The Air On Board idea is to have one or two reasonable pumps, plus an air cylinder. The air cylinder can be used to power air horns as well. Pipes can take the air to the front / back and allow two tyres to be inflated at once. Air Onboard 24v 200psi 9l tank This is a 200psi (160psi), 9litre 24v system. At 100 psi (road pressures) the system draws 19A (23a) and only 1.13 cubic feet per minute. That is pretty slow.
Have a look at YouTube nowhere bound touring, ultimate air compressor. They installed a Jedair 24v compressor (horizontal) into a small tank. Fills two tyres in 6 mins. Runs at 200psi (they ran it at 150 psi) They brought it from a mob that have tanks and valves and stuff to suit. In queensland. http://www.jedair.com.au/air-compressors/ XD4000-24 seems to be the one. Need pressure switch for 150psi, and a tank of about 10-20 litre size – they have a 37.9 litre tank that may be able to mount the compressor – or the XDT-4000 (they only show this at 12v, but I am sure that the 24v will fit.)
A digital tyre inflater would be worth the price if CTIS is not used. Digital Inflater
http://aircti.com is a morwell based firm that does truck central tyre inflation. It is not clear if this will fit the Unimog / wheels. I emailed them.
5.11 Air-Horn
Air ride Train Horn Kits have Kleinn kits available in Australia. Not sure if other people import them. I brought a HornBlaster Shocker XL Train Horn from the US. It runs off 12v though. Current horn will need to power a 24v relay that switches the 12v to power the air to the horn. The air will be from the truck at the moment, but later may be from air-on-board reservoir to feed the CTIS. I need a 120-150psi reservoir with at least 10 litre capacity.
The Air-horns can be mounted on the passenger side front of the tray, with air being supplied from just in front. (see photo - this is how Sam Tucker mounted his (thanks to Sam for the photo)).
5.8.11 Donaldson Top Hat
This is a pretty simple upgrade. The existing snorkel head reduces dust entering the snorkel – but it does not show when it should be serviced. Traditional Australia 4x4 snorkel ‘ram-feed’ heads don’t reduce the dust traveling down the snorkel once it has entered the head. You can get socks for some of them, but that certainly restricts the air flow down the snorkel. The Donaldson is not pretty, but it does allow a good airflow, does fit, and does let you see and service dust entering. Donaldson Top Hat
Looking at the Donaldson website, the topspin might have replaced the top hat. I need to know the outlet diameter and the cubic feet per minute of the airflow into the engine. Page 188 has a top hat to topspin conversion / upgrade path. Western filters has the Donaldson topspin. Donaldson Catalogue.
5.27 Inverter
When camping, I would prefer to have 240v AC available. I would prefer about 3000W, so that I can run any home appliance (which draw 2400W). Elinz have one that is only $264 – says 1500W / 3000W – not sure why two measures. Nah, it is 1500W max continuous. For $509 they have a 3000W continuous. That is plenty. However, it operates off the 12v supply. They also have 24V 3000W for same price.
Enerdrive 2600w $1600 though. Perfect for the caravan.
Allspark have a 24v 4000 watt pure sine wave inverter for $759. Allspark 4000w -- wait, there is a disclaimer that this is not suitable for hardwired installations. ??? what does that mean ???
Victron’s 3000VA is $1465.28 from solar4rvs.
Enerdrive have a 2000w version for $1,250 – but it has 240v pass-through as well - which is nice.
6.8 Tarp / Cover / Canvas
Robco Products made the army tarps for the perentie. Not clear if they made them for the Unimog or not. King canvas sell a range of products made by Robco.
I think the best answer is a steel box over the lot. Nothing fancy – just a big box with side access doors. The rear could contain the potty holder & spare tyres with winches. The roof could contain sleeping quarters and solar arrays.
6 Repairs
6.1 Speedo Repair
See Speedo Upgrade the repair was necessary, but it was also an upgrade / modification.
6.2 Canvas Tarp Repair
I wanted to keep the canvas tarp, at least for the foreseeable future. It had three things wrong with it though: 1) it had several pin-prick wear holes in it that let in water; 2) some of grommets had come out, and the bungy cord for them was wrecked; 3) several of the bands were busted.
The first thing I did was to buy some brass grommets and some Poly backed camo material pieces. This material is no longer available from this seller, but I assume you can still buy similar if you do a search. I folded the material in half, and then glued this to the back (underneath) of the army tarp. This provided a strong basis for the new grommets.
Recognising that the poly material was neither large or in unlimited volumes, I also brought some camo material. This was used to make the Winch Covers. This material is no longer available from this seller, but I assume you can still buy similar if you do a search.
6.3 Starter Motor Repair
Another repair that could be considered an upgrade. The starter motor is one of the items that is prone to failing. I got mine changed out while it was having work done at MogCentral. Call it a preemptive repair.
6.4 Generator Repair
(see also Generator / Alternator Upgrade) Another repair that could be considered an upgrade. The generator is one of the items that is prone to failing. I got mine changed out for an 100A alternator while it was having work done at MogCentral. This is not a simple swap. It involves putting in new brackets, providing the alternator, and then re-wiring the cabling. For non-military purposes, an alternator is better than a generator. Call it a preemptive repair. $1,072 (2024-10-12)
7 Fit out
7.1 Habitat (expedition vehicle) fit out
Ok, first thing is that we did not do this. I know that many people buy the Mog with the idea of turning it into an expedition vehicle, but we wanted it as a combo tow-tug for our caravan, and 4x4 camper. I have listed some expedition fit out sources below though.
- The Outfit YouTube channel. One of the better known Mog fit outs, Chris and Ange have some 46 videos of them fitting out their Mog, and more than 50 more on trips etc.
- A different approach to the custom box was taken by several people on Facebook, who fitted a (slightly?) modified Jayco caravan on the back of the body. At least one of these was a pop-up style van. This keeps the profile down to around the cab height. It appears that one Jayco model fits. Sorry, I don't know the model number.
7.2 Camper fit out
The Mog will not simply be a tow-tug. I concept is to take it, with the van, to a spot, stop, and decouple the Mog from the van, and then drive around the area. This is what we do with the current 4X4 vehicle. It works well for us. We have stayed in one spot anything from a few hours to about 1 week. Most of the travel without the van is a simple 1 hour trip or an afternoon etc., however we have had occasion when we have been gone overnight. We want to be able to do more of this with the Mog, so the Mog will be set up to camp for a few days.
7.2.1 Camper Tent
Yes, I know we can sleep in the back of the Mog. We intend to try this, and we were keen to look at Gary's approach to sleeping in the back of his Mog. It is exactly what we intend to try. Basically a stretcher down the side (one side for him, two sides for us). We already had one swag and several tents from our days car camping though.. We intend to just use one of these if we want a tent. I also had a camp stretcher that I had used several times, and like, so I brought one of these for Jenny. Again, we had several sleeping bags already. So the basic camp was done.
7.2.2 Camper Kitchen
Most of the Kitchen gear we had was from when we bushwalked (i.e. ultra-light stuff). We used to have some kitchen gear from car based camping, but that had been thrown out years before hand. We do have several items intended for cooking on an open fire. So we got a new cooker.
7.2.3 Camper Toilet
Ok, Jenny and I are OLD. I know it. Huge numbers of people camp remotely just using a small garden shovel. That was not going to happen. We have had many years of experience of chemical toilets in our caravan, and in the van, we swapped to an OGO toilet. For a camping toilet, we wanted to try and have a composting toilet. We purchased a Joolca GottaGo toilet, and a canvas bag to suit.
We have not used it yet, so I will not comment on it.
7.2.4 Camper Shower
Jenny and I don't mind going a day without a shower provided that the weather is mild. When it is hot though, we want a daily shower. Given we wished to be able to camp for a week or maybe even two . . . we needed to have a shower. I went with the Joolca hot water / shower. We have a gas bottle for the cooking, so it can double for hot water. The Joolca kit also gives washing up, hand washing, stand, small pump, etc. I am not sure how useful these other things will be, but it looks a good shower.
7.3 Tow Tug fit out
By 'Tow-Tug' I mean a vehicle that can LEGALLY tow a 4T caravan. Yes, I know your puny car could manage it, but just don't get caught or have an accident. You will not be covered. SO many Utes and 4x4 advertise that they can tow 3.5T - but check the weights. Let's take a 2024 Isuzu Ute MU-X 3.0 LS-M as an example. It is advertised with 3.5T towing. My research says it has Kerb Weight of 2045kg, with a Gross Vehicle Mass of 2700kg, and GCM of 5900kg. Firstly, 5900GCM - 2700GVM leaves only 3,200g, NOT 3,500. However, a 3.5T van should have about 10% of its weight on the tow ball - thats 350kg. Kerb weight "includes the vehicle with a full tank of fuel, without occupants, luggage or cargo and with all standard equipment." So let's add two occupants of 80kg. The weight moves from 2045 + 80 + 80 + 350 = 2,555, leaving us 145 kg for bullbar, roof racks, luggage, spares, water, extra fuel, tow bar, driving lights, fridge, food, etc. And this is ignoring that the fact that 2,555 + 3,500 = 6,055 - some 150kg over GCM already. The bottom line is that these 'Utes that can tow 3500kg' can't do that in real world circumstances without breaking their GVM or GCM limits. The Queensland Government, in particular, has been pulling over vans, weighing them, and then not letting them proceed if they are not within limits.
For us, with a bullbar, roof-rack, tow bar, driving lights, Engel fridge and extra 150 litres of fuel -- we would be overweight before we added spares, food, etc. Now I am not knocking Isuzu - I am knocking virtually ALL 4x4 Japanese / European Utes. The US 'trucks' are better, but their 1500 models are still VERY limited in what they can carry and be legal. We have a Silverado 2500 HD LTZ. "It could tow anything" - yes? No, well not legally. Unless we are careful we are over the limit, and careful means NO food in Ute fridge, NO extra fuel in Auxiliary tank, and NO boat / fishing gear.
See Robert Pepper's view: Why so many caravans and 4x4s are overweight.
On the other hand, the Mog can be fitted out to tow a (12v) 4T van while having a few ton in the back. It has a weight of about 5.5-6ton, GVM of 12t, and GCM of 24t. We can fit all our equipment in it and still not exceed 12 ton with the caravan attached. However, it needs:
- A tow receiver / tow bar.
I brought the Mog Central Rear Towbar $685 (20241004). This fits around / under / within the existing Pintle hitch. Mog Central say that: "This is the ONLY legal towbar on the market that is ADR (Australian Design Rules) compliant for road use in Australia." I have no idea if it is or isn't. I do know that I could get it shipped 'free' with some other stuff from Mog Central, and that it works. - A tow hitch.
For most cars, this is not a problem. Head down to SuperCheap or Repco whatever and come back with one. For the Mog though, this is an issue. 1) The Mog is high. I need a drop hitch. 2) The Mog is going to bounce on bumps, so its tail will go up and down - regardless of what it is connected to. This will put a lot of pressure on the A-frame of a caravan, and it would tend to break the A-frame from most caravans. (Note, cars weigh a lot less than the Mog. In the case of 2T towing 2T, the two vehicles 'push each other'. In the case of the Mog, it will tend to do what it wants and force the van to comply - so greater shock loads and forces) Some 'bounce-reduction' is needed if the caravan is going to survive long term.
This is not a simple or cheap problem. See Drop Hitch for discussion on what I brought. - Brake controller. (See Caravan Brakes)
There are several on the market, but the Redarc Tow-Pro Elite ($415 20241003) is well spoken about by all the reviews I saw. This works by providing an electrical signal to the caravan that is proportional to the deceleration level of the Mog. It can be adjusted on the dash for gain, but also triggered on the dash. (i.e. if the van starts to mis-behave you can put the van's brakes on). It is a legal requirement to have one of these, but a its a safety requirement to have a good one. I went for the best I could find. - 24v -> 12v Turn signals converter. (See 12v Caravan Signals)
The Mog's electrics are 24v. There is a NATO connector at the rear that has all the various signals in it - but they are all 24v and not suitable for the van. The Redarc Trailer Lighting Reducer takes in the 24v turn signals and gives out 12v compatible signals - for brake lights, tail / clearance lights, right indicator, left indicator. The REV model includes reversing lights, but my van does not have reversing lights. - 12 Pin Plug & Anderson power connector. (See Trailer Plugs)
The Bushtracker uses a high current 12 pin connector for all its signals. I also need to have a way of charging the van from the Mog. I will take 12v from the 12v battery, via the 50A Anderson to charge the Mog. - Safety Chains.
The Mog Central Rear Towbar has small rings that are suitable for attaching safety chains. I have yet to find the right connector for them though.
Optional equipment includes:
- Hitch camera.
If you want a divorce, then get one spouse to yell directions to other on how to reverse up to a hitch. We use the 5T Hitch-Ezy, which I thoroughly recommend as being the easiest heavy duty hitch I have seen - however, it is still not easy. A rear view of the hitch makes this super easy. - Caravan rear view camera.
I fitted this to our Chevy and absolutely love it. It is basically a replacement mirror for the car (Mog) where you see what is behind you (via video) - BUT when you connect the van, you see what is behind the van. It turns infra-red after dusk, so you can still see behind you at night. An all seeing rear vision mirror. Brilliant.
8 Equipment and Tools
8.1 Toolkit
The toolkit that the army put under the MOG consisted of:
| # | Item Description | Item Location |
|---|---|---|
| Item 1 | Pick with Handle | Separated, the handle at the top of the holder, with the Pick head located underneath |
| Item 2 | Combination Spade & Shovel | In the middle of the holder |
| Item 3 | Axe with handle | In the bottom of the holder |
The tools under the rear of the Unimog as shown in video: Pat and Jele YouTube 'Moggy' Tour 1:09 I.e axe, shovel, pick axe.
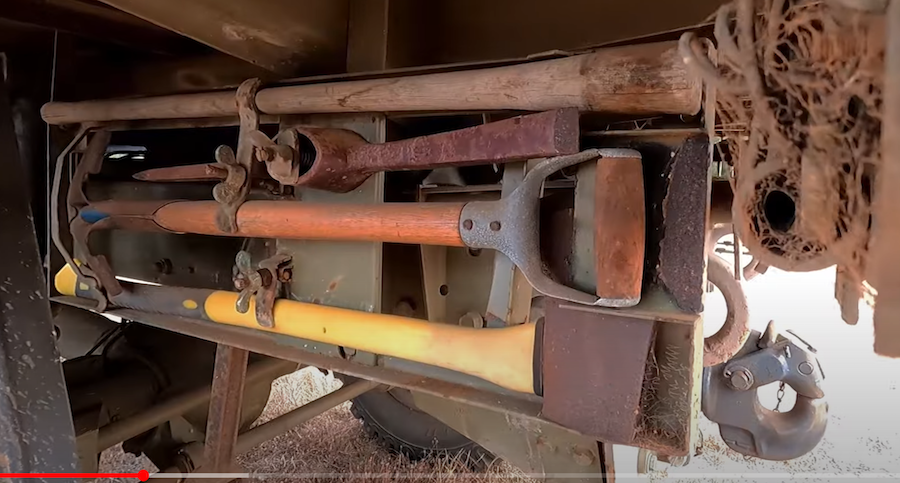
"CES" Complete Equipment Schedule
As you read through the documentation that the DoD provided for the Mogs, you will come across the term 'CES'. I for one could not find out what this meant until Trevor Boyd helped me out by providing a PDF version of some pages. The PDF is now hosted within the files of the OZMOG facebook page: ADF Unimog Complete Equipment Schedule inventory Upload.pdf
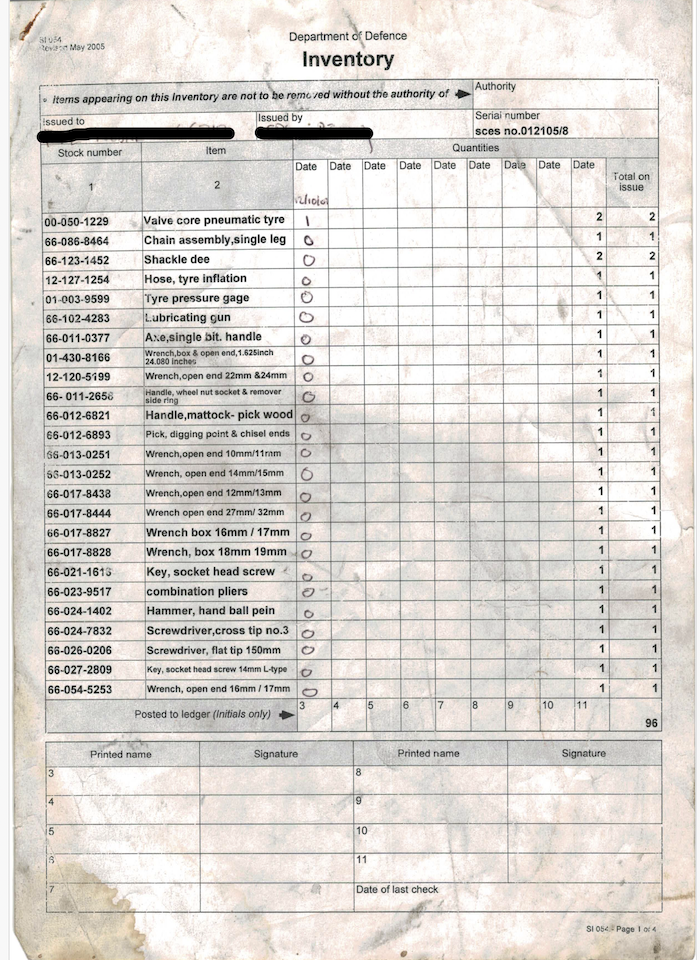
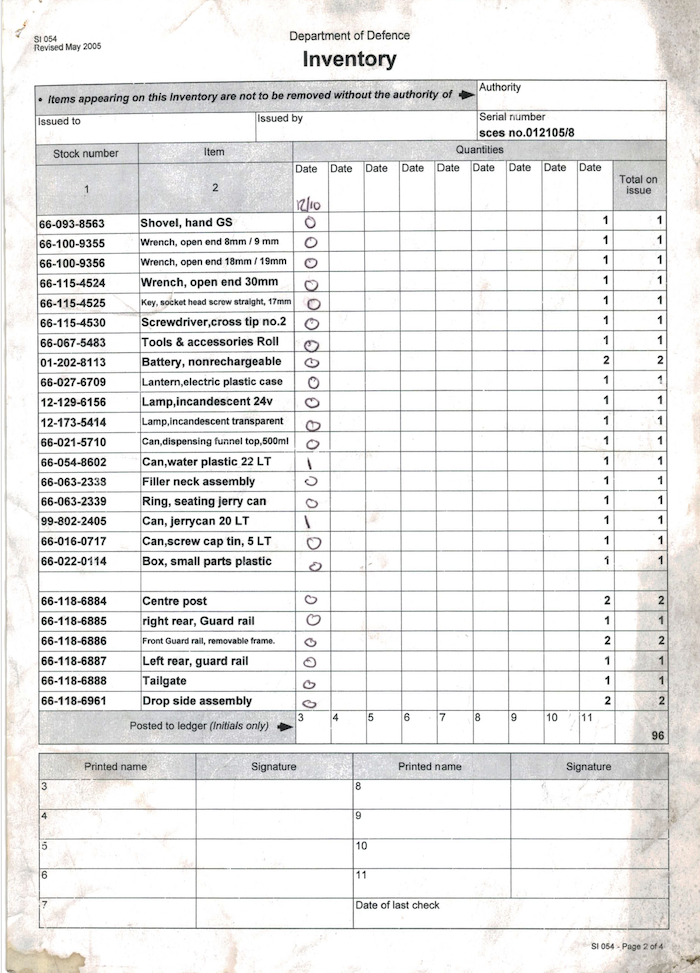
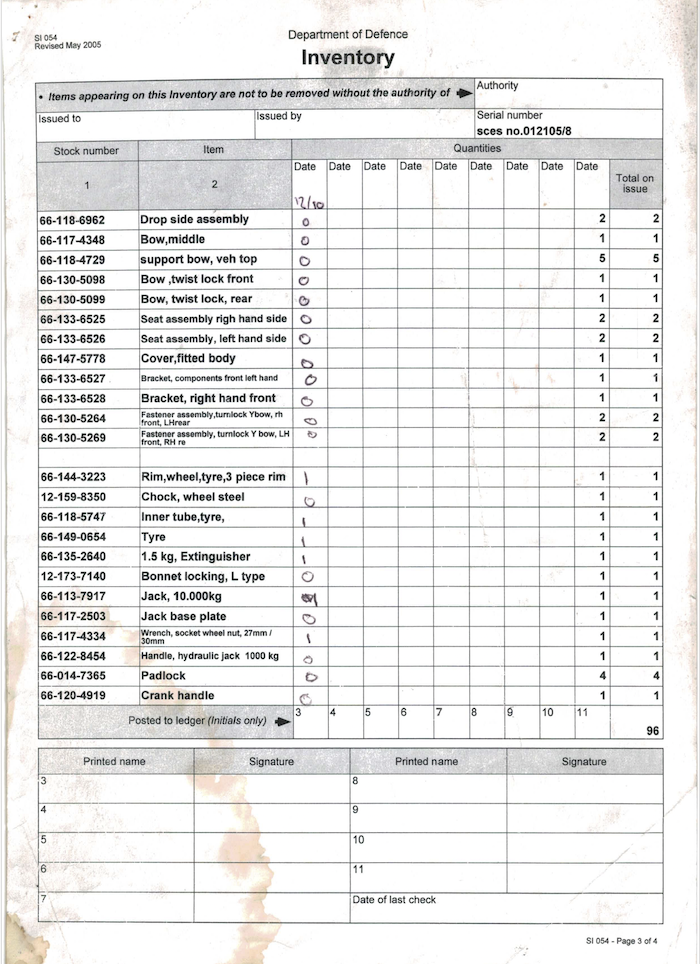
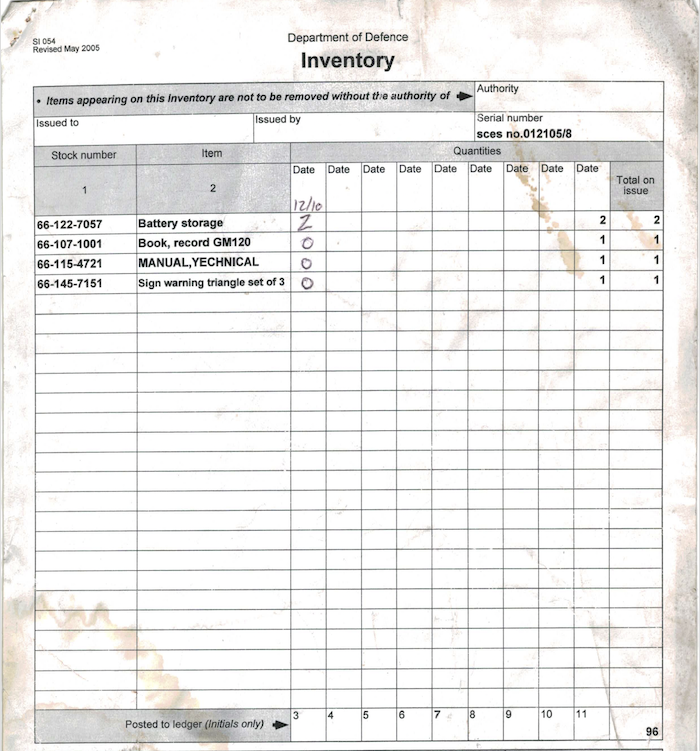
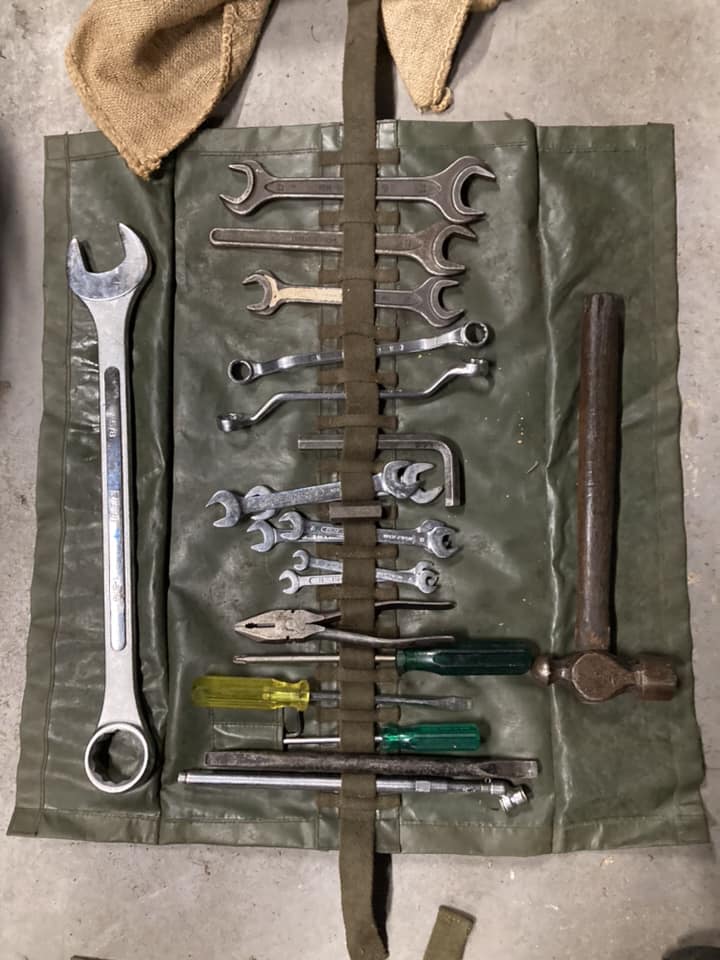
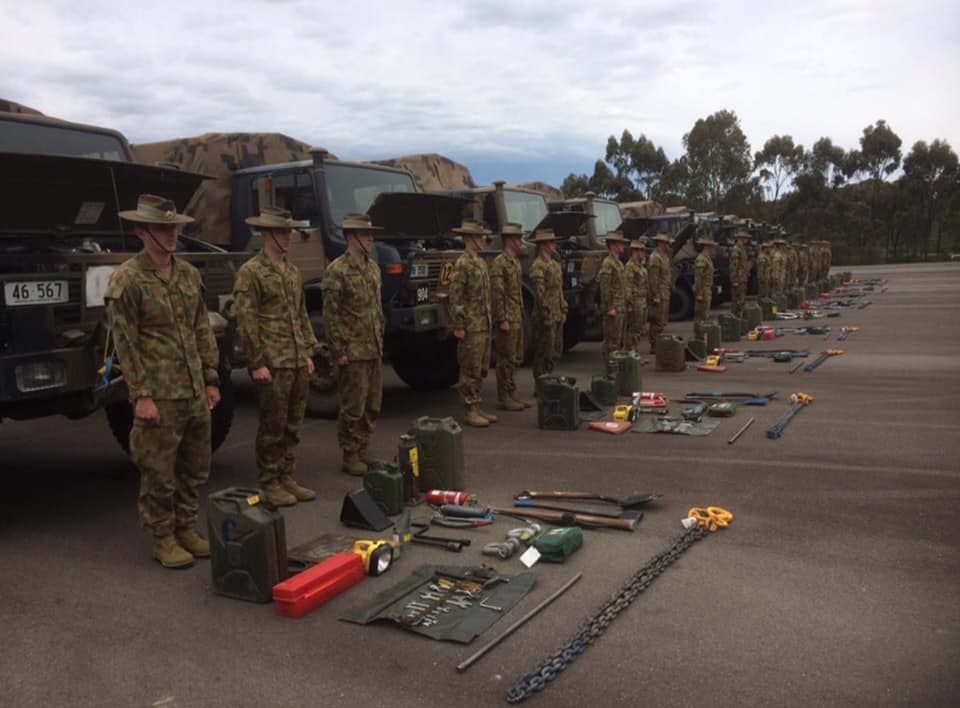 Staff Inspection of CES
8.2 Torque Wrench
The TW needs to go up to 750NM. I have a typical 3/8 Torque Wrench, and I have a ½ Ryobi impact driver that can hit 450Nm. – but I have nothing high enough for the Unimog and in particular for its wheel nuts. Total Tools have this Warren & Brown 3/4 inch 150-750nm one for $539 (2024-11-19). I have not found cheaper ones that can do the 450+NM. This thing also looks long enough that you don't need to be superman to use it.
8.3 Socket Kit
I already have a great Stanley 3/8 spanner / socket kit, but this wont handle Unimog sizes. I got a Kingchrome cheap ½ socket set that covers the big sizes, but with no spanners. I am probably going to have to use adjustable spanners when I get beyond 30mm.
8.4 Spanner Kit
I already have a great Stanley spanner - 3/8” socket kit, and simple (cheap) kit of ratchet spanners. These kits are great. You may only use a few of the items, but everything is together and held in place.
For the Mog though, I needed a 3/4" drive set of sockets - not 3mm sockets - but the big 20-30mm ones.
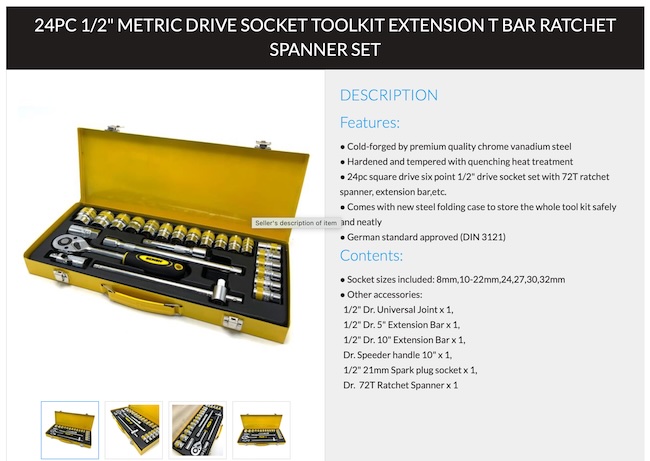
I got the above socket set - including 8mm, 10-22mm, 24, 27, 30 and 32mm sockets, for $55. I am confident that it is not high quality, but I also think that it will do for while. I really needed the 24-32mm sockets.
8.5 Crimping kit
I am doing my own wiring, in the sense that I am designing it, measuring it, and installing it. If I am cutting the wires to length, then i need to have a crimping tool. The multiple batteries, winches, invertors, dc-dc, fridges, etc. mean a reasonable amount of heavy current cables, that will need good sized crimps and crimping tools. Various people on the Ozmog forum indicated that a hydraylic crimping tool is the only way to go. I got a 16ton one on ebay for $70 that comes with 20 dies.
8.6 Universal tool
The Mercedes "Universal Tool" is a simple piece of steel rod, bent 90 0 in the middle. On one end it has a square socket, and the other end is square. This normally lives in the drivers side door pocket clipped to two small plastic lugs. The Universal tool is used to open the bonnet, remove the bonnet, and open the battery box. I have not found other uses for it. These are cheap to buy if lost, and, in a pinch, I am sure other tools would perform the role.
8.7 Nutsert Tool
The interior panel on the Mog is kept in place with plastic trim pins. These work, but they tend to break when you try and take them off, and there is a bewildering array of various pins on the market - so finding the right replacements is not easy. Nutserts, or Rivnuts, are nuts that are popped into a panel like a pop rivet. They leave a nut in the thin panel, and this lets you bolt things to the panel. Bunnings and I assume other stores like SuperCheap, Repco and Autobarn, have the nuts available for 50 cents each, and the tools for around $80-$200. I brought my tool kit on ebay. Note that, as panels are thin, it is not likely that you will bolt a M24 bolt to the panel. It is small sizes like M3-M10 that are most useful.
8.8 Cabin Tilt
Sooner or later you are going to need to tilt the cabin either to get to the engine, or to get to the bottom of the cabin (for painting etc.). The ADF had a boxed cabin tilt kit available at their workshops, and these occasionally become available for sale second hand.
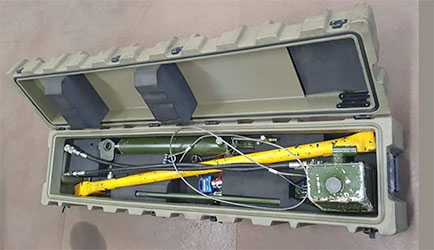
Most people have had to make their own Cabin Tilt kit by modifying a standard (but long) hydraulic jack. Jason Firmstone's Dare to Dream website provides a wealth of information on how he did his, including a range of photos.
Pate and Jele Tilted Cab is an episode of their YouTube series. At Minute 13:45 they show where the tilt mechanism is installed; at Minute 14:35 they begin prepping to tilt; and at Minute 15:00 they do the tilt. They simply use a forklift instead of a hydraulic ram. At Minute 21:00 they manufacture a stay for the cabin, but this one goes in where most people would put their hydraulic lifting ram.
Jocke Selin's Unimog Camper E020 - Tilting the cab and propping it up provides another video of someone tilting the cabin. In this case he shows a lot of details about the prep work. At minute 7:10 he installs his cab tilt mechanism. His mechanism appears to consist of two machine bolts. At minute 11:21 he installs temporary cab supports and manufactures his two cab stays.
Paul Allwood indicated that: "Retracted length C-C between mounts is 590 mm. Extended is 1080 mm." Nick Barratt found a Vevor 8 ton engine lift that he intended to modify. The unit is $73 (20240925) with free postage. Minimum height 66cm, and maximum 116cm. The extension of 50cm is perfect, but the attachments would need to reduce the length by some 7cm.
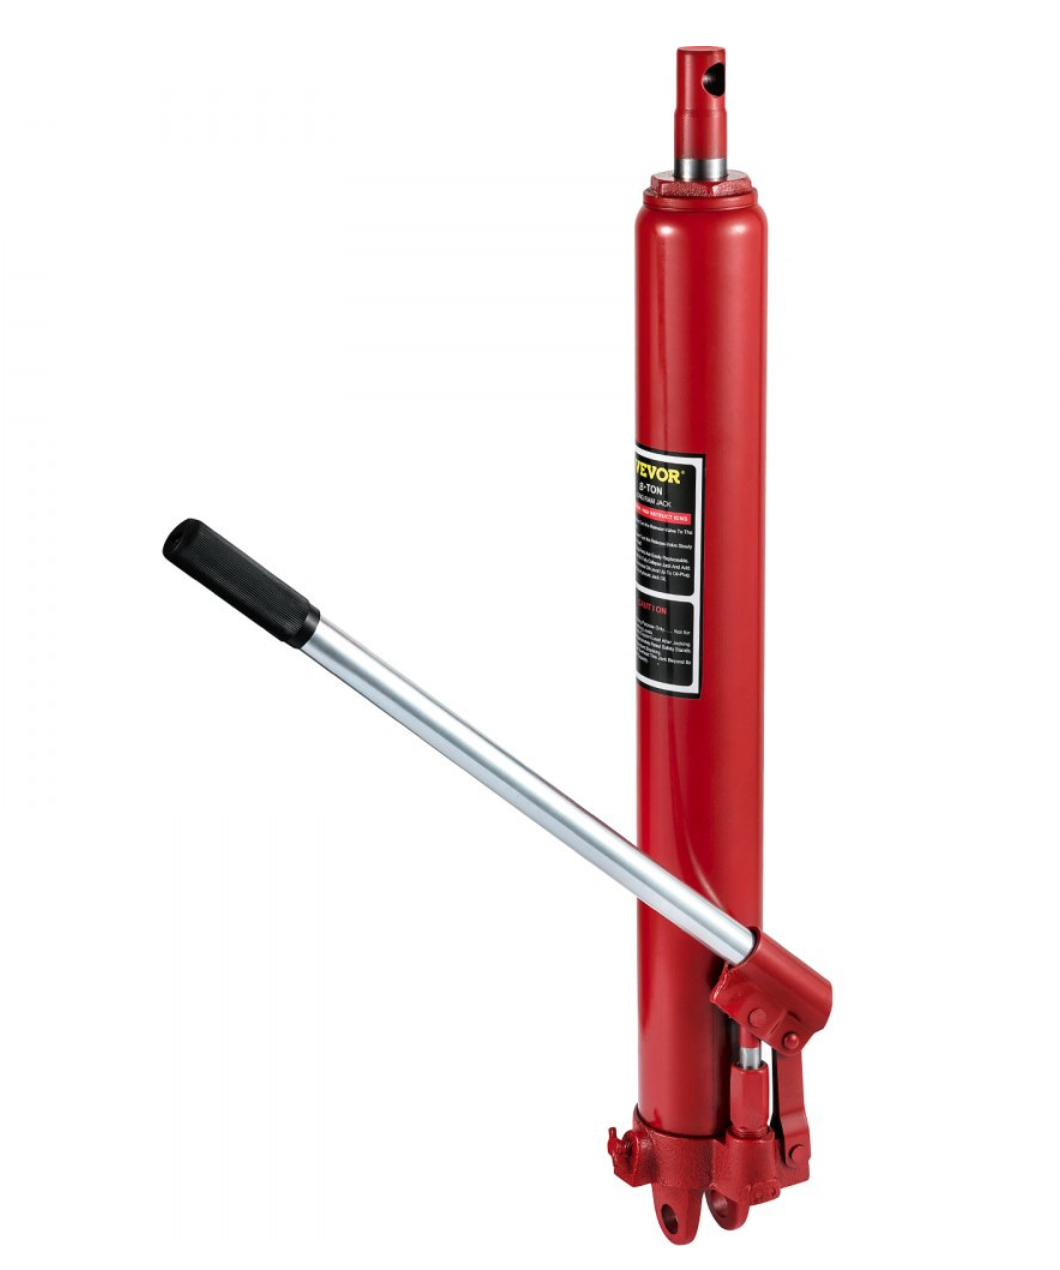
7.8.1 Cabin Stay
Regardless of how you tilt the cabin, for safety sake, you need to put in a stay to ensure it stays tilted. This is the yellow rod that you can see in the ADF kit above.
8.9 Electrical kit
8.10 Toolboxes
Siemens have a free 2d drafting tool called solid edge. It has been used before to create underbody toolkits. https://www.youtube.com/watch?v=W_8dlNnxyhI He then used a sheetmetal modelling tool “runshape” – sheet metal modelling.
8.10.1 Under tray boxes
I want to put more tool boxes under the tray. These will carry the emergency kit – towing / recovery gear. T.C.Boxes has the sort of thing available for $449 (extracted 2024-09-01). Total Tools also has options. I need to find out the right size needed, and I will need to replace the rear lights to suit. One thing is that the passenger side one of these would cover over the Army toolkit. I notice that most of these also have 'flat tops' to the boxes, but the underneath of the Mog is definitely not flat. Some thought would need to go into how to mount these.
8.10.2 On top of tray box
I also need to have a box in the back of the Unimog that can retain all our gear. This needs to be designed / constructed. Effectively a tall tradie box. It needs to be the width of the tray (internally), attach to the deck (bolted / secured), be sturdy to cover the movement of the tray, up to around 160mm high (quite high) and a depth that will allow the batteries, front runner boxes and canvas bags to all go in ok. This tray will have the batteries on its bottom shelf, connectivity to the existing 24v, switches, relays,etc..
8.10.3 Rear deck
The base (army) rear deck is marine ply. ‘Adventures of the Downward Dog’ used 10mm steel. There were lots of comments on QT-80 in 6mm, or QT-400 or Hardox 450 in 5mm being more resilient and lighter. It seems the existing deck is 19mm 6-ply marine ply. That seems good enough for me. It might be worth some sort of lining on the deck like rubber mat. I could put down Raptor or another 'tray liner' product, but these seem better suited to steel decking, and not to the sacrificial marine ply.
The key issue is getting the old ply out, getting the right bolts (someone called them decking bolts – never heard of that, but they are not coach bolts either), and then putting in new decking. I did find "CSK bolts" (Countersunk Flat Socket Cap Bolts). These appear to be the right thing. Countersunk to go into the ply, flat top to not poke up from the deck, long enough to go through the 19mm deck + whatever is getting bolted on, Allen key tops, and bolts not screws. My 'go-to' store for fasteners is 'fastenersgalore1' on ebay. They are based in Brisbane, and have products to me here in Melbourne after 2-3 days. They have a pack of 100 zinc plated countersunk M10 X 70mm for $69 (20240924) with free postage. This would handle attaching items up to around 40mm thick under the tray. Also M10 X 45mm, pack 100 for $42 (20240924) which would handle items up to around 15mm thick. I will be making up steel brackets for a few items, probably out of 6mm steel, so these M10 X 45mm bolts look ideal.
8.11 Air line tool
The Mog operates off air. Air brakes, air park brakes, air to change gear sets, air to everywhere for fording rivers, etc. Air lines are an important part of any service or repair kit. The air line tool helps in pushing the air lines onto their post. The air lines should not be heated. Facebook User Stuart Bucket found the following item: Amazon Air Tubing Pipe Grips for $115. I found the same product available on Ebay for $163 and up to $190 elsewhere on the internet. A tool that looks better quality, and states:"This tool is used to install the plastic line on to barbed fittings found in numerous applications all over the UNIMOG. Comes with two interchangeable heads and may be used with the seven most common line sizes. Original Mercedes-Benz tool." is available Air line installation tool but at $945.44 (20241006) is a bit rich for me.
8.12 Welder
I really want a welder that can operate on 240V, 10 A source, but also do AC/DC Mig / Tig. Unimig welders seem to be the one. Several options, but 180 / 185 at the smaller end (no AC), and 200 having AC/DC but also a 15A draw. Need an adjustable helmet, gloves, etc. Purchased a Lincoln 200m multi process 4 in 1 welder – stick, mig, dc & ac tig. I have used it on some thin steel, and it did a better job than me. I just need practice, and a lot of grinding wheels :-)
9 Parts list
I found sourcing the right bits for the Unimog was a major issue, and I was surprised how often someone would jump onto facebook and say something that was 'gold' in terms of what I was looking for. I present this (unmaintained) list of products, prices and sources for others. Hopefully you can use this to either find or initiate your search.
| Product | Photo | Price | Source | Comments |
|---|---|---|---|---|
| Ignition, Key | 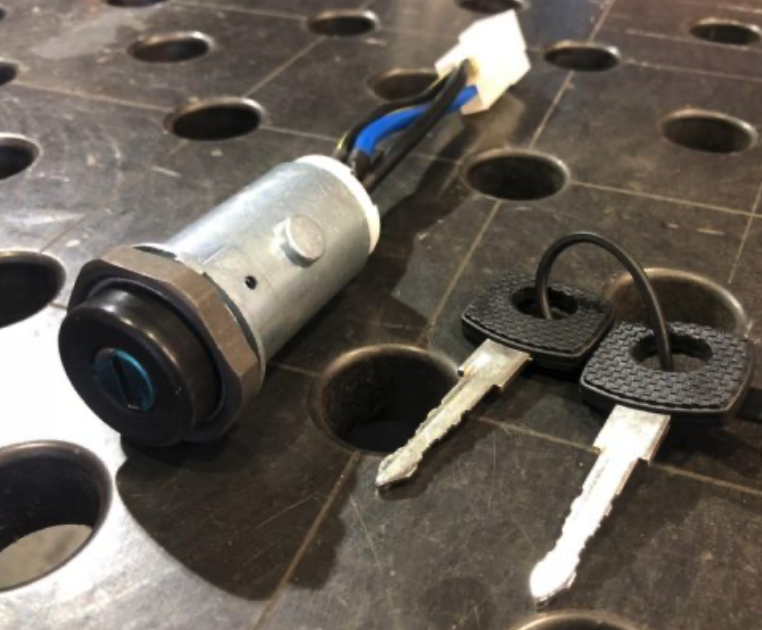 |
$102.01 | MogCentral Ignition Barrel with Keys. | I believed that this is required for roadworthy, however some Facebook users say that it is not required. I cannot imagine owning a vehicle that cannot be locked shut and that has the key permanently stuck in the ignition though. See video to install. |
| Speedo | $294.25 | Speedo Kit with Hall Effect Sensor & Cable. | The standard Mog speedo appears to be very unreliable. (mine broke fairly quickly after buying the Mog, and many others have similar stories) This is a hall effect device (i.e. electronic) that should be very reliable. You program the speedo to suit your wheels by saying (for example) '8150 pulses = 1km'. Once you get the right number, then the speedo will be VERY accurate. You can put in different numbers to suit different tyre inflation pressures, but I very much doubt that this would be worth the effort. | |
| White, Yellow, Red reflectors | 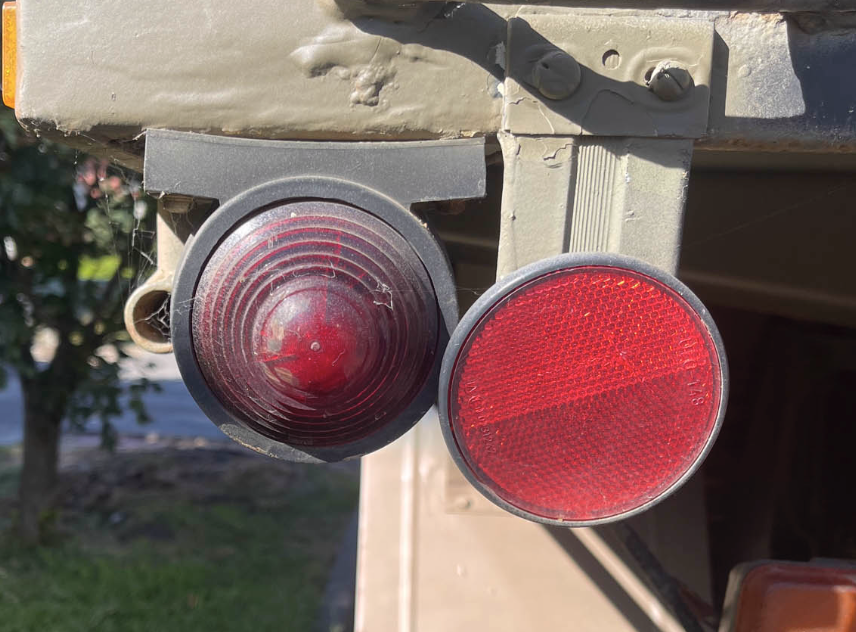 |
$5.91 | Bunnings Trailer Reflectors. | One of the few issues I had on my heavy vehicle roadworthy was that they wanted reflectors on the tray. Red on the back (which it had), white on the front of the tray, and yellow on the sides. Bunnings sells these, and I am sure truck stops, Supercheap, Repco, etc. do too. |
| Runva 25000 winch with Synthetic rope | |
$2695 | NEW Winch – RUNVA EWB25000 Premium 24V with SYNTHETIC Rope | Runva, Sherpa and Warn are two well known winch brands. I have a WARN 15000 on my 4x4. Runva and Sherpa both sell big winches suitable for the Mog. I preferred the Runva. I could get this in 20,000lb or 25,000lb. I didn't know what I needed, so I just went bigger just in case. Both 20K & 25K models have either steel or synthetic rope. I served on a ship where a steel cable snapped. For safety reasons I went with synthetic. Mog Central have all four options. Unidan appeared to have only the 20K. I believe that the 20K model has a longer (but thinner) rope. |
| Front Winch Plate | |
$1,595 | Front winch plate to suit Runva EWB25000 | I have a video on the installation of this. I love this with the elephant ears still installed. Lots of options. The kit is not hard to install, but it does weigh an awful lot. I used an engine crane to lift it. Others have used forklifts. Certainly not a single handed install. |
| Rear Winch Plate | |
$1,595 | Rear winch plate to suit Runva EWB25000 | The bag I have on top is mostly obscuring the winch. (It protects the synthetic cable from dust and sunlight) Again, I have a video on the installation of this. One tough puppy. The kit is not hard to install, but it does weigh an awful lot. I used an engine crane to lift it (having slings through the sling holes in the rear of the Mogs tray floor. Others have used forklifts. Certainly not a single handed install. |
| Stairs | Johan Bester on Facebook | Contact Johan Bester for details. Great bloke. Great set of stairs. Stairs Installation Video |
||
| Twin Oil Filter kit |  |
$34.96 | Mog Central Twin oil-filters | See pictures for where the oil filters are found, and check whether you have one or two filters fitted. From what I can see, the bulk of the Unimogs / early ones are fitted with dual oil filters, and the latter ones / U1750 are fitted with a single filter. |
| Overdrive |  |
$22,000 plus the cost to shorten the driveshaft (if needed) | Mog Central Claas Overdrive | This should add about 22% to the final drive, turning ~80kph into ~96kph - perfect for the highway. Of course, that also means a 20% effective reduction in torque when engaged, so you need to drop out of overdrive for hills. Several people have reported an improvement in fuel consumption too. I do not have the workshop that fit this, so I got MogCentral to fit for me. (Sept 24) |
| Heater tap valve | 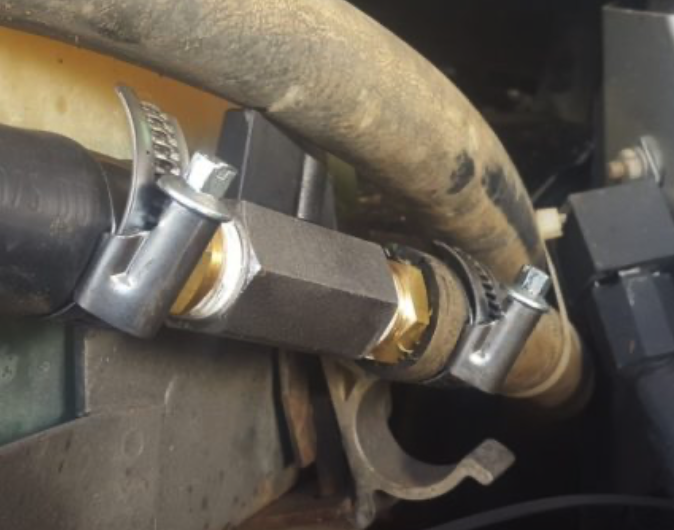 |
$45 | Mog Central Heater Tap | Ok, this may seem a very minor issue, but the Unimog constantly has the heater partly on. Of a winter day, this is no big deal - but of a hot summer day, this is ridiculous. $50 allows it to be turned off. |
| Grease Gun |  |
$329 | Ryobi Grease Gun | While it is possible to use a manual 'squeegee' type gun, it seems that most users go for a battery operated gun due to the volume needed. In my case, I have Ryobi tools, but whatever battery scheme you have seems to be the answer. This one comes with no battery (I have plenty) and a flexible hose already. |
| Quick Release Grease Gun Coupler |  |
$59.50 | Total Tools Coupler | Highly recommended by Facebook users for use on the Mog. |
| MaxTrax Extreme |
|
$519 | MaxTrax Australia | These are very similar to the other MaxTrax, except the teeth are "replaceable hard-anodised alloy". |
| Unimog Battery |  |
$440 | Delkor Heavy Duty Battery | These are the military batteries. 730Amp cold cranking and 100 amp/hour capacity. As the batteries are 12v each, you need two for 24v, and if you have a 'dual battery' set up (starter + leisure battery) - you need four. I got four as part of my battery boxes / steps. |
| Battery Terminal Protector |  |
$18.68 | CRC Battery Terminal Protector 300g | This is the equivalent of the military product used on battery terminals. It limits corrosion of the terminals and moisture ingression. |
| Service Kit | $70.80 | Mog Central Filter Service Kit + Oil | This is not really a product, so much as a pick list. Mog Central recommend some spares, but you can delete some of their items and add some of your own. I try to carry key spares and oils with us when we go remote. Regardless of spares, if you are going to service your own Mog, then this is a one stop shop for your service needs. | |
| Repair Kit | This is not really a product either, but a list of items that I try and carry when traveling remotely to fix as many as practical of the Mog's likely failures. | |||
| Diesel Fuel filter | Dirty fuel, or fuel with water in it, is a major cause of breakdowns in the outback. This is not so much from little fuel stations, but from a fuel truck dumping a lot of fuel into their underground tanks quickly and stirring up the bottom. Finding water in your fuel early is cheap insurance. | |||
| Saber 22,000kg Ultimate Heavy Duty Recovery Kit | $1,039.50 | Saber 22,000kg Ultimate Heavy Duty Recovery Kit | This is the Mog Central recovery kit. It includes: 22,000KG ULTIMATE Heavy Duty Recovery KIT INCLUDES: 1 x Winch Damper 1 x Saber Recovery Gloves- L/XL 1 x Ezy-Glide Recovery Ring 1 x 15,000kg SaberPro Utility Rope 1 x 18k Soft Shackle with Protective Sheath 1 x 22k Kinetic Recovery Rope 1 x 16K & 22K Ultimate Recovery Gear Bag 2 x 24K New HDX Technora Bound Soft Shackle 1 x Belt Straps(Short) |
|
| George4x4 Heavy Duty Recovery Kit (13pcs) Deluxe Version | $1099 | George4x4 Heavy Duty Recovery Kit (13pcs) Deluxe Version | George4x4 Heavy Duty Kit. Suits for Vehicle with GVM of 5.5ton to 8ton including but not limited to: ISUZU NPS300 / UNIMOG / FUSO Canter / HINO 300 / IVECO daily, etc This Kit includes: 1pc*Kinetic Rope, 23900kg*9m 3pcs*Soft Shackles (Button Knot), Australian made 22000kg*60cm 1pc*Bridle Rope (Pink), Australian made 14000kg*4m 1pc*Tow Rope, Australian made 13200kg*20m 1pc*Tree Equaliser 24000kg*3m 2pcs*Aluminum Pulley Snatch Rings, Australian designed and NATA accredited lab tested (The silver rings are currently out of stock. We do have it available in red) 15000kg 2pcs*4.7ton Rated Shackles 1pc*Camouflage Recovery Bag 1pc*Dampener |
|
| 20T soft shackle and winch ring |  |
$233.98 | 6" winch ring with 20T soft shackle | The winch ring is rated for 14T (WLL), but it was as big as I could find. It handles rope of 10-19mm diameter. The 20T soft shackle is more than sufficient for the ring. (Note, the ring is $41.89 by itself). |
| 160 Piece heavy duty nutsert |  |
$69.99 | 160PCS Heavy Duty Nut Rivet Riveter Rivnut Nutsert Gun Riveting Kit Thread M3-12 | Ebay kit with M3 - M12 tools and some nuts. This certainly works, and appears as good as any other tool I have seen. I am not saying that these sort of tools are 'professional grade', but provided it does all the work I need, then I don't need it to be better. (A variation of Colin Chapman's Lotus Car mantra). I augmented this kit with more M6 rivnuts. Bunnings have packs of 20 for $11.50. Bunnings also have twin handle Riveters available, but at $189 for something that does not appear as good as I brought from Ebay. |
| Maxtrax replacement teeth | $68 | Outback Equipment Maxtrax Replacement Teeth Repair Kit [Qty: 12pk] | A cheap way to repair damaged Maxtrax, or to upgrade standard Maxtrax to be similar in function to Maxtrax Xtreme. | |
| Maxtrax Xtreme | Maxtrax Extreme Drab | These are available from other firms at a discount. | ||
| Generator / Alternator | $1072.50 | MogCentral Alternator Kit | Fitted by the MogCentral team while the Mog was having the Overdrive installed. | |
| Starter Motor | $616 | Starter Motor | Not really an upgrade or a repair, I installed a new one as preemptive repair. MogCentral installed it for me while it was in for Overdrive fitment. I *THINK* both Unidan and Brown Bear supply these also - but I could not find them on their websites. |
|
| ADF Seat covers | $450 | Black Duck seat covers through PPD | Not sure why you find Black Duck seat covers on this website and not on Black Duck's. A range of colours. These cover the drivers side seat and the bench seat. | |
| 24v inverter (& battery charger) | $1,467.73 | Victron Multibus 24/3000/70 | Google shows many inverter options. Unfortunately, most are 12v supply only. This one is 24v, but also provides shore power pass through, shore power supplement, battery charging (@70amp). | |
| 4 stroke Petrol Generator | |
Generally available for less than $2000 | Honda EU22 | We inherited ours, so it was not our decision. That said, I am more than happy with this product. Low noise, low fuel consumption, easy start. No matter how much solar you have, you cant avoid rainy days or shade overhead. (Just ask South Australia :-) |
| Infra-red Thermometer |  |
$89 | BTMeter Instrument non-contact thermometer | This one seems to do everything that is needed. It is easy to go around and check tyre / rim / portal / engine temperatures. |
10 Videos
10.1 General Walk around
Several people do walk arounds / introductions, including me.
- Robert Pepper (L2SFBC) is a very well known 4x4 Auto Journalist, that covers a range of interesting subjects (e.g. towing, winching, weights, etc.). The surprises of an ex-Army Unimog - Part 1 This was followed by Part 2.
- Ronny Dahl does a range of Australian 4x4 videos. Here he reviews a typical Unimog. Ronny Dahl, Doomsday Truck, Unimog Modified Episode 83
- Ronny Dahl does a range of Australian 4x4 videos. Here he reviews a typical Unimog. Ronny Dahl, Off-Road Adventure Truck, Unimog Modified Episode 89
- This is a brief walk-around our Unimog prior to it being modified. My video of a walk around our truck.
10.2 Front Winch Install
10.3 Rear Winch Install
10.4 Stairs Installation
- I installed (and use almost daily) the stairs by Johan Bester. Big fan. Video of the unpackaging, installation and testing of Johan's stairs.
10.5 Key & Door Lock Installation
- Lockable Door and Ignition Key Mod This is one of the first jobs that most new Mog owners do.
10.6 Fix Bonnet crack
Not quite sure exactly what the MOG bonnets are mad of (plastic? / fiber-glass?) but they are subject to cracking. If you have this problem and need a solution, "The Outfit" YouTube channel has a good video for this.
- The Outfit fix a large crack through their bonnet (see position: 2:00 minutes)
- I also fix some 'spider web' surface blemishes on my Mog.
11 Trips
See Auspano Travels
11.1 Oodnadatta Trip
11.2 Alpine Trip
11.3 Mogfest 2024
Mogfest is a yearly get together of like-minded Mog enthusiasts. It usually occurs in the Victorian / NSW Alps, so it is mostly Victorian / ACT / NSW Mogs that participate. In 2024 it was held at Mallacoota and sponsored by Mog Central, Nakie hammocks and camping gear, Recycled Mats, Tiegear ropes and pegs, Travla Ultra-Low Carb Beer, Muk Mats, Whooska Stoves, Maxtrax Recovery Gear, and Travel Buddy 12 & 24v Ovens.
A great time was held by all and there was lots of looking at various designs, ideas and types of Mogs. Several people tried out the new Overdrive / Turbo combination that Ben had just installed in my truck. I was keen to look at what others had done in terms of towing and under the rear toolboxes. I drove back from Mallacoota to Melbourne sitting nicely on 100km/hr and passing other traffic up hills.
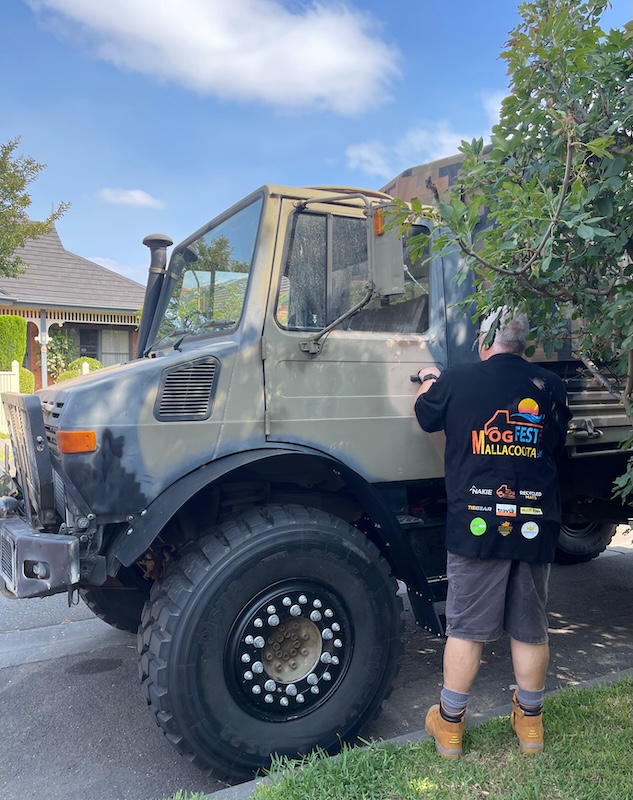
Canyonoffroad.com.au have a ClearView Tyre Spider (SKU: YYR-01) which is a small compressed air cylinder with 4 pipes coming from it to fill 4 tyres simultaneously. The cylinder is not meant to contain compressed air as a source of air, but rather as a surge tank to even out the flow to the four tyres. The source of air would therefore be something like the glad hand on the Unimog. "Each kit contains two 5 meter hoses and two 8 meter hoses for simple application on the longest of wheel-based vehicles." Given the Mog is 6.45 m long, this means that the 8m hoses should reach to the front tyres from the back (or back tyres from the front). The inlet valve has a tap on it, so it could be connected to the gladhand and the tap then cracked open. The cylinder has a pressure gauge on it, so you could quickly see the pressure in all tyres and close off the supply tap.
4.6.7 Camp Stretcher
BCF have a Wanderer Tourer Extreme super wide swag stretcher. $139 It is intended to put a swag on top. It handles 200kg, is over 2m long and 50cm high. Most of the other stretchers are very low. This one can have a mat put on top and then be used in the tent instead of having a swag on top too.
5 Upgrading
5.2 Key / lock / door change
The DoD Unimogs do not have door locks, and have the key pinned into the ignition switch so it cant be removed. This means that anyone can jump in one of these at any time and get going. Good for the military, illegal for normal use. Probably the first job on any DoD Unimog is to fit a lockable door and ignition kit. Brought a kit. https://mogcentral.com.au/product/door-handles-set-plus-ignition-complete/ Do a movie on this. This is not a big job, but you do need a can of WD40 (which can be said for anything on the Unimog). I found that even with this kit, my doors would not work. The trouble was that the doors need to be slammed shut!. If you look at the mechanism, there is a ‘door closed’ (mechanism at 60 degrees) and a ‘door lockable’ ((mechanism at 90 degrees) setting. If the door is closed ‘gently’ then it only goes to the first setting. I needed to oil (WD40) my door / lock mechanisms and then slam my door to get it to go to the second setting, before I could lock it. This has improved with usage.
5.6 Painting
5.6.1 Raptor coat
Raptor coat is perfect for the hard-wearing areas. It is two pack. There are a bunch of YouTube videos on Raptor, and many products. I will use raptor on all the wearing surfaces / undercarriage. I will also use it inside the cabin, under the floor seal, to improve the rust resistance. If spraying, run 60 psi and the professional gun. Use acetone for cleanup – plenty of it !!
5.6.1.1 Prep
I cant remove all of the existing enamel. I can cut it back / clean it up. It looks like the adhesion promoter can be used to fix these sins. Primer over the sanded / prep bits and adhesion over the rest.
5.6.2 Primer
5.6.2.1 Acid etch primer.
https://www.supercheapauto.com.au/p/raptor-raptor-acid-etch-primer---330g/564526.html this is sold at supercheap. $44.99 The page above says that you use it and then follow up with Raptor 2K epoxy primer. JasonandRose Pullman said "you are best not to use etch primer with 2k primer and paint. Better to use 2k primer only. Get the sandable 2k primer for the cab bodywork. Use non sandable 2k primer for the chassis, brackets etc. Either apply the 2k primer to bare clean metal after applying wax and grease remover then 120grit DA sanding. Or after applying metal conditioner, which is a weak phosphoric acid mix."
Sandable 2k Primer
Non-Sandable 2k Primer
5.6.2.2 Raptor Adhesion Promoter
This is used for any surface like plastics etc. $45 per can. Not sure how much it will cover. Repco Raptor Adhesion Promoter. Given that I am painting metal, I don't think I will need any of this.
5.6.2.3 Raptor 2k epoxy primer
Again sold in supercheap. Supercheap Raptor 2k Mostly in 400ml spray cans. These are one time use only $64.99 I will need to have the panels cleaned and sorted properly before using this. Given everything should have two coats – it is probably much better to have some litre kits.
I will mostly roll the raptor on. Raptor Roller Raptor Acid Etch primer aerosol UP4830 1 litre kit should do 60 sq feet – i.e. about the cabin area. https://raptorcoatings.com/au/product/raptor-adhesion-promoter/ The adhesion promoter is used when you cant get to an area to sand it. It adheres to most things including painted surfaces and body fillers.
5.6.2.4 Raptor professional sprayer
Repco Spray Gun $199 from Repco. Operates on 40-60psi @ 5-6 cfm. (15-18 lpm) (1/4” NPT air inlet).
5.6.2.5 Air Compressor to suit
Bunnings has the AEG 50L 3.0HP belt drive compressor. 115Psi (8 bar) max. This is 240V !! 2200 W, 210L/min. It is $649, Bunnings also has a Ryobi 50L 2HP air compressor – 115 psi, 1500Watt, 4.2 cfm – i.e. not enough. A 3 or 3.5 HP motor is required, and this means 2400Watt or close to it. The Bunnings Full Boar oil free v-twin has a 3HP motor, 2200W consumption, 50L tank, 145psi max pressure, and 175L/min free air – which would drop considerably for 60psi. It is $299.
Repco have a Chicago 2.5HP 235L/min (8.3cfm or 235 lpm) 50L tank for $450. It will deliver 98L/min at 10 bar (145psi).
Air on Board has a 24 Volt 200psi system. It is only 4litre tank. In looking at their products, they are perfect for air horns and a tyre, but not for painting. https://www.aironboard.com.au/store/24-volt-200psi-compressor-4-litre-tank-and-3-trumpets-horn-universal-full-system.html Need 2X 24 volt pump, plus air horns, plus 9 litre tank. The one double fill hose with a quick connect air.
Canyonoffroad.com.au have a ClearView Tyre Spider (SKU: YYR-01) which is a small compressed air cylinder with 4 pipes coming from it to fill 4 tyres simultaneously.
5.6.3 Alkyd Enamel
Protec produce the https://www.unidan.com.au/products/PROTEC-DEFENCE-SPRAYING-ENAMEL/
5.7 Soundproofing
Okay, so this is a big and thankless task. The Unimog will always be loud and rough. It is will never be a limo. I decided to go with one firm where I could buy everything. That will be Car Builders, who seem to have everything except marine carpet. (They have carpet – but they say is not for under-foot.)
Dynamat, Dynadeck, Dynaliner
Stage 1 Sound Deadener - apply to roof skin, floor pan, rear wall, door skins, above engine and bulk head. (this is not pre cut and comes in tiles which are easy to cut and lay)
Mass Noise Liner - Stage 2 Premium underlay, covers floor pan, under seats and rear bulk head, pre cut to suit. Firewall
Van Liner - Stage 2 Sound and Heat Insulation for roof skin, comes pre cut covering entire roof skin.
Acoustic Liner - Stage 2 twin layer foam pre cut to cover rear wall.
Insul-layer – for roof and door trims.
Water Proof carpet underlay – for floor.
Sound Barrier Floor Mat -- is a durable heavy weight barrier used as floor coatings in today's prime movers. This is what I will use on the floor instead of carpet. Easily cleaned. 4 way Stretch Carpet - Pre cut to apply over Acoustic Liner, allows you to upholster rear wall to an automotive standard.
“How many boxes of the Stage 2 did you use?
“4 rolls mate. 8 boxes of Stage 1 so far, but still need to do the firewall, so probably 9. Will be 2 boxes / rolls of the water proof also, then the carpet underlay, then marine carpet. Used a lot less on the previous ones though.”
The outfit (https://www.youtube.com/watch?v=9zhk3b6MYpk Build 5 Min15:06 ) said that they used 6 boxes. They seem to have done everything. They appear to have used acoustic liner on the floors etc. (min 16:56). Episode Build 6 (https://www.youtube.com/watch?v=LkrU-J4bALM) they used 9mm (marine?) ply for door cards. Mass noise liner for the inside of the door trims. They show the carpet around Min 10:30. They used Mass liner in bits on the roof trim (13:00). They did similar carpet covered ply for the rear wall bits. (build #7). They used Mass Liner for the floor. They just sat the carpet over the Mass Liner. They stuck it down with Selly’s Kwikgrip.
It appears that 9 boxes of Stage 1 is about right, 4 rolls of stage 2 (I assume that this is van liner?), and 2 boxes / rolls of the water proof carpet underlay (stage 2) (?), then Acoustic Liner (stage 2) carpet underlay, then marine carpet (from Bunnings). Template film also. Spray Adhesive/. Stage 1 tape.
5.7.1 Step 1. Remove trim.
I am only going to do this a bit at a time. I can’t pull the truck down to 1000 pieces in a workshop and then slowly reassemble. I need to disassemble, fix, reassemble and then move to the next bit. The Drivers door is the start, followed by passenger, followed by drivers side, passenger side, and finally rear wall.
5.7.2 Step 2 Clean it all down
Start with water and give it a wash. Make sure it is dry. This is where I will remove glue, find any rust, repair rust and then paint with Raptor in sand colour. Only then (2 days after paint) will I try and move to the next stage.
5.7.3 Step 3. Sound deadener Stage 1.
This is a sort butyl rubber sheet. It can be cut with scissors or knife, and is already sticky. You don’t need to get 100% coverage, but you certainly want to put it in the middle of large areas of flat steel. They have a little roller that you can use to push it onto the panels and make it conform around corners etc. I put this everywhere !! Inside doors. On the floor. Under the dash. Behind the seats and on the roof.
5.7.4 Step 4 – Doors.
5.7.5 Step 4 – Floor
Use Mass Noise liner, then cover this with Sound Barrier floor mat, or black checker plate vinyl (see below).
5.7.6 Step 4 – side panels
5.7.7 Step 4 – roof
Insul layer is the car buyers product recommended for roofs. I also used their Spray Adhesive. https://www.carbuilders.com.au/spray-adhesive You want to make sure you roller this when into place. Also, don’t try and put the whole sheet in at once. Peel a little plastic, check and put in a corner or side, double check, and then slowly remove bits of plastic and rub into place until the whole sheet is done. Never let the product touch itself (sticky side to sticky side) – you want get it apart.
5.7.8 Step 4 - under bonnet insulation.
The bottom line is that I did not bother with this. Firstly, you need to tilt or lift the cabin to get to most of this area, and secondly, there is not a lot of room in the engine bay. This is great for cars, but I don’t think worth it on the Unimog
Note the UK firm (avkison ??) have under bonnet engine liner that just clips in. Might be worth it?
For the roof lining & door lining – use M5 rivnuts instead of the push things.
5.7.9 Step 5 – Install floor covering
Checker Plate vinyl? https://www.swanstreet.com.au/Garage-Checker-Plate-Vinyl-Flooring-200cm-Wide-Black~3978 This doesn’t look bad. Nope, go with marine grey – or maybe green – carpet. Not for the floor – but for the non-walking spots such as rear panel and doors. For the floor, use Sound Barrier Floor Mat.
Figure 5 12 Pin flat trailer plug guide
Figure 6 7 Pin round trailer plug guide
5.9 Unidan upgrades
5.9.1 Ordering from Unidan
Contact Us
geoff@auspano.com Click to send mail